background image

TRUST 632AV LCD POWER VIDEO

26

An old version of
DirectX is installed.

DirectX 8.0 is included on the Trust
CD-ROM. This is installed
automatically when the drivers are
installed. Reinstall the drivers.

Drivers for an old
webcam are still
installed.

Find these drivers and uninstall
them (see chapter 5.1).

More than one monitor
has been configured
for use on the
desktop.

Select one monitor (Windows
monitor settings) and try again.

The VGA drivers need
to be updated.

Download new VGA card drivers or
contact the supplier of your VGA
card.

A live recording
gives a displaced
image and the
wrong colours.

If a too high VGA
resolution is used (for
example, 1600 x
1200), it is possible
that there is
insufficient memory
for the video overlay.

Set your VGA card to a lower
resolution and colour depth (for
example, 800 x 600 / 16 bits
colours).

The background
lighting is not white.

Change the lighting. If this does
not help, use Photo Express to edit
the colour.

The monitor has not
been set correctly.

Compare the photograph to other
photographs (for example, on the
Internet) where you known the
colour is correct. Adjust your
monitor correctly (see the
instruction manual provided with
your monitor).

The printer has been
set incorrectly.

If the photographs look good on
your monitor, check your printer
settings.

An inkjet printer has a
blocked ink cartridge.

See the instruction manual
provided with your printer for
instructions on how to test the
printer and solve any problems.

Photographs are
discoloured on
the monitor or
when printed.

The paper used is
unsuitable for printing
photographs.

Use original paper from your printer
manufacturer for the most reliable
result.

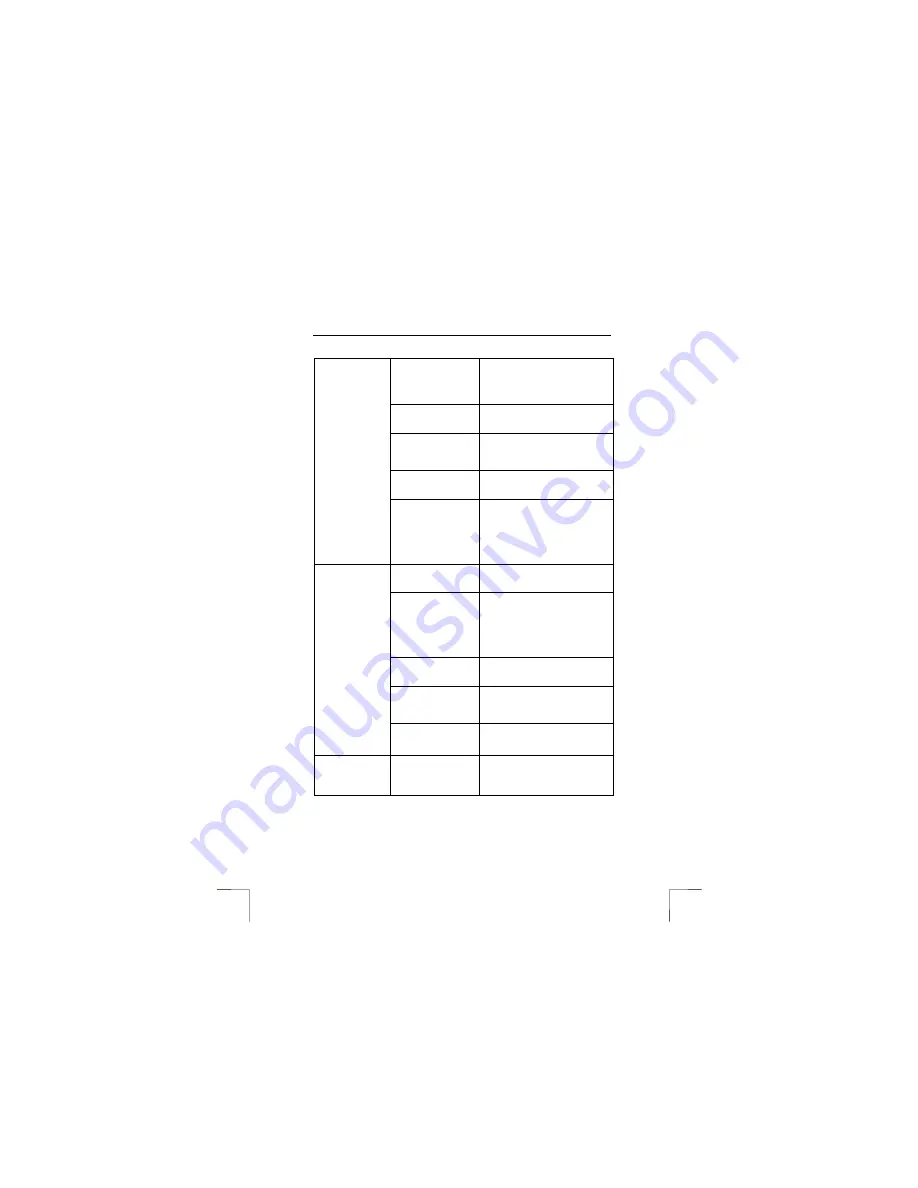
Video images are
jerky.

The camera records
10 images per
second. This is less
than a camcorder.

Move the camera slowly or use a
stand. The recordings will then be
more stable.

Содержание 632AV

Страница 1: ... a slightly damp soft cloth to clean the camera Do not use aggressive substances such as white spirit to clean the device These may harm the material Do not submerge the device in liquid This may be dangerous and will damage the device Do not use this device near water Do not repair this device yourself Do not look through the viewfinder if it is aimed directly at the sun because this may damage y...

Страница 2: ... viewing the image to record You can also view the subject by looking at the built in LCD screen The viewfinder is useful in bright light if the LCD screen is difficult to see 7 LCD screen For looking to see what the photograph will look like Also used to view the photographs which have been taken and if desired to delete them 8 Video recording A video clip with sound is recorded after pressing th...

Страница 3: ...ery power Table 4 Left hand side of the camera 3 5 Menu system Use table 5 in combination with figure 8 Item Description Function 1 Turns the symbols on the LCD screen off 2 This function selects the display menu for viewing photographs and playing video and sound recordings 3 Select this function to record sound in speaking quality 4 Selects the resolution used to take photographs High for sharpe...

Страница 4: ...hese cards separately to increase the number of recordings that the camera can save 1 Hold the camera with the lens of the camera facing forwards see figure 3 2 Insert the CF card into the camera with the top of the card facing to the left 3 Press the card firmly into place The card must not protrude from the camera Do not use excessive force to insert the card into the camera If you save recordin...

Страница 5: ... replaced or become empty Use a CF card or transfer the recordings to your computer before replacing the batteries or before they become empty The battery condition is shown on the LCD screen 10 figure 2 as follows The batteries are full The battery capacity is low Only a few more photographs can be taken The batteries are empty Table 6 Battery conditions 4 4 Turning the camera on and off See figu...

Страница 6: ...IDEO namely 1600 x 1200 1280 x 1024 and 640 x 480 The default resolution when the camera is turned on is 1280 x 1024 1 3M Carry out the following if you wish to set the camera to a higher or lower resolution 1 Make the menu visible using the menu button 2 Scroll to the resolution symbol 4 in figure 2 3 Press the menu button for a short period to change the resolution to a different resolution If t...

Страница 7: ...ects photographed at a distance of less than 2 5 metres are not sharp Use the macro setting to make these photographs sharp This setting works up to a minimum distance of 40 cm Objects photographed at a distance greater than 2 5 metres will not be sharp when the macro setting is selected Select the macro setting as follows Macro setting 1 Direct the camera towards the object that you wish to photo...

Страница 8: ...l the camera is ready The camera is ready to take another photograph when a noise is heard and the LED is turned off Note Keep the glass of the lens clean Use a cotton bud to clean the lens If necessary use special cleaning liquid for camera lenses Do not use a different cleaning product Note All the recordings in the camera s internal memory are deleted when the batteries are replaced or when the...

Страница 9: ...ollowing to record a video clip 1 Turn the camera on see chapter 4 4 2 Turn the menu off if it is visible You cannot record a video clip if the menu is visible 3 Direct the camera at the subject If necessary use the LCD screen 4 Press the video button button 8 figure 1 The camera will now start recording The LED above the video button will flash The counter for the elapsed time will be visible on ...

Страница 10: ...rdings The CF card can be removed when it is full You can then save recordings in the camera s internal memory 4 8 Viewing and deleting recordings 4 8 1 Viewing Recordings are played via the PLAY menu All the recordings video photo or sound which can be viewed from this menu are displayed as icons The files can only be played one at a time on the camera You can connect a TV to the camera via the A...

Страница 11: ...choose Format symbol 8 figure 2 The result will be the same i e all the files will be deleted Formatting is recommended when using a new memory card or if the memory card can no longer be used Note Deleted files cannot be retrieved Your recordings will be deleted for good after carrying out the instructions given above 4 8 4 Connecting the camera to a TV The camera can be connected to a TV You wil...

Страница 12: ...8 SE not included Although some functions will work stable operation is not guaranteed The device does not work in any versions of Windows 95 Tip The latest driver can be downloaded from www trust com 13339 Check whether a new driver is available and use this for the installation The current version of the driver is included on the Trust Installation CD ROM Note Make sure all other programs are cl...

Страница 13: ...king after the installation After installing the device and the drivers the following are installed on your computer and can be checked connect the camera and turn it on Start Settings Control Panel Double click on the System icon and select the Device Manager tab If used as a webcam Live option Imaging device TRUST 632AV LCD PV Video TRUST 632AV LCD PV Still If used to download photographs Disk d...

Страница 14: ...n the camera If your computer has a suitable DVD writer or CD writer this video film can be saved on a CD ROM or a DVD Follow the instructions given below to install the program 1 Start the Trust Software Installer see chapter 5 2 points 1 3 Figure 11 will appear 2 Select DVD Movie Factory 3 If asked select the PAL video system 4 If asked choose to install QuickTime You can skip the registration 5...

Страница 15: ... selected recording s Selected recordings have a red frame 2 Status detector Gives tips and indicates what the program is doing 3 Select all Selects all the recordings 4 Make a copy Copies the selected recording s to the computer 5 Send mail Sends the selected recordings by e mail Note video recordings take a long time to send by e mail 6 Start slide show Starts the slide show and activates button...

Страница 16: ...ll appear The image will be displayed on the screen 5 If necessary use buttons 5 and 6 to alter the settings The frequency in Europe is 50 Hz The image is less distorted when the Flicker filter function is enabled The best setting for Bandwidth is 6 6 Press the record button 1 figure 10 7 A window will appear in which you can specify whether the recording should have a time limit and how long this...

Страница 17: ...rogram for more detailed information 7 1 6 Alternative method for transferring recordings from the camera The TRUST 632AV LCD POWER VIDEO is visible in Windows as an extra removable disk when it is in the Storage medium mode see figure 7 Its use is as easy as moving a file In contrast to other cameras this camera therefore does not require a separate TWAIN driver Download photographs using File Op...

Страница 18: ...ng the photograph to save the finished result See this program s instruction manual and Help function for more information Note The photographs are saved in JPEG format to save space JPEG reduces the size of the file by removing small details from the photograph If you wish to edit the photographs during different sessions use a different file format to JPEG for example TIFF to prevent the loss of...

Страница 19: ...ents or other uses 7 4 VideoLive Mail Use figure 14 and table 13 c with these instructions To send multimedia e mails you must have a sound card speakers and an Internet connection with an e mail program A video e mail can be easily made and sent using the VideoMail Wizard 1 Start the program by clicking on Start Programs Cyberlink VideoLive Mail 4 0 VideoLive Mail Figure 14 will appear 2 Click on...

Страница 20: ...rogram remains active 14 Help Starts the Help function Gives information about how to use the program Table 13 Meaning of the components included in the program 7 5 DVD MovieFactory This program can be used to quickly compose a video film and make it suitable for saving on a CD ROM or DVD You require a CD writer or a DVD writer to save the video on disk You can also send the file via the Internet ...

Страница 21: ...en completed This can take a lot longer than it takes to play the video film particularly for the MPEG 2 DVD format After the file has been converted an extra clip will be visible with a CD icon above it This is the whole film The Export window will now be visible 16 Play the entire file to check whether it is correct 17 If it was only the intention to create a video file you have now finished Con...

Страница 22: ... click on a person in the list A NetMeeting connection will be made The person may not wish to make a connection with you because this person may be communicating with somebody else If this is the case select somebody else from the list You can find other ils servers on the Internet An example is http www netmeetinghq com For more information or solutions to problems click on Help in NetMeeting s ...

Страница 23: ... box or the envelope The camera has not been connected to a USB port Connect the camera to a USB port The camera is in the DV disk mode Set the camera to the Live mode see figure 8 Error message Capture device was not detected is displayed The camera has been connected to a USB hub which does not have a power supply Connect the camera to a USB hub which has a power supply or to a USB port on your ...

Страница 24: ... batteries see chapter 4 3 The camera is still connected to your computer Disconnect the USB cable The camera cannot be operated when it is connected to a computer The camera is turned off Turn the camera on see chapter 4 4 The camera does not do anything The batteries are empty Replace the batteries This can be tested by connecting the camera to the USB port Something must appear on the camera s ...

Страница 25: ...rdings are not clear hazy There is insufficient light Improve the lighting The camera is busy recording video or audio Stop recording The camera menu is active Turn the menu off see chapter 4 5 The memory is full Transfer photographs to your computer and delete them from the memory You can take many more photographs using a larger CF card Ask your dealer No photograph is taken when the exposure bu...

Страница 26: ...16 bits colours The background lighting is not white Change the lighting If this does not help use Photo Express to edit the colour The monitor has not been set correctly Compare the photograph to other photographs for example on the Internet where you known the colour is correct Adjust your monitor correctly see the instruction manual provided with your monitor The printer has been set incorrectl...

Страница 27: ...n be saved on the CF card than expected The recordings contain a lot of detail or noise If they contain noise select a location with more light If they contain a lot of detail it is normal that less photographs or video clips can be taken The CF card has been formatted in the wrong format Format the CF card in the camera Camera menu 8 figure 2 Do not format it in a card reader The card has not bee...

Страница 28: ...taken in dark surroundings Make sure there is enough light The contrast in the subject is too great Change the lighting or take the photograph closer by or further away The photographs are overexposed The photographs were taken in bright sunlight Take photographs in shadow The problem is not listed here Check the Internet for the latest update of the camera Troubleshooter Go to www trust com custo...

Отзывы: