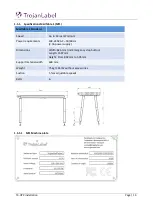
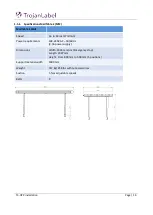
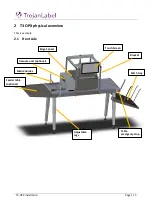
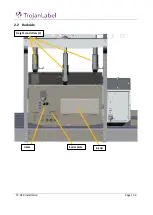


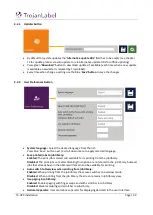
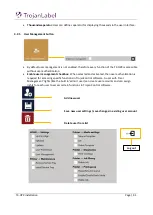
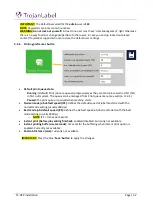

T3-OPX installation
Page | 27
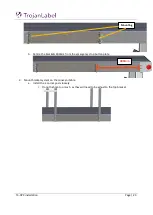
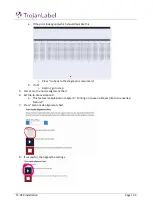
7.
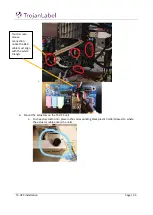
Install the actuators onto the bracket system.
a.
Place the three metal actuator rods in the top bracket
b.
Move the T3 OPX unit so each metal rod can fit into each actuator
c.
Push the metal rod into the actuator
i.
There may be some resistance pushig it through the plastic fitting at the top
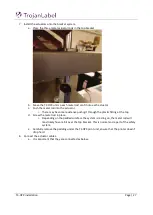
d.
Screw the metal rod in place.
i.
Depending on the padded sureface the system is resting on, the metal rod will
most likely hover a bit over the top bracket. This is normal and a part of the safety
system.
e.
Carefully remove the padding under the T3 OPX print unit, ensure that the printer doesn’t
drop hard.
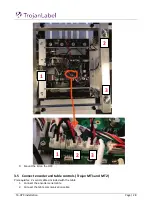
8.
Connect the actuator cables.
a.
It is important that they are connected as below:
Содержание T3-OPX
Страница 1: ...T3 OPX user guide Version 1 2...
Страница 5: ...T3 OPX installation Page 4...
Страница 7: ...T3 OPX installation Page 6 1 1 1 Emissions...
Страница 13: ...T3 OPX installation Page 12...
Страница 17: ...T3 OPX installation Page 16 2 2 Backside Height controllers 3 Inlets Ink lid Serial plate...
Страница 20: ...T3 OPX installation Page 19...
Страница 34: ...T3 OPX installation Page 33 i The process will use the purge height in the settings menu...


