Triumph Adler DC 2062 Скачать руководство пользователя страница 39

Section 5  OTHER CONVENIENT FUNCTIONS

2A080030A

KM-6230 (KME)

/ 131

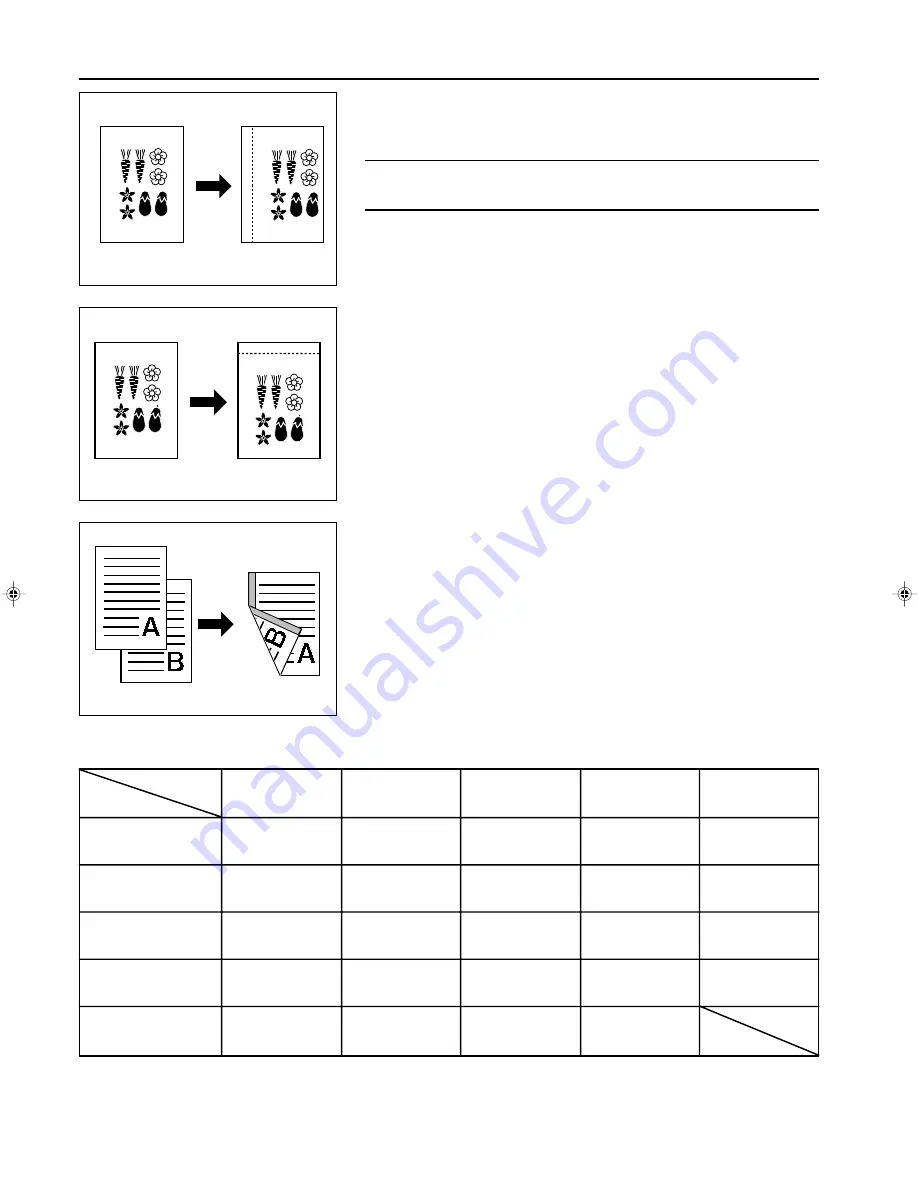
(1) Making a margin space in the copies for binding, etc. [Margin mode]

 Left margin

The image of the original will be shifted to the right in order to make a margin for binding on
the left side of the copy paper. The margin width can be set between 6 mm and 18 mm in
1 mm increments.

POINT OF INFORMATION
If you select to make a left margin when you are making two-sided copies, a right margin – of
the same width as you select for the front side – will automatically be set for the back side.

 Top margin

The image of the original will be shifted downward in order to make a margin for binding on
the top side of the copy paper. The margin width can be set between 6 mm and 18 mm in
1 mm increments.

* The margin position that is available for the back side will differ depending upon the margin position that is selected for the front side.

The circle (“

”) indicates the possible settings.

 Front & back margin

When you are making two-sided copies, the margin positions and margin width can be se-
lected separately for the front and back sides of the copies. The margin width can be set
between 1 mm and 18 mm in 1 mm increments.
* In order to set the front and back margins separately, it is necessary in advance to select

“ON” under “

$

 Front & back margin key ON/OFF” on page 8-16.

“LEFT M.”

“RIGHT”

“TOP M.”

“BOTTOM”

“NO”

Front side

“LEFT M.”

“RIGHT”

“TOP M.”

“BOTTOM”

“NO MARGIN”

Back side

5-1

Section 5  OTHER CONVENIENT FUNCTIONS

E_Sec5_Kinou.PM6

10/16/00, 7:13

2

Содержание DC 2062

Страница 1: ...INSTRUCTION HANDBOOK DC 2062...

Страница 2: ...registered mark The Auto Shut off time setting becomes 15 to 120 minutes in the areas corresponding to the Swiss Energy 2000 program All rights reserved No part of this material may be reproduced or t...

Страница 3: ...ent attention to or incorrect compliance with the related points Symbols The m symbol indicates that the related section includes safety warnings Specific points of attention are indicated inside the...

Страница 4: ......

Страница 5: ...Cover mode 5 8 Insert mode 5 8 Chapter mode 5 9 2 Combining modes 5 10 3 Making copies with the sheet copy mode 5 10 6 Making handout materials together withTransparencies Presentation mode 5 13 Prese...

Страница 6: ...in code change 8 11 0 Auto shut off ON OFF 8 11 Date time 8 11 Accessing the machine default setting mode 8 12 Changing the default settings 8 12 2 Copy related defaults 8 15 Types of copy defaults 8...

Страница 7: ...e in the copies for binding etc Margin mode page 5 1 Copying onto both the front and back of the copy paper from various originals Two sided copy mode page 4 5 Printing page numbers on the copies Prin...

Страница 8: ...for easy sorting Rotate Sort copy mode page 5 27 Making mirror image copies Mirror image mode page 5 26 Inverting black and white Invert copy mode page 5 26 Memorizing frequency used settings Program...

Страница 9: ...ent is avail able Finisher page 9 1 Booklet Stitcher page 9 10 Mailbox Unit page 9 12 Side Deck page 9 11 Key Counter page 9 11 Print Scan System page 9 12 Tandem Board page 9 12 31 MAKING FULL USE OF...

Страница 10: ...ION LABELS NOTE DO NOT remove these labels Label 2 High temperature inside Do not touch parts in this area because there is a dan ger of getting burned Label 1 High voltage inside NEVER touch parts in...

Страница 11: ...conditioned room recommended room temperature around 20 C humidity around 65 RH and avoid the following locations when selecting a site for the copier Avoid locations near a window or with exposure to...

Страница 12: ...remove the power plug from the outlet when performing cleaning operations If dust accumulates within the copier there is a danger of fire or other trouble It is therefore recommended that you consult...

Страница 13: ...2 1...

Страница 14: ...Section 2 NAMES OF PARTS Section 2 NAMES OF PARTS 2 1...

Страница 15: ...nals that have been scanned for copying The bottom line indicates the number of copies made Instruction handbook box Keep the instruction handbook here Transport handles Use these handles when moving...

Страница 16: ...number of copies to be made or to enter a desired value Reset key See Initial mode at right Stop Clear key Press this key when you want to stop copying or want to change the number of copies to be ma...

Страница 17: ...The total number of exposure steps can be set to either 7 or 13 See 2 Exposure steps on page 8 15 0 Copy exposure adjustment keys Touch the appropriate key when you want to manually adjust the copy ex...

Страница 18: ...the Finisher or when replenishing staples in the stapler holders 5 Front cover handle Use this handle to open the front cover 6 Upper cover Open this cover if paper misfeeds during ejection onto the...

Страница 19: ...press this switch Paper plate up down switch for upper cover Press or hold down this switch when you want to raise or lower the paper plate inside the Side Deck Press it once to lower the paper plate...

Страница 20: ...3 1...

Страница 21: ...the guides until both of them are aligned with the width of the paper that will be loaded in that drawer 4 Set the paper against the right hand side of the drawer first and then let go of the paper s...

Страница 22: ...75 g m2 or 80 g m2 paper The paper can be of any size between 5 1 2 x 8 1 2 and 11 x 17 A6R and A3 When copying onto special paper always use this tray to feed the paper If you want to copy onto non s...

Страница 23: ...To register the size of envelopes that you want to use see How to register a custom size on page 8 12 4 Loading paper into the Side Deck option The optional Side Deck will hold up to 4 000 sheets of...

Страница 24: ...s or folds before using them Clippings or originals with very slippery surfaces Originals with wet correction fluid Originals with folds If you must use such originals smooth out the folded portions b...

Страница 25: ...SUME COPYING appears in the message dis play DO NOT add toner unless this message is displayed Touch the TONER key on the touch panel to display the procedure for adding toner 5 Auto selection mode Th...

Страница 26: ...the toner bottle located below the over the metal pin 1 that is protruding out of the toner supply slot 6 Turn the bottle clockwise 90 degrees and the toner in the bottle will be emptied into the cop...

Страница 27: ...4 1...

Страница 28: ...me size as the original no special settings are required 5 Copy exposure adjustment In the initial mode manual exposure mode is selected the exposure scale will be displayed and the copy exposure can...

Страница 29: ...opy Tray Finisher or Booklet Stitcher Depending upon the copy mode the copies may be ejected face up or face down If the copier is equipped with the optional Copy Tray a maximum of 250 copies can be s...

Страница 30: ...e key if you want to change the currently selected paper size 2 Zoom copy mode The zoom ratio can be set to any 1 increment between 25 and 400 If you set the originals in the DF the zoom ratio can be...

Страница 31: ...lected the corresponding copy zoom ratio will be displayed 5 Touch the END key The touch panel will return to the basic screen and selected the zoom ratio will be displayed Touch the desired paper siz...

Страница 32: ...nce you touch one of these keys and thereby highlight the width field the desired zoom ratio can also be entered directly using the numeric keys Touch the 100 key if you want to return the zoom ratio...

Страница 33: ...o sided copy set up screen will appear The same screen will also appear if you touch the DUPLEX key on the function select screen 3 Specify the type of the originals that are being used If you selecte...

Страница 34: ...ginals that were registered using the job reservation function you can use the copy modes etc that were already selected for that job Once the interrupt copying job is finished the operation that was...

Страница 35: ...tered originals Once copying of the selected originals is finished the interrupted copy job will be resumed automatically 5 Rotate copy When the orientation of the originals is different than that of...

Страница 36: ...CHECK key and the touch panel will return to the basic screen If you want to change any of the settings touch the corresponding function key on the touch panel and then touch the CHANGE key after that...

Страница 37: ...to set the auto preheat function to engage automatically if the copier is not used for a certain period of time See 7 Auto preheat time on page 8 11 10 Auto shut off function This function automatical...

Страница 38: ...6 1...

Страница 39: ...n for binding on the top side of the copy paper The margin width can be set between 6 mm and 18 mm in 1 mm increments The margin position that is available for the back side will differ depending upon...

Страница 40: ...to step 6 4 If you want to change the width of the margin touch the key or the key until the desired width is displayed The margin width can be set between 6 mm and 18 mm in 1 mm increments The previo...

Страница 41: ...nt to make a margin on the back side touch the NO key The margin position that is available for the back side will differ depending upon the margin position that is selected for the front side Once th...

Страница 42: ...ant the copies for the third original to be designated as page one enter 2 under the 1ST PAGE field In order to have the first original designated as a page number other than one enter the number a po...

Страница 43: ...size In this operation it is necessary to specify the binding orientation of the originals 1 LEFT The left page of the originals is copied first followed by the right page 2 RIGHT The right page of t...

Страница 44: ...tion indicates the width of the border that will be erased Erasing blemishes from the edges and middle of copies Book Use for making neat copies from thick books etc The a in the illustration indicate...

Страница 45: ...border that will be erased under SHEET or BOOK touch the key or the key The border width can be set to 6 mm 12 mm or 18 mm In order to use the CUSTOM key with non standard paper sizes the size of the...

Страница 46: ...erted at specified locations among copies made from multiple originals You can also select whether or not you want the insert sheets themselves to be copied onto The drawer in which the insert sheets...

Страница 47: ...ying When leaving both the front and back side of the insert sheets blank The illustration shows an example of two sided copying Chapter mode Special paper can be specified as pages that will designat...

Страница 48: ...same page It is not possible to specify locations for insert sheets and chapter pages separately 3 Select the type of finished copies that you want to make by touching either the DUPLEX SPLIT or 1 SID...

Страница 49: ...irection when the pages are opened just as they are on a wall calendar 6 Specify the type of the originals that are being used by touching either the DUPLEX or BOOK key If you selected DUPLEX go to st...

Страница 50: ...ront side BLANK or NO no back cover at all key If you do not want to use any other modes go to step 19 Insert mode settings 12 Touch the INSERT key if you want to use the insert mode If not go to step...

Страница 51: ...t In other words calculate each two sided original as 2 individual pages when entering the page number 18 Once you are finished entering page numbers touch the ENTER key If you want to perform the pro...

Страница 52: ...tion indicate the transparencies 1 Set the transparencies in the stack bypass tray POINT OF INFORMATION Fan out the transparencies at least once before setting them Up to 25 transparencies can be load...

Страница 53: ...r the DUPLEX BOOK or 1 SIDED key If you selected DUPLEX the touch panel will return to the basic screen In this case go to step 12 If you selected BOOK go to the next step If you selected 1 SIDED go t...

Страница 54: ...ed onto tray 1 7 Feeding paper as a backing sheet for transparencies Transparency backing sheet modes When 2 or 3 transparencies are stacked on top of one another static electricity can cause problems...

Страница 55: ...er of the same size as the transparencies is loaded in one of the drawers or decks 2 Set the originals 3 Touch the FUNCTION key The function select screen will appear 4 Touch the TRANS BACK key If tha...

Страница 56: ...register images 1 Touch the FUNCTION key The function select screen will appear 2 Touch the OVERLAY key If that key is not displayed touch the key or the key until it is displayed The form overlay mo...

Страница 57: ...INT OF INFORMATION Both the originals and the copy paper must be of standard paper sizes 1 Combination styles 2 in 1 Use this mode to copy two originals onto one sheet This mode can also be used toget...

Страница 58: ...ey or the 4 IN 1 key POINT OF INFORMATION The mode that you should use depends on the orientation in which the originals are set Depending upon the key that was touched during selection of the combina...

Страница 59: ...nds to the paper that you want to copy onto 9 Press the Start key 10 Making a booklet sheet originals Booklet copy This mode can be used to copy one sided or two sided originals onto two page open fac...

Страница 60: ...l appear 2 Touch the BOOKLET key If that key is not displayed touch the key or the key until it is displayed The booklet mode set up screen will appear 3 Specify the type of the originals that are bei...

Страница 61: ...front and back covers will be blank 1 Touch the FUNCTION key The function select screen will appear 2 Touch the BOOK BOOK key If that key is not displayed touch the key or the key until it is displaye...

Страница 62: ...sheet and then staple the arranged copies into a booklet format such as with a weekly magazine or a pamphlet POINT OF INFORMATION To use this mode it is necessary to select the drawer or deck from wh...

Страница 63: ...e finished copies will read from right to left 2 Left side binding orientation The order of copying will be performed so that the stacked and folded pages of the finished copies will read from left to...

Страница 64: ...he originals When setting the originals on the platen start with the first page 10 Press the Start key 13 Inverting black and white Invert copy mode The black and white areas of the image are inverted...

Страница 65: ...in the drawers and or decks 1 Set the originals 2 Press the Sort Group key to light the Sort indicator 3 Press the Start key If you set the originals in the DF scanning will start and copying carried...

Страница 66: ...gs that are registered under that program number 2 Copying with a registered program 1 Press the Program key The program select screen will appear If OFF THE PLATEN is selected under 9 Job programming...

Страница 67: ...6 1...

Страница 68: ...erformed in order starting the topmost job in the display downward 3 No of copies Indicates the number of originals in the copy job 4 No of originals Indicates the number of copies that will be made 2...

Страница 69: ...ey to select the desired mode If the copier is equipped with the optional Finisher it is also possible to change the Staple Sort mode and the Hole Punch mode settings as well If the copier is equipped...

Страница 70: ...finished you can select from among 9 different modes The instructions for the job build function can be displayed on the touch panel To access them touch the key 1 Memory copying from the DF or plate...

Страница 71: ...ify the type of the originals that are being used by touching either the 2 SIDED ORIG or 1 SIDED ORIG key 5 Select how you want the copies to be finished by touching either the 2 SIDED COPY or 1 SIDED...

Страница 72: ...m step 3 on page 5 20 Print page numbers function Touch the PAGE key and follow the procedure from step 4 on page 5 4 7 Set the originals 8 Press the Start key 9 If you want to scan in more originals...

Страница 73: ...copies from all types of originals Duplex All Originals By specifying whether each set of originals is either one sided or two sided each set will be scanned and all of the originals will be made into...

Страница 74: ...e the setting for the border erase mode touch the key or the key at the right of the border width display to select the desired width The border width can be set to 6 mm 12 mm or 18 mm In this setting...

Страница 75: ...ake by touching the key or the key This number can also be entered directly with the numeric keys 12 Touch the END key Copying will begin 3 Batch copy from the platen Sheet originals only Sheet origin...

Страница 76: ...o next step 6 Specify the binding orientation of the originals 7 The start scanning screen will appear The auto magnification selection mode is the default setting in the initial mode When copying ont...

Страница 77: ...continue scanning by repeat ing the procedure from step 5 If you selected BOOK ORIGINALS continue scanning by repeating the procedure from step 6 If you selected SHEET ORIGINALS continue scanning by r...

Страница 78: ...7 1...

Страница 79: ...y See 1 Reset box delete all on page 8 23 It is also possible to print out a list of all of the registered images See 4 Document list on page 8 23 1 Registering an image 1 Press the Doc Mgmt key The d...

Страница 80: ...regarding a specific image or to print it out select the desired image and touch the RECALL key If the image that you want to check is not displayed touch the key or the key until it is displayed 4 In...

Страница 81: ...nge the order in which the image names are displayed 1 Press the Doc Mgmt key The document management screen will appear 2 Touch the OVERLAY FROM STORAGE key A list of registered images will appear 3...

Страница 82: ...ange any copy settings that you want such as the number of copies to be made etc 3 Touch the START key Copying will begin Once copying is finished the touch panel will return to the basic screen 3 Qui...

Страница 83: ...touch panel will return to the basic screen 2 Checking data for a print job Follow the procedure below when you want to check certain information that corresponds to a specific print job 1 Press the...

Страница 84: ...u want to delete If the print job that you want to delete is not displayed touch the key or the key until it is displayed 4 Touch the DELETE key 5 If you are certain that you want to delete that data...

Страница 85: ...ayed under ORIGINAL If you want to change the size of the copy paper touch the PAPER key and select the size of paper that you want 7 Press the Start key Scanning of the originals will begin 8 Once sc...

Страница 86: ...If you touch the FUNCTION key you can select from among the two sided copy mode the margin mode the print page numbers function the form overlay mode the sheet copy mode and the booklet cover copy mo...

Страница 87: ...t to print out the first page of the originals touch the HEAD PRINT key Once printing is finished the touch panel will return to the screen that was displayed before printing began Once you are finish...

Страница 88: ...ich the name for the shared data is displayed touch the q UP key or the Q DOWN key until that name is in the position that you want If you want to change the name of the data touch the RENAME key See...

Страница 89: ...lf Follow the procedure below when you want to use the copier to store the original in a synergy print box 1 Press the Doc Mgmt key The document management screen will appear 2 Touch the PRIVATE PRINT...

Страница 90: ...ress the Doc Mgmt key The document management screen will appear 2 Touch the PRIVATE PRINT BOX key 3 Touch the STORAGE key The available synergy print boxes will be displayed in blocks of 10 4 Select...

Страница 91: ...the copies will be finished touch the AS ORIGINAL JOB key and go to step 11 10 Select the copy mode and function that you want to use and press the Start key Copying will begin If you touch the FUNCTI...

Страница 92: ...nished The touch panel will return to the screen for step 2 In this case go to step 5 If you selected more than one set of originals touch the key or the key to display the information about the other...

Страница 93: ...10 sets of originals at one time If any original that you want to print out is not displayed touch the key or the key until it is displayed 3 Touch the ORDER CHANGE key A list of the originals you se...

Страница 94: ...you do not want to change the name go to step 8 If the name that you want to change is not displayed touch the key or the key until it is displayed 7 Enter the new name that you want to register for...

Страница 95: ...rtual mailboxes See 1 Reset box delete all on page 8 23 It is also possible to print out a list of all of the registered information for each virtual mail box See 4 Document list on page 8 23 IMPORTAN...

Страница 96: ...want to continue printing from the next set of originals touch the CONTINUE FROM NEXT JOB key 2 Changing the password 1 Follow steps 1 6 on page 7 17 2 Touch the PASSWORD key 3 Use the numeric keys t...

Страница 97: ...8 1...

Страница 98: ...edure to change the limit for the number of copies that can be made by one or more departments without need to delete and re register the department codes Follow this procedure to check copy totals It...

Страница 99: ...git management pin code as desired See 9 Management pin code change on page 8 11 3 How to register the various management settings Registering new department codes 1 Enter the copy management select m...

Страница 100: ...7 8 Touch the END key The touch panel will return to the screen for step 3 9 Touch the END key The touch panel will return to the copy management mode set up screen 10 Touch the END key The touch pane...

Страница 101: ...or the key until it is displayed 5 Use the numeric keys to change the limit for the number of copies that can be made under that department code The limit can be set in units of 1 000 sheets up to a m...

Страница 102: ...g copy counts 1 Enter the copy management select mode See page 8 1 2 Touch the REFERENCE key The numbers of copies made by each individual department will be displayed 3 Touch the TOTAL ALL ID CODES k...

Страница 103: ...anagement ON when you use this machine as a printer under the optional Print Scan System touch PRINTER in order to put a checkmark in the check box A corresponding setting is also required in your com...

Страница 104: ...eekly timer Canceling the timer function Turning the weekly timer ON OFF Follow this procedure to set the present time If the time is not set correctly here weekly timer operation will not be triggere...

Страница 105: ...The touch panel will return to the basic screen Programming the weekly timer 1 Enter the weekly timer select mode See page 8 7 2 Touch the WEEK TIMER key 3 Touch the day of the week that you want to...

Страница 106: ...you are finished setting the ON OFF times touch the ENTER key The touch panel will return to the weekly timer set up screen 9 Touch the END key The touch panel will return to the basic screen Canceli...

Страница 107: ...ver indicator will blink Warm up has begun Wait a while Another way to start warm up is to turn the main switch OFF O and then back ON again 2 Once warm up is finished you can make copies using the no...

Страница 108: ...before the auto shut off function see page 4 10 automatically turns the power to the copier OFF It is possible to set this time to any 15 minute increment between 15 and 240 minutes It is also possib...

Страница 109: ...2 Touch the DEFAULT SETTING key 3 Use the numeric keys to enter the management pin code 6200 If the pin code you entered matches the registered one the screen will change to the default select screen...

Страница 110: ...you want to change the size of the drawer touch the CHANGE key 2 Touch the desired size of paper to be loaded to the drawer The touch panel will return to the machine default select screen If you wan...

Страница 111: ...at function engages by touching the key or the key as appropriate If you want to continue changing other default settings follow the procedure that corre sponds to that setting Once you are finished t...

Страница 112: ...re certain that you want to change the time touch the OK key If you want to continue changing other default settings follow the procedure that corre sponds to that setting Once you are finished touch...

Страница 113: ...limit on the number of copies that can be made at one time 1 999 Custom border erase size Select the size of the area to be designated for the CUSTOM setting of the border erase mode see page 5 6 It...

Страница 114: ...the pin code you entered matches the registered one the screen will change to the default select screen You can change the 4 digit pin code as desired See 9 Management pin code change on page 8 11 4 T...

Страница 115: ...r not by touching the ON key or the OFF key as appropriate under TONER ECO MODE 3 Select the default setting for the toner economy mode by touching the ON key or the OFF key as appropriate under ECONO...

Страница 116: ...Select the default copy quality mode by touching the MIXED key the TEXT key or the PHOTO key as appropriate If you want to continue changing other default settings follow the procedure that corre spo...

Страница 117: ...hen the BASIC key The touch panel will return to the basic screen Zoom mode 1 Select the default zoom mode by touching the SIZE ZOOM key or the STANDARD ZOOM key as appropriate If you want to continue...

Страница 118: ...reen or not by touching the ON key or the OFF key as appropriate If you want to continue changing other default settings follow the procedure that corre sponds to that setting Once you are finished to...

Страница 119: ...hen the BASIC key The touch panel will return to the basic screen Repeat copying 1 Select whether to allow repeat copying or not by touching the ON key or the OFF key as appropriate If you want to con...

Страница 120: ...information registered This procedure will delete at one time all of the data registered in any one box However since each synergy print box and virtual mailbox can have its own name and password if...

Страница 121: ...he pin code you entered matches the registered one the screen will change to the default select screen You can change the 4 digit pin code as desired See 9 Management pin code change on page 8 11 4 To...

Страница 122: ...n touch the BASIC key The touch panel will return to the basic screen 2 Box name password Clear data in box 1 Touch the BOX NAME BOX PASSWORD CLEAR DATA IN BOX key 2 Select the number of the box 001 1...

Страница 123: ...e making settings for other boxes repeat steps 2 11 Once you are finished touch the END key and then in the next screen touch the BASIC key The touch panel will return to the basic screen 3 Box defaul...

Страница 124: ...The process to delete all of the data can take between 20 to 30 minutes Normally is not necessary to delete stored data 1 Touch the SPECIAL key The management mode select screen will appear 2 Touch th...

Страница 125: ...keys to enter the management pin code 6200 If the pin code you entered matches the registered one the screen will change to the default select screen You can change the 4 digit pin code as desired Se...

Страница 126: ...ouch the MODE key Use the numeric keys to enter numbers The function of each key a key Touch to switch between the screens for inputting upper and lowercase letters MODE key Touch to switch between th...

Страница 127: ...h the MODE key to switch back to the screen for inputting lowercase letters 8 Touch the a key to switch to the screen for inputting uppercase letters 9 Touch the D key 8 30 10 Touch the a key to switc...

Страница 128: ...9 1...

Страница 129: ...page 8 16 SORT ON The Sort mode will be selected and copies will be ejected into the Non sort tray SORT OFF The Non sort mode will be selected and copies will be ejected into the Non sort tray Staple...

Страница 130: ...all copies from the Sort tray The maximum number of copies that can be stored on the Sort tray will differ depend ing on the size of copy paper that is being used See page 9 5 5 Remove all of the fini...

Страница 131: ...an original on the platen a message will appear after each original is scanned to confirm whether you want to scan another original or not POINT OF INFORMATION A maximum of fifty A4 or A4R size copie...

Страница 132: ...0 g m2 Hole punching will be accomplished as shown in the illustration at left as viewed from the front of the copies IMPORTANT The position of the holes on each page may differ very slightly due to t...

Страница 133: ...CAPACITY EXCEEDED REMOVE PAPER FROM FINISHER will appear in the message display and copying will stop Remove all of the finished copies from the Non sort tray and then resume copying When the Hole Pun...

Страница 134: ...tact the service representative for your copier 0 0 0 0 0 Refilling the Stapling Unit If a message appears on the copier indicating that staples have run out the staple holder s need to be replenished...

Страница 135: ...is correct The arrow on the staple cartridge indicates the correct direction of insertion 8 Make sure the new staple cartridge is completely inserted all the way into the staple holder and then remov...

Страница 136: ...over towards you 2 Grasp the internal tray handle and carefully pull the internal tray out towards you 3 Grasp the Stapling Unit handle and lift up the Stapling Unit The two staplers will become visib...

Страница 137: ...nto place 10 Lift up the Stapling Unit slightly and then lower it into its original position 11 Replace the internal tray in its original position all the way into the Finisher 12 Close the front cove...

Страница 138: ...well 6 Push in on both knobs one on each side of the scrap hole punch tank to lock the tank back in place 7 Reattach the Finisher to your copier 2 Booklet Stitcher This unit lets you store a large vol...

Страница 139: ...able 3 Side Deck This unit is an auxiliary paper feed unit that holds up to 4 000 sheets of standard 80 g m2 A4 size copy paper 4 Key Counter The Key Counter enables you to verify the number of copies...

Страница 140: ...nit 6 Print Scan System If the copier is equipped with the Print Scan System the copier can be used as a printer For more detailed information refer to the printer edition of your instruction handbook...

Страница 141: ...10 1...

Страница 142: ...PLACE PAPER ON BYPASS There is no paper in the stack bypass tray Set paper in the stack bypass tray 3 2 REPOSITION ORIGINAL OR SELECT OTHER PAPER DRAWER The orientation of the originals and the paper...

Страница 143: ...ESS START KEY The first original was not fed correctly into the DF Remove all originals and then set them in the DF once again 10 2 MEMORY FULL The corresponding box has reached its acceptable limit o...

Страница 144: ...the main body of the copier 2 Open the waste toner tank cover 3 Remove the waste toner tank 4 Close the opening of the waste toner tank with the attached seal IMPORTANT Waste toner is NOT reusable Giv...

Страница 145: ...16 The procedure to remove misfed paper can be displayed on the touch panel by touching the key 2 Cautions WARNING High voltage is present in the charger section Take sufficient care when working in...

Страница 146: ...ndicator 2 Remove the misfed paper without tearing it If the paper does happen to tear remove any loose scraps from inside the copier 3 Push the drawer firmly back into the copier Misfeed in the Front...

Страница 147: ...If the paper does happen to tear remove any loose scraps from inside the copier 3 Close the right upper cover Misfeed inside the right lower cover If PAPER MISFEED OPEN RIGHT LOWER COVER and the misf...

Страница 148: ...the misfeed message has disappeared from the touch panel Then re set the paper into the stack bypass tray 2 2 2 2 2 Misfeed in the paper conveyor section If PAPER MISFEED OPEN FRONT COVER and the misf...

Страница 149: ...ing burned 7 Push the conveyor section all the way back into its original position in the copier and return the release lever to its original position as well 8 Close the front cover 3 3 3 3 3 Misfeed...

Страница 150: ...e remove it without tearing it If the misfed paper is not visible perform steps 5 10 If you simply cannot remove the misfed paper easily turn the fixing unit knob in the direction of the arrow to ejec...

Страница 151: ...detach or remove it from the copier as appropriate and then reattach replace it in its origi nal position once the procedure to remove the misfed paper is finished If the misfed paper is not visible g...

Страница 152: ...ersing cover screws a located on the left side of the duplex unit The paper reversing cover b will open downwards 8 Remove the misfed paper without tearing it Close the paper reversing cover and faste...

Страница 153: ...sfed originals without tearing them 5 If you cannot remove the originals easily open the reversing unit and remove them from there 6 If you still cannot remove the originals easily turn the original m...

Страница 154: ...removed from the coupling section open the upper cover 4 Remove the misfed paper from the conveyor section 5 Close the upper cover and reattach the Finisher to the copier Misfeed in the Sort tray If...

Страница 155: ...ob in a clockwise direction The misfed paper will be returned to the internal tray and the internal tray can now be pulled out 5 Grasp the internal tray handle and carefully pull the internal tray out...

Страница 156: ...ed location indicator shown in the illustration appear on the touch panel paper has misfed in the paper conveyor section to the internal tray 1 Grasp the front cover handle and open the front cover to...

Страница 157: ...isible in the internal tray remove it without tearing it 9 Replace the internal tray in its original position all the way into the Finisher 10 Close the front cover securely 7 7 7 7 7 Misfeed in the o...

Страница 158: ...ide Deck and the copier remove the paper without tearing it If you cannot remove the misfed paper easily go to the next step 3 Open the right cover to the Side Deck 4 Remove the misfed paper without t...

Страница 159: ...ing an original on the platen set it face down 3 5 The finished copies are too light Is the copier in the auto exposure mode To adjust the overall exposure level perform the Auto exposure adjustment p...

Страница 160: ...l exposure level perform the Manual exposure adjustment procedure 8 16 Clean the platen the slit glass and the original protector under the DF 10 20 Paper is continually misfed Were the originals set...

Страница 161: ...it glass section c with a soft cloth dampen with alcohol or mild detergent DO NOT use thinner or other solvents If the slit glass section of the DF becomes dirty black lines may appear on finished cop...

Страница 162: ...12 1...

Страница 163: ...stack bypass tray Standard 60 g m2 200 g m2 or special paper letterheads colored paper or Transparencies etc envelopes DL C5 COM 10 Monarch only when using the printer functions of this machine Conti...

Страница 164: ...ser no radiation can leak from the machine This machine is classified as Class 1 laser product under IEC 825 CAUTION Performance of procedures other than those specified in this manual may result in h...

Страница 165: ...gy equipment EN55024 Limits and methods of measurement for radio interference characteristics of information technology equipment EN55022 Class B Limits for harmonic currents emissions for equipment i...

Отзывы: