background image

12

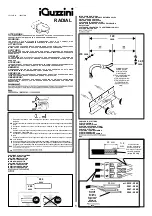
Elektrischer Anschluss

Electrical connection

Raccordement électrique

Collegamento elettrico

Conexión eléctrica

Elektrische verbinding

N

1 2

3

50...E

L

+ -

N

50...EDD

59

3

Position beachten!

Consider the correct position!

Considérer la position correcte !

Fare attenzione alla posizione!

Considerar la posición correcta!

Positie in acht nemen!

5

6

10

11

10

8

9

9

min. 1,2 Nm

7

4

Содержание 5041 L Series

Страница 1: ...vaux de maintenance ult rieurs Vous avez la possibilit de consulter des informations importantes concernant l efficacit nerg tique des luminaires TRILUX ainsi que l entretien et l limination des lumin...

Страница 2: ...f r Steuereing nge dimmbarer EVG 1 10 V DALI etc 230 V netzspannungsfest auslegen E Safety notes These instructions assume expert knowledge corresponding to a completed professional education as an e...

Страница 3: ...mmerabili 1 10 V DALI ecc a 230 V garantendo la rigidit dielettrica S Indicaciones de seguridad Para manejar estas instrucciones se requieren los conoci mientos cnicos propios de un electricista cuali...

Страница 4: ...x35 49 3 7 5051R L 2x80 3 9 11 11 1193 28 54W 1493 35 49 80W E E E 1193 28 54W 1493 35 49 80W 11 Typ ca kg 5041R L 28 54 3 2 5041R L 35 49 80 3 8 Typ ca kg 5041R L 2x28 54 3 3 5041R L 2x35 49 4 1 5041...

Страница 5: ...na temperatura ambiente di ta 25 C Pu essere utilizzato come apparecchio singolo oppure come linea continua S Uso previsto Luminaria 5041 L 5051 L est concebida para el montaje en espacios interiores...

Страница 6: ...lettrico S Conexi n el ctrica N Elektrische verbinding N 1 2 3 50 E L N 50 EDD 59 3 D Position beachten E Consider the correct position F Consid rer la position correcte I Fare attenzione alla posizio...

Страница 7: ...es luminaires en ligne continue il faut assurer que tous les borniers de raccordement sont situ s du m me c t de la ligne continue I Il cablaggio passante non deve toccare il reattore ed il contrappes...

Страница 8: ...14 15 ca 10 9 62 4 5 05000 DD A 03 D 116 m i n 9 0 7 8 6 15...

Страница 9: ...profile into corresponding sections previously F Couper d abord le profil d obturation dimension I Prima tagliare a misura il profilo cieco S Antes recortar el perfil ciego a la medida adecuada N Blin...

Страница 10: ...5 2 5 3 5 3 1 2 D Seil wird eingef delt E Wire is to be introduced F Le c ble m tallique doit tre introduit I Fune metallica da inserire S El cable met lico tiene que ser introducido N De kabel wordt...

Страница 11: ...e N De kabel dient zelf ter beschikking gesteld te worden 108 L max 1000 D Leitungen anschlie en und Klemmen positionieren siehe 7 und 14 E Connect cables and position terminals see 7 and 14 F Raccord...

Страница 12: ...t to each other F Remarque concernant les lampes 2 lp Placez les ampoules de mani re ce que les tampons soient toujours plac s les uns c t des autres I Avvertenza relativa alle lampade 2 lp Montare le...

Страница 13: ...e film plastique prot geant l optique doit tre retir avant la mise en service du luminaire I Inserendo l ottica non toccare le linee Prima della messa in servizio dell apparecchio togliere il foglio d...

Страница 14: ...05000 A26 05000 A26 50 1x E ED 50 2x28 35 49 54 E 50 2x28 35 49 54 80 ED 50 2x80 E A 03 S 07690 A 03 S 07690 A 03 S 07690 A 03 S 07690 D Klebestreifen benutzen E Use adhesive tape F Utiliser le papier...

Отзывы: