


© Copyright 2019 TRENDnet. All Rights Reserved.
49
TRENDnet User’s Guide
TWG-431BR
Setting up the L2TP VPN server with IPsec encryption (PSK)
1. Log into your router management page (see “
Access your router management page
on page 7).
2. Click on
System
and click
L2TP Server Setup
.
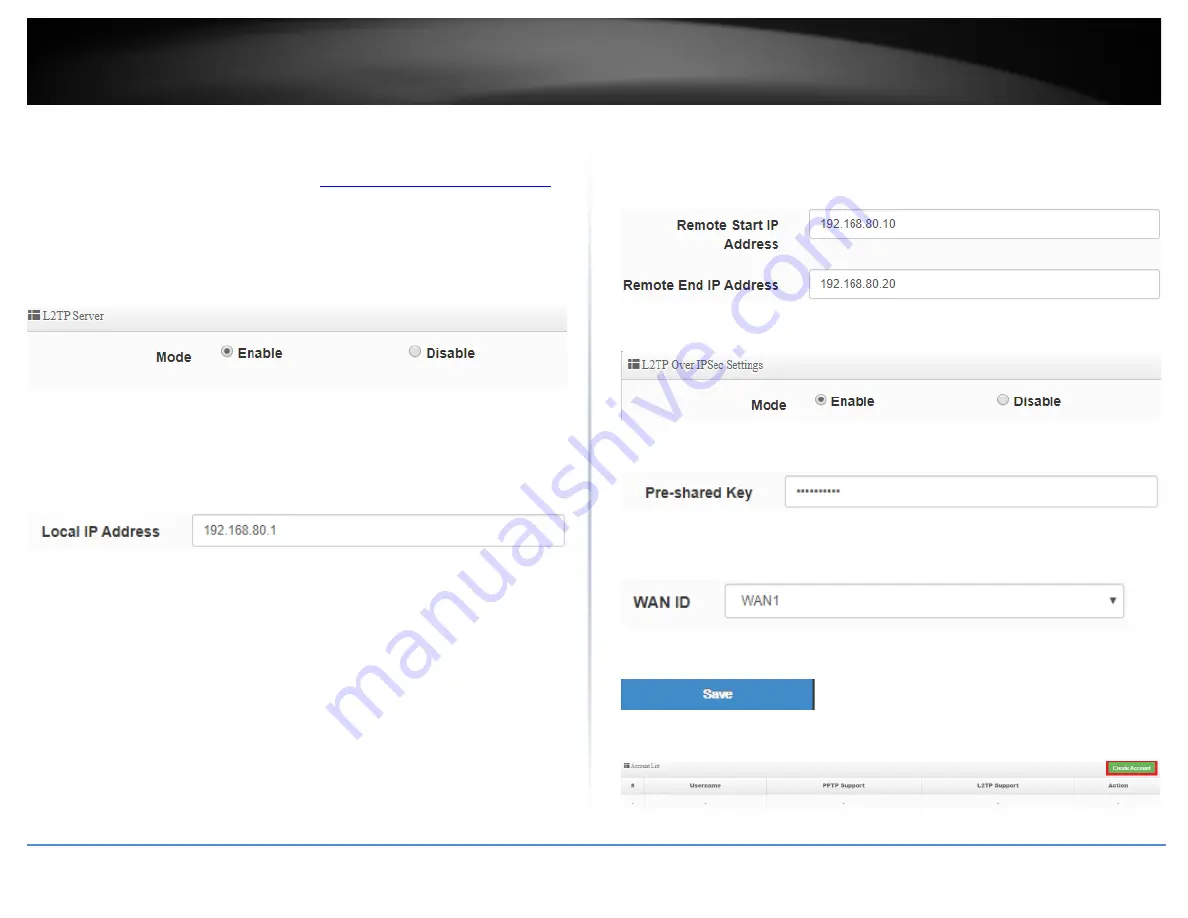
3. For the Mode, select the
Enable
option to enable the L2TP server.
4. In the
Local IP Address
field, enter an IP address other than the LAN IP address.
(Default LAN IP: 192.168.10.1) (e.g. 192.168.80.1)
Note:
Entering an IP address different from the LAN IP address as the Local IP of the L2TP
server ensures your L2TP VPN clients are able to access the Internet and the router LAN
network via full tunneling. If the LAN IP address is entered, L2TP VPN clients will be
allowed to access router LAN and not the Internet.
5. In the
Remote Start/End IP Address
fields, enter an IP address range (within the same
Local IP Address subnet range) to assign to L2TP VPN clients.
In this example, we assigned 192.168.80.1 as the Local IP Address for the L2TP server so
we will assign a range such as 192.168.80.10-192.168.80.20.
6. Under L2TP Over IPSec Settings, for the Mode, select
Enable.
7. Enter the
Pre-shared Key
for IPsec encryption.
8. Click the
WAN ID
drop-down list to select the correct WAN interface for the L2TP over
IPsec server.
9. Click
Save
at the bottom.
10. Click on
System
, click on
PPTP/L2TP Account Setup
, and click
Create Account.
Содержание TWG-431BR
Страница 1: ......
Страница 8: ...Copyright 2019 TRENDnet All Rights Reserved TRENDnet User s Guide TWG 431BR 5 Applications...
Страница 93: ......