9
11
UNT-PRC002-GB
Sound power levels
Discharge
Measurement conditions:
Measurements taken in a room adjacent to the room containing the FWD, at the outlet of the rectangular duct (1.5 m
long) fixed to its discharge opening.
Fan
Power level in dB(A), per Hz frequency band
Overall power
Unit
speed
125
250
500
1000
2000
4000
8000
dB(A)
1
55
50
42
37
37
31
30
46
FWD 08
2
57
54
47
40
30
38
40
50
3
58
57
50
42
32
40
43
53
1
57
51
45
42
34
33
28
48
FWD 10
2
58
54
48
45
38
39
35
51
3
60
58
50
48
40
42
39
54
1
57
51
45
42
34
33
28
48
FWD 12
2
58
54
48
45
38
39
35
51
3
60
58
50
48
40
42
39
54
1
56
62
50
48
39
38
36
56
FWD 14
2
61
66
55
53
47
46
45
60
3
63
69
58
56
50
50
49
63
1
57
63
51
49
40
39
37
57
FWD 20
2
61
66
55
53
47
46
45
60
3
63
69
58
56
50
50
49
63
Intake
Measurement conditions:
Measurements taken at the horizontal air intake.
Fan
Power level in dB(A), per Hz frequency band
Overall power
Unit
speed
125
250
500
1000
2000
4000
8000
dB(A)
1
56
55
55
53
46
45
42
57
FWD 08
2
63
62
60
60
53
53
53
64
3
66
65
63
62
56
55
57
67
1
62
58
55
58
51
48
44
61
FWD 10
2
66
63
60
62
56
55
52
66
3
70
67
63
65
59
59
57
69
1
62
58
55
58
51
48
44
61
FWD 12
2
66
63
60
62
56
55
52
66
3
70
67
63
65
59
59
57
69
1
66
65
65
65
57
50
46
68
FWD 14
2
73
72
69
71
64
59
57
74
3
78
76
73
75
69
64
63
78
1
68
72
64
64
56
52
50
69
FWD 20
2
76
76
68
71
65
61
61
75
3
78
79
71
74
69
66
66
78
AH-SVX03C-GB
CAUTION!
Never lift the units by the heat exchanger connections or by any other projections. Do not tilt the fan
module to avoid possible impingement on the dampers.
Sections will be delivered with a base frame equipped with wooden blocks positioned on each corner. To remove
the wooden blocks, the unit must be lifted from the ground, providing access to the screws. Damper movement is
factory-tested. At unit reception, carefully check that dampers move freely. Refer to the "Reception" paragraph if there
is a problem. Trane will not assume responsibility for damper movement after reception of the unit.
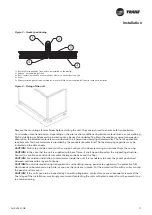
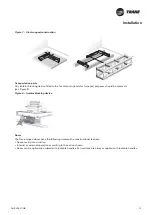
If a section is provided on a base frame without any fork holes or without feet, insert the fork of the lift below the
section lifting it by a lever action. In this case, the bar must only bear against the base frame or profile (see Figure 2).
Use the same instructions to extract forks or belts.
With larger units, the use of several forklifts may be required.
When rigging the unit by crane, follow these guidelines:
1. If lifting holes are provided on the unit base frame, always use sling spreader bars (see Figure 1).
2. If lifting points (eye bolts) are provided, crane belts can be connected directly to them. In this case, after handling
and positioning, replace the eye bolt with bolts to avoid injury (see Figure 1).
3. The minimum rated lifting capacity (vertical) of each sling and spreader bar should be no less than the shipping
weight.
4. The unit must be lifted with care, avoiding shock load by lifting the unit slowly and evenly.
5. All lifting points in one axis of the unit must be used when offloading and moving the unit.
6. Belts are to be provided by the rigger and attached to all lifting points.
CAUTION!
Loading, unloading and removal of single sections have to be carried out by employing means able to
support the unit weight indicated in the technical sheet. Ensure that the belts do not damage the top surface of the
unit structure using proper devices.
When the unit is provided with an outdoor protection roof, reinforcement parts may have been added in the factory
to avoid damage during transport. Remove the reinforcement parts after unloading.
Storage
In case of external storage, units must be protected from adverse weather conditions. Make sure that air ventilation
and recirculation between the protective film wrapping and the section is warrented.
A protective wax can be applied to the unit casing to avoid corrosion due to condensate which can form between the
film and the casing. Remove it using paper and a heptane-based solvent, taking care to not damage the paint and the
profile.
With internal and external storage, the unit must also be protected against damage.
To avoid damage to the bearings, the motor and fans should be rotated once a month.
If the units do not operate for more than 18 months, the grease in the bearings must be changed. For long term
storage, all electrical equipment and accessories delivered separately in a box (filters, humidifiers, etc) and fan belts
must be removed and stored in a dry atmosphere. The unit shall be electrically grounded.
Unit assembly
When selecting and preparing the unit site, follow these guidelines:
1. Ensure that the site can support the total weight of the unit. Unit weight figures only provide total gross weights
and do not include the additional weight for water in coils and humidifiers.
2. Confirm that the foundation of the mounting platform is large enough to include the unit dimensions plus a safe
service access including anti-fall protection.
3. The floor or foundation must be level for correct assembly, coil drainage and condensate flow.
4. Provide adequate lighting for maintenance personnel to perform maintenance duties.
5. Provide sufficient clearance around the unit for correct installation of drain, overflow tubes, and for coil removal.
Clearance should also be allowed around the unit to ensure that correct operation and effective and safe
maintenance can be carried out.
6. If the unit has more that one section, ensure that all the air-handling unit sections are positioned in the correct
order, as indicated in the drawings.
7. Adjoining sections must be perfectly aligned in height and depth. If necessary, minor corrections may be made
using steel sheet pieces as underlay.
Installation


