background image

TD-W8950ND

  150Mbps Wireless N ADSL2+ Modem Router User Guide


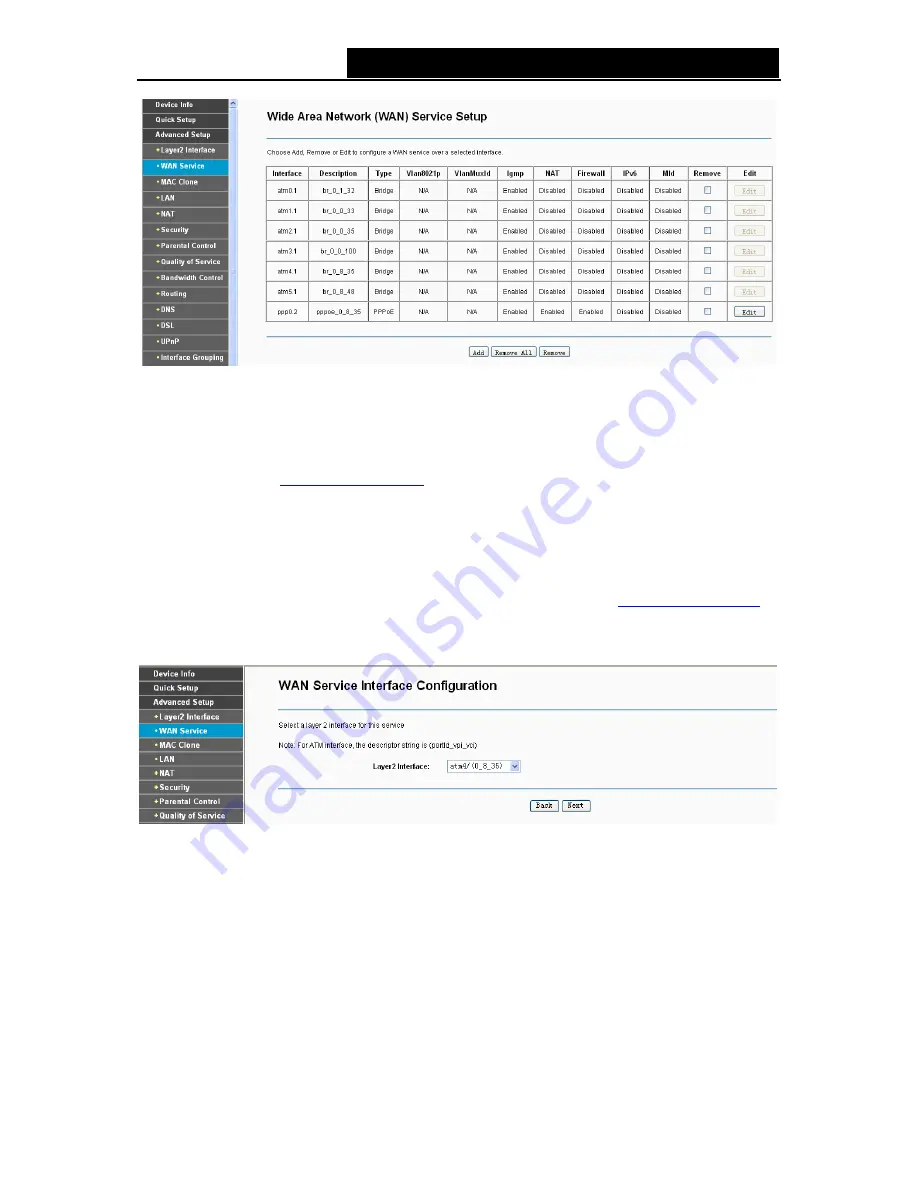
Figure 4-7 

)


Note: 

The following section adopts different VPI, VCI to introduce further configuration for the different 
connection types, if you need to change the configuration of ATM PVC (VPI/VCI), you should go to 
the previous section (

4.4.1 Layer2 Interface

) to configure them again. 

4.4.2.1  ATM-EoA-PPPoE 

If your ISP provides a

 PPPoE

 connection and you need to use an ATM Interface, follow the steps 

below to add a WAN service over a selected ATM interface: 

1. Add 

new

 ATM interface and select 

EoA

 option for DSL Link Type (

4.4.1.1 ATM interface

).  

2. Click 

the 

Add

 button on the screen Figure 4-7 and you will enter the next screen as shown in 

Figure 4-8. Click 

Next


Figure 4-8 

3. Select 

the 

WAN service type

 in Figure 4-9. If your ISP provides a PPPoE connection, select


PPPoE

 option. You can create a service name for the 

Service Description

 or leave it the 

default name. Click 

Next

22 

Содержание TD-W8950ND

Страница 1: ...TD W8950ND 150Mbps Wireless N ADSL2 Modem Router Rev 2 0 0 1910010793...

Страница 2: ...are trademarks or registered trademarks of their respective holders No part of the specifications may be reproduced in any form or by any means or used to make any derivative such as translation tran...

Страница 3: ...radio TV technician for help This device complies with part 15 of the FCC Rules Operation is subject to the following two conditions 1 This device may not cause harmful interference 2 This device mus...

Страница 4: ...lowing two conditions 1 This device may not cause interference and 2 This device must accept any interference including interference that may cause undesired operation of the device Cet appareil est c...

Страница 5: ...nnect the product or the power adapter from the power source z Don t disassemble the product or make repairs yourself You run the risk of electric shock and voiding the limited warranty If you need se...

Страница 6: ...o the product within the scope of Council Directives Directives 1999 5 EC Directives 2004 108 EC Directives 2006 95 EC Directives 1999 519 EC Directives 2011 65 EU The above product is in conformity w...

Страница 7: ...s 7 2 3 Connecting the Modem Router 7 Chapter 3 Quick Installation Guide 9 3 1 Configuring the PC 9 3 2 Quick Installation Guide 12 Chapter 4 Configuring the Modem Router 17 4 1 Login 17 4 2 Device In...

Страница 8: ...5 Advanced 79 4 5 6 Station info 80 4 6 Diagnostics 81 4 7 Management 81 4 7 1 Settings 81 4 7 2 System Log 84 4 7 3 SNMP Agent 85 4 7 4 TR 069 client 86 4 7 5 Internet Time 87 4 7 6 Access Control 88...

Страница 9: ...dapter for TD W8950ND 150Mbps Wireless N ADSL2 Modem Router Quick Installation Guide One RJ45 cable Two RJ11 cables One ADSL splitter One Resource CD for TD W8950ND 150Mbps Wireless N ADSL2 Modem Rout...

Страница 10: ...for handling multiple data streams at the same time which ensures your network stable and smooth The performance of this 802 11n wireless modem router will give you the unexpected networking experienc...

Страница 11: ...PA2 WPA PSK WPA2 PSK data security TKIP AES encryption security Provides 64 128 bit WEP encryption security and wireless LAN ACL Access Control List Adopts Advanced DMT modulation and demodulation tec...

Страница 12: ...data over the wireless network WLAN Off Wireless function is disabled On A wireless device has been successfully added to the network by WPS function Flash WPS handshaking is in process and will conti...

Страница 13: ...are connected and RESET button are located on the back panel Figure 1 2 ADSL Connect to the Modem Port of Splitter or to the telephone line LAN4 WAN LAN3 LAN2 LAN1 Through these ports you can connect...

Страница 14: ...nd hold the RESET button for at least 5 seconds And the modem router will reboot to its factory default settings WPS The switch for the WPS function For details please refer to 4 5 2 1 WPS Setup ON OF...

Страница 15: ...out the power plug and keep your hands dry 1 Locate an optimum location for the modem router The best place is usually at the center of your wireless network 2 Adjust the direction of the antenna Nor...

Страница 16: ...TD W8950ND 150Mbps Wireless N ADSL2 Modem Router User Guide Figure 2 1 8...

Страница 17: ...directly connect your PC to theTD W8950ND or connect your adapter to a Hub Switch which has connected to the modem router you need to configure your PC s IP address Follow the steps below to configur...

Страница 18: ...TD W8950ND 150Mbps Wireless N ADSL2 Modem Router User Guide Figure 3 2 Step 3 Select General tab highlight Internet Protocol TCP IP and then click the Properties button Figure 3 3 10...

Страница 19: ...ain DNS server address automatically in the screen above Now you can run the Ping command in the command prompt to verify the network connection Please click the Start menu on your desktop select run...

Страница 20: ...s IP address must be within the range of 192 168 1 2 192 168 1 254 3 2 Quick Installation Guide With a Web based utility it is easy to configure and manage the TD W8950ND 150Mbps Wireless N ADSL2 Mode...

Страница 21: ...s Connections LAN Settings in the screen that appears cancel the Using Proxy checkbox and click OK to finish it 2 After your successful login you will see the Login screen as shown in Figure 3 9 Click...

Страница 22: ...E as an example Enter the PPP Username and PPP Password provided by your ISP and then click Next Figure 3 11 z Ethernet WAN The modem router supports two WAN Link types PPPoE and IPoE Choose the WAN L...

Страница 23: ...your wireless network and create your own password in this page The default wireless network name is TP LINK_XXXXXX and the default wireless password the same as the PIN code is printed on the bottom...

Страница 24: ...TD W8950ND 150Mbps Wireless N ADSL2 Modem Router User Guide Figure 3 14 16...

Страница 25: ...menu there are six submenus under the main menu Summary WAN Statistics Route ARP and DHCP This Device Info section mainly introduces the elementary information about the modem router and its current...

Страница 26: ...e Advanced Setup there are many submenus under the main menu Among the submenus Layer2 Interface WAN Service LAN etc are default menus while NAT IP MAC filtering of the Security Quality of Service and...

Страница 27: ...I Virtual Channel Identifier settings and the DSL Interface with RJ11 connector Figure 2 1 ETH Interface Configure the modem router to access Internet as an Ethernet user ISP provides you Broadband In...

Страница 28: ...your ISP in the drop down list The default type is UBR Without PCR Note Enabling packet level QoS for PVC improves performance for selected classes of applications While QoS consumes system resources...

Страница 29: ...corresponding interface will be deleted in the table Note One ETH is allowed to configure as the layer 2 WAN Interface 4 4 2 WAN Service Choose Advanced Setup WAN Service and you will see the WAN Por...

Страница 30: ...r ISP provides a PPPoE connection and you need to use an ATM Interface follow the steps below to add a WAN service over a selected ATM interface 1 Add a new ATM interface and select EoA option for DSL...

Страница 31: ...escription on the previous screen Authentication Method Select the Authentication Method from the drop down list the default method is AUTO and you can leave it as a default setting Note If you are no...

Страница 32: ...v4 Address If your ISP gives you a static IPv4 address select this option to enter it manually Use Static IPv6 Address If your ISP gives you a static IPv6 address select this option to enter it manual...

Страница 33: ...Address You can select this option to manually enter the primary and or optional secondary DNS server IP addresses provided by your ISP Note If only single PVC with IPoA is configured you must enter...

Страница 34: ...new ATM interface and select EoA option for DSL Link Type 4 4 1 1 ATM interface 2 Click the Add button on the screen as shown Figure 4 7 Select WAN Service Interface over ATM PVC on the next screen as...

Страница 35: ...second Alternatively the device may use IAID value 1 for the virtual circuit corresponding to the first connection object in the data model and value 2 for the second connection object in the data mod...

Страница 36: ...mote configuration for client devices such as the modem router If you are unsure check with your ISP Note If you select the Enable NAT checkbox the NAT menu will be added to the Web based Utility We w...

Страница 37: ...nterface follow the steps below to add a WAN service over a selected ATM interface 1 Add a new ATM interface and select PPPoA option for DSL Link Type see 4 4 1 1 ATM interface 2 Click the Add button...

Страница 38: ...ce 2 Click the Add button on the screen Figure 4 7 and the next configuration is similar to IPoE over ATM interface see section 4 4 2 2 ATM EoA IPoE 4 4 2 8 ETH Bridge If you want to adopt the Bridge...

Страница 39: ...an configure the modem router s IP Address and Subnet Mask for LAN Interface IP Address Enter the modem router s local IP Address then you can access to the Web based Utility via the IP Address the de...

Страница 40: ...sed Time hour The L be allowed connection to the modem router with their current dynamic IP address Enter the amount of time in hours then the user will be leased this dynamic IP address After the dyn...

Страница 41: ...atic is chosen please enter an IPv6 prefix IPv6 LAN Applications Select a type to assign IPv6 addresses to the computers in your LAN DHCPv6 Server and RADVD are provided For DHCPv6 Server 1 If Statele...

Страница 42: ...rk WAN Setup or when you select Enable NAT for the of IPv6 is forwa 4 4 5 NAT NAT Netw address for Note When you select PPPoA or PPPoE for the type of IPoA and IPoE connection 4 4 2 WAN Service you wi...

Страница 43: ...ase number of Internal Ports You can type a service port or ort End The end number of Internal Ports You can type a service port or leave providing the service application and then click the Remove in...

Страница 44: ...you select the service from the drop down list the External Port Start External Port End Internal Port Start Internal Port End and the Protocol will be added in the table automatically You only need t...

Страница 45: ...The WAN Service Interface setting the Port Triggering Add Click the button to add a new entry Remove Select the check box in the table shown in Figure 4 27 and then click the Remove button then the c...

Страница 46: ...ed Setup NAT DMZ Host you can set up DMZ Host on the screen shown in Figure 4 29 The DMZ host feature can make a local host be exposed to the Internet for a special purpose service such as online gami...

Страница 47: ...dministrators to control user s access to the Internet which is based on user s IP The IP address filtering includes Outgoing and Incoming the detailed descriptions are provided below IP Filtering Out...

Страница 48: ...ave Apply to save this entry ination IP Address blank Port blank it suggests that all Source Ports vanced Setup Security MAC Filtering you can configure MAC Filtering rules n as shown in Figure 4 34 T...

Страница 49: ...ocked except those matching with any of the specified rules in the preceding table Add Click the Add button and then you can add a new MAC Filter in the next screen shown in Figure 4 34 Remove Select...

Страница 50: ...ld by restricting the time of surfing URL Filter limits every computer connected to the router to 4 34 4 4 7 Parental Control screen as shown in Figure 4 36 access certain websites These two features...

Страница 51: ...d End Blocking Time in the text box separately and then the device controlled will then be unable to connect to the internet during that time 6 Click Save Apply to save this entry and then you will se...

Страница 52: ...n the screen shown in Figure 4 41 QoS helps to prioritize data as it enters your router By attaching special identification marks or headers to incoming packets QoS determines which queue the packets...

Страница 53: ...set up virtual servers on the screen below Figure 4 42 Click the Add button in Figure 4 42 and you can configure the QoS queue entry on the next screen as shown in Figure 4 43 Figure 4 43 Name Set a...

Страница 54: ...queue relative to others 2 The queue entry configured here will be used by the classifier to place ingress packets appropriately 4 4 8 2 QoS Classification This section will guide you to create a tra...

Страница 55: ...n in Figure 4 46 This page allows you to enable this function and to configure the value of Total Upstream Downstream Bandwidth Figure 4 46 Enable Bandwidth Control Check this box to enable the Bandwi...

Страница 56: ...list to enable or disable the rule IP Range Enter a single IP address or a range of IP addresses Port Range Enter a single port or a range of ports Protocol Select a protocol type from the drop down...

Страница 57: ...ocated to the rule with hypo high priority For rules with the same priority the surplus bandwidth is allocated to them according to their min upstream downstream rate The greater a rule s min upstream...

Страница 58: ...n in Figure 4 51 and you will see the screen as shown in Figure 4 52 Figure 4 52 2 Enter the following data IP Version Select the version of IP Destination IP Address The Destination IP Address is the...

Страница 59: ...nformation Protocol screen which allows you to configure the RIP shown in Figure 4 53 Figure 4 53 Note RIP cannot be configured on the WAN Interface which has NAT enabled such as PPPoE To activate RIP...

Страница 60: ...er will accept automatically the first received DNS assignment from the selected configured WAN interface during the connection establishment For single PVC with IPoA static IPoE protocol please selec...

Страница 61: ...your modem router to be more easily accessed from various locations on the Internet Figure 4 56 To add a DDNS entry 1 Click the Add button pop up Figure 4 56 and then you will set the DDNS in the nex...

Страница 62: ...otocol on the screen UPnP Universal Plug and Play is a distributed open networking standard that uses TCP IP for simple peer to peer network connectivity between devices An UPnP device can dynamically...

Страница 63: ...dependent network Figure 4 60 To support this feature you must create mapping groups with appropriate LAN and WAN interfaces using the Add button The Remove button will remove the grouping and add the...

Страница 64: ...ailable interface list and add it to the grouped interface list using the arrow buttons to create the required mapping of the ports Note These clients may obtain public IP addresses 5 Click Save Apply...

Страница 65: ...up to 10 VPN tunnels simultaneously Click Add New Connection in Figure 4 62 and then you will enter the screen shown in Figure 4 63 Figure 4 63 IPSec Connection Name Enter a name for your VPN Remote...

Страница 66: ...or VPN Enter the IP address of the Remote LAN For example Input 192 168 2 1 in Device1 Input 192 168 1 1 in Device2 IP Subnetmask Enter the subnetmask of the remote LAN For example Input 255 255 255 0...

Страница 67: ...ting the identities of the security firewall in the clear When using aggressive mode some configuration parameters such as Diffie Hellman groups and PFS can not be negotiated resulting in a greater im...

Страница 68: ...figure the IGMP protocol on the screen Figure 4 64 Click Apply Save to save your settings 4 5 Wireless Choose Wireless there are six submenus to configure Wireless LAN settings Click any of them and y...

Страница 69: ...te with you can select this option to avoided being surveyed Clients Isolation Select this option to enable AP isolation function so that stations associated to the AP will not be able to communicate...

Страница 70: ...vailable only when OPEN WPA2 PSK or Mixed WPA2 WPA PSK mode is configured 2 To build a successful connection by WPS you should also do the corresponding configuration of the new device for WPS functio...

Страница 71: ...Hardware push button Step 1 Press the WPS button on the back panel of the modem router Step 2 Press and hold the WPS button of the adapter directly for 2 or 3 seconds Step 3 Wait for a while until th...

Страница 72: ...Figure 4 68 Method Two Step 1 Press the WPS button on the back panel of the modem router Step 2 For the configuration of the wireless adapter please choose Push the button on my access point in the c...

Страница 73: ...4 69 Step 3 Wait for a while until the next screen appears Click Finish to complete the WPS configuration Figure 4 70 II By PIN If the new device supports Quick Security Setup and the PIN method you...

Страница 74: ...PIN code of the wireless adapter in the field under as shown below Then click Add Enrollee Figure 4 71 Note The PIN code of the adapter is always displayed on the WPS configuration screen Step 2 For...

Страница 75: ...fault PIN code of this adapter is 16952898 as the preceding figure shown Method Two Enter the PIN of my modem router into the wireless adapter Step 1 Get the Current PIN code generated by the modem ro...

Страница 76: ...router To unlock the current PIN code click the Enable Modem Router s PIN button or restore the modem router to its factory default settings Method two Enter the PIN of my modem router into the wirele...

Страница 77: ...changes to these wireless settings 1 WEP WEP is a basic encryption method offering two levels of encryption 64 bit and 128 bit encryption To configure the WEP encryption there are two ways Keep the Ne...

Страница 78: ...nsmission key number Network Key 1 4 If you want to manually enter the WEP keys then enter them in the network Key 1 4 fields Configure WEP Settings 1 Select Shared good from the Network Authenticatio...

Страница 79: ...lick Save Apply to save the new configuration Figure 4 78 Note We use Network Authentication Shared good Encryption Strength 64 bit Current Network Key 1 and enter 10 hexadecimal digits 1234567890 in...

Страница 80: ...ort of the RADIUS server The default number is 1812 RADIUS key The password of the RADIUS Server WPA Encryption Select the encryption you want to use TKIP or AES AES is an encryption method stronger t...

Страница 81: ...outer and your other network devices It must have 8 63 ASCII characters or 8 64 Hexadecimal digits Click here to display Click it to show you the WPA Pre Shared Key Configure WPA Personal settings 1 S...

Страница 82: ...e 4 83 will pop up and it shows the password you have set In addition it won t show the blank characters in both ends of the password phrase Figure 4 83 4 WPA2 Enterprise To configure WPA2 Enterprise...

Страница 83: ...hile leave it blank or enter 0 to disable it 5 WPA2 Personal To configure WPA2 Personal settings select the WPA2 Personal option from the drop down list The menu will change to offer the appropriate s...

Страница 84: ...PA Personal settings select the Mixed WPA2 WPA Personal option from the drop down list The menu will change to offer the appropriate settings The steps of this setting are the same with WPA PSK Figure...

Страница 85: ...ction that block wireless access from the devices listed on this screen Add Click this button to add the MAC Address Remove Select the item of the MAC Address and click this button to remove it When y...

Страница 86: ...re remote LANs Bridge Restrict Disabled Select this option to disables wireless bridge restriction that any wireless bridge will be granted access Enabled Select this option as shown below to enables...

Страница 87: ...This field determines which operating frequency will be used It is not necessary to change the wireless channel unless you notice interference problems with another nearby access point Mode In the dr...

Страница 88: ...ld informing clients of the next window for listening to broadcast and multicast messages The countdown unit is measured by the amounts of beacon frames received When the modem router has buffered bro...

Страница 89: ...ion and ADSL Synchronization You can refer to the Help menu to get more information about the corresponding test Figure 4 95 4 7 Management Choose Management there are eight submenus under the main me...

Страница 90: ...97 allows you to save the current configuration of the modem router as a backup file Figure 4 97 To back up the modem router s current settings 1 Click the Export Settings button on the preceding scre...

Страница 91: ...Figure 4 100 To update the modem router s settings 1 Click the Browse button to locate the update file for the device and you can also enter the exact path to the Setting file in the text box 2 After...

Страница 92: ...o the factory defaults and then follow the on screen instructions to complete it Account and Password The default account name and its password are both admin The default IP Address 192 168 1 1 The de...

Страница 93: ...ll be sent to the local memory and the remote system log server Server IP Address Type the address of the server you want to record the events Server UDP Port Type the UDP Port of the server 4 7 3 SNM...

Страница 94: ...Community This field allows you to specify the SNMP Community string which provides read and write access to the modem router that the community has the authority to read and change the device configu...

Страница 95: ...your ISP Note If you want to log on the ACS you must own the ACS User Name and ACS Password WAN Interface used by TR 069 Client Please select the WAN Interface from the drop down list to perform this...

Страница 96: ...rm Password should be the same as the New Password 4 Click Save Apply to make your change take effect Note 1 Access to your DSL Modem Router is controlled through three user accounts admin support and...

Страница 97: ...ade file from the TP LINK website http www tp link com 2 Click Browse to view the folders and select the image file or enter the exact path to the image file location in the text box 3 Click the Updat...

Страница 98: ...10 which allows you to reboot the modem router Figure 4 110 Note 1 After you clicked the Reboot button please wait for a while before reopening your web browser 2 Do not turn off the modem router or p...

Страница 99: ...Note If you are a Cable user please configure the modem router following the above steps 2 How do I configure the modem router to access Internet by Ethernet users Log in to the modem router and confi...

Страница 100: ...outer click the Advanced Setup NAT menu on the left of your browser and click DMZ Host submenu On the DMZ page type your IP address into the DMZ Host IP Address field using 192 168 1 222 as an example...

Страница 101: ...ort 80 will interfere with the WEB management port 80 on the modem router you will be prompt to change the WEB management port number to avoid interference 5 The wireless stations cannot connect to th...

Страница 102: ...ta Go to Start Settings Control Panel Click View network status and tasks View status Properties and double click Internet Protocol Version 4 TCP IPv4 Select Obtain an IP address automatically choose...

Страница 103: ...category 5 5e cable maximum 100m EIA TIA 568 100 STP maximum 100m LAN1 4 WLAN ADSL LED Power Internet WPS Safety Emissions FCC CE Wireless Frequency Band 2 4 2 4835GHz Radio Data Rate 11n up to 150Mb...

Страница 104: ...intain a connection at as much as three times the transmission distance of traditional 802 11b and 802 11g products for a coverage area that is up to nine times greater A traditional 802 11b and 802 1...

Страница 105: ...the resources of a network from users from other networks Gateway A device that interconnects networks with different incompatible communications protocols IEEE 802 11b The IEEE 802 11b standard spec...

Страница 106: ...l In User Service A protocol that uses an authentication server to control network access RJ45 Registered Jack 45 An Ethernet connector that holds up to eight wires Router A networking device that con...

Страница 107: ...e with a newer version VLAN Virtual Local Air Network Logical subgroups that constitute a Local Area Network LAN This is done in software rather than defining a hardware solution VLAN ID 0 4095 Indica...

Страница 108: ...20 360 E mail support de tp link com Fee 0 14 EUR min from the German fixed phone network and up to 0 42 EUR min from mobile phone Service time Monday to Friday 09 00 to 12 30 and 13 30 to 17 30 GMT 1...

Отзывы: