background image

English

MATERIAL TYPES:

Use materials recommended for use with a spray 

gun.

Preparation of the spray material

Total Painter can be used to spray undiluted or 

slightly diluted paint, lacquer and varnish.

If the paint needs to be diluted, start with a dilution 

of 10%. Do this by filling a 1-litre container with the 

paint to be used. The viscosity cup holds one decili-

tre, so cover the hole and fill it with the required thin-

ner. Add the thinner to the paint and stir thoroughly. 

Then measure the viscosity using the guidelines 

provided below. If the paint needs to be thinned fur-

ther, dilute it by a further 5% (half the capacity of 

the viscosity cup) and measure the viscosity again. 

If the paint has still not reached the recommended 

viscosity, repeat the previous step until the right vis-

cosity is obtained.

This spray gun can be used with products with a vis-

cosity of 25 DIN/sec to a maximum of 50 DIN/sec. 

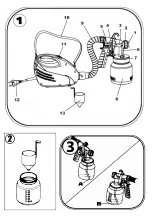
Submerge the viscosity cup in the material and fill it. 

Then time how long it takes for the cup to empty (Fi-

gure 2). This time is known as “DIN/sec”. Apart from 

these guidelines, you should also see the material 

manufacturer’s instructions, as a guide to determine 

whether the material requires further thinning. 

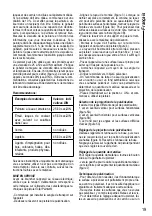
Guidelines:

Example of material

Approximate 

DIN 

values

Water-based paint and 

emulsions

25-50 DIN/sec

Gloss paint, water-soluble 

or solvent-based coloured 

lacquers

45-50 DIN/sec

Varnishes

undiluted

Primers

45-50 DIN/sec

Wood impregnators, 

stains, oils, disinfectants, 

phytosanitary products

undiluted

Follow the instructions provided in this manual only 

if the material you wish to use does not have its own 

instructions for use. Otherwise, follow the instruc-

tions provided with the material.

GETTING STARTED

Before connecting the device to the mains power 

supply, please ensure that the mains voltage mat-

ches the data shown on the Total Painter® product 

rating plate.

- Begin by attaching the carry strap to the device. 

- Unscrew the tank from the spray gun.

- Align the fluid hose (Figure 3). With the fluid hose in 

the correct position, the contents of the tank can be 

sprayed with almost no residue. To paint or for work 

on  horizontal  objects,  bend  the  fluid  hose  forward 

(Figure 3A). For work on objects above head height, 

bend the fluid hose backward (Figure 3B).  

- Place the tank on a paper-covered surface and fill 

with the spray material.

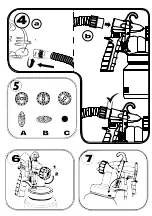
- Attach the flexible air hose to the connector on the 

device and the spray-gun handle (Figure 4).

- The flexible air hose should be connected to the 

spray gun. Make sure it is firmly attached. The hose 

does not have to be completely inserted, but it must 

be firmly in place.

- Place the device on a clean, flat surface to prevent 

it from sucking in dust, etc.

- Hang the device from the carry strap.

- Aim the spray gun at the object to be sprayed.

- Carry out a test on a piece of cardboard or on a 

surface similar to the one to be sprayed. This will 

allow you to determine the amount of material and 

the type of spray.

- Activate the “ON/OFF” button and start using Total 

Painter®.

Choosing the Spray Pattern

The spray has three different patterns: 

1. Vertical fan, recommended for horizontal surfaces 

(Figure 5A)

2. Horizontal fan, recommended for vertical surfaces 

(Figure 5B)

3.  Round  stream,  recommended  for  corners  and 

hard-to-access surfaces (Figure 5C)

Adjusting the Spray

With the nozzle adjuster ring slightly loosened, turn 

the air cap to the desired spray position (Figure 6). 

Then tighten the nozzle adjuster ring again. 

Never press the spray-gun trigger while adjusting 

the air cap. 

Adjusting the Material Flow 

To  adjust  the  material  flow,  turn  the  adjustment 

screw on the spray-gun trigger:

- for less material, turn to the left. 

9

Содержание VBRVACIND0001

Страница 1: ...International patents pending All imitations will be prosecuted TOTAL PAINTER is a registered EU CTM trade mark...

Страница 2: ......

Страница 3: ...LLGEMEINE SICHERHEITSHINWEISE 22 B DETAILS ZU DEN TEILEN 23 C INBETRIEBNAHME 24 D BETRIEBSUNTERBRECHUNG 25 E AUSSERBETRIEBSETZUNG 25 F WARTUNG 25 G LAGERUNG 25 H ZUSAMMENBAU 25 I TECHNISCHE DATEN 26 I...

Страница 4: ...3...

Страница 5: ......

Страница 6: ...5 6...

Страница 7: ...d body contact with earthed or grounded surfaces such as pipes radiators ranges and refrigerators There is an increased risk of electric shock if your body is earthed or grounded Do not expose power t...

Страница 8: ...binding of moving parts breakage of parts and any other condition that may affect the power tool s operation If damaged have the power tool repaired before use Many accidents are caused by poorly mai...

Страница 9: ...fore connecting the device to the mains power supply please ensure that the mains voltage mat ches the data shown on the Total Painter product rating plate Begin by attaching the carry strap to the de...

Страница 10: ...h solvent or water and screw it to the spray gun Only solvents with a flash point above 21 C can be used Reassemble the spray gun Figure 9 Plug the power cord into the mains turn on the device and spr...

Страница 11: ...rantees Act 1993 both of which provide protection for consumers There is no express warranty for this product in Australia or New Zealand The above pa ragraph refers to other countries ATTENTION Disp...

Страница 12: ...ca debe coincidir con la toma Bajo ninguna circuns tancia deber modificarse el enchufe original Tampoco podr n utilizarse adaptadores con los equipos con conexi n a tierra Los enchufes originales dism...

Страница 13: ...funcionamiento de la herramienta el ctrica Si observa alg n da o h galo reparar antes de usar la herramienta Muchos accidentes est n causados por la falta de mantenimiento de la he rramienta Utilice l...

Страница 14: ...datos indicados en la etiqueta de caracter s ticas t cnicas del Total Painter Empiece por instalar la correa de transporte en el aparato Desenroscar el dep sito de la pistola de pulveri zaci n Alinea...

Страница 15: ...21 C Volver a montar la pistola figura 9 Enchufar la clavija de red encender el equipo y pulverizar disolvente o agua en un recipiente o un pa o Apagar el equipo y extraer la clavija de red Desenrosc...

Страница 16: ...de este producto de la misma for ma que lo har a con los residuos generales de su hogar Debe hacerlo seg n las normativas locales correspondientes Los productos el ctricos y electr nicos contienen su...

Страница 17: ...iche de l outil lectrique doit co ncider avec la prise de courant La prise originale ne doit en aucun cas tre modifi e Il ne faudra pas non plus utiliser d adaptateur avec les appareils reli s la terr...

Страница 18: ...tionnement de l outil lectrique Si vous observez le moindre dommage faites le r parer avant d utiliser l outil Le manque d entretien de l outil est l origine de nombreux accidents Utilisez l outil lec...

Страница 19: ...peindre des surfaces horizontales tournez le tuyau de mont e vers l avant figure 3A Pour pulv riser des surfaces situ es au dessus de votre t te tournez le tuyau de mont e vers l arri re figure 3B Pl...

Страница 20: ...vissez le couvercle de la vanne figure 9A 13 et retirez la membrane figure 9A 14 Nettoyez soigneusement toutes les pi ces D vissez l anneau de la buse puis retirez le cache d air et la buse Nettoyez...

Страница 21: ...ion locale en vigueur en mati re de collecte de d chets Les produits lectriques et lectroniques contiennent des substances dangereuses qui ont des effets n fastes sur l environnement ou sur la sant hu...

Страница 22: ...er darf in keiner Weise ver ndert werden Verwenden Sie keine Adapterstecker gemeinsam mit schutzgeer deten Elektrowerkzeugen Unver nderte Stecker verringern das Risiko eines elektrischen Schlages Verm...

Страница 23: ...em Einsatz des Ger tes reparieren Viele Unf lle haben ihre Ursache in schlecht gewarteten Elektrowerkzeugen Verwenden Sie Elektrowerkzeug Zubeh r Ein satzwerkzeuge usw entsprechend diesen Anwei sungen...

Страница 24: ...Befolgen Sie sonst die mit dem Material ge lieferten Anweisungen INBETRIEBNAHME Bevor Sie das Ger t ans Netz anschlie en versichern Sie sich dass die Netzspannung mit den Angaben auf dem Typenschild...

Страница 25: ...rauben Restliches Beschich tungsmaterial wieder in die Verpackung entleeren Farbbeh lter und Steigrohr mit einem Pinsel s u bern L sungsmittel oder Wasser in den Beh lter f llen und letzteren festschr...

Страница 26: ...gung dieser Art von Produkten informieren m ssen Entsorgen Sie dieses Produkt nicht mit Ihrem Haus m ll Sie m ssen bei der Entsorgung die vor Ort geltenden Bestimmungen beachten Elektrische und elektr...

Страница 27: ...e se il corpo dell utente ha contatto a terra La spina dell apparecchio elettrico deve coin cidere con la presa La spina originale non deve essere modificata per nessun motivo Inoltre non si possono u...

Страница 28: ...vi siano parti rotte e che le condizioni generali dell apparecchio elettrico non possano provoca re un mal funzionamento dello stesso Nel caso in cui venissero riscontrati eventuali danni ripa rare l...

Страница 29: ...a le caratteristi che tecniche di Total Painter Fissare la tracolla per il trasporto nell apparecchio Svitare il serbatoio della pistola a spruzzo Allineare il tubo di salita figura 3 Con il tubo di s...

Страница 30: ...la pistola Svitare il serbatoio Versare il resto del materiale nel contenitore originale Pulire con un pennello il serbatoio e il tubo di salita Riempire di solvente o acqua il serbatoio ed avvi tare...

Страница 31: ...denti o manomissioni DISMISSIONE E ROTTAMAZIONE DELL APPARECCHIO Il simbolo di un cassonetto su ruote barra to indica che necessario conoscere e rispettare le normative e le ordinanze muni cipali spec...

Страница 32: ...trica mais elevado se o seu corpo estiver em contacto com o ch o As fichas das ferramentas el tricas devem ser adequadas s tomadas s quais v o ser ligadas Nunca se deve modificar uma ficha original N...

Страница 33: ...mentas el tricas em bom estado Verifique se as pe as m veis est o bem montadas e se existem pe as partidas ou deterio radas assim como tudo aquilo que poderia afetar o funcionamento da ferramenta el t...

Страница 34: ...caracter sticas t cnicas da Total Painter Comece por colocar a correia de transporte no aparelho Desenrosque o dep sito da pistola de pulveriza o Alinhe o tubo de subida figura 3 Com o tubo de subida...

Страница 35: ...r com um pincel o dep sito e o tubo de su bida Encher o dep sito com solvente ou com gua e enrosc lo Utilizar unicamente solventes com um ponto de igni o superior a 21 C Voltar a montar a pistola figu...

Страница 36: ...relativas elimina o deste tipo de produtos N o se desfa a deste produto da mesma forma que o faz habitualmente com os res duos gerais da sua casa A elimina o do produto deve ser realizada de acordo co...

Страница 37: ...t elektrisch gereedschap moet met het stopcontact overeenkomen Onder geen enkele voorwaarde mag de oorspronkelijke ste kker worden gewijzigd Ook mogen er geen adap ters bij geaarde apparaten worden ge...

Страница 38: ...oleer of bewegende delen goed zijn afgesteld er geen onderdelen kapot zijn of andere omstandigheden bestaan die een slechte werking van het elektrisch gereedschap kunnen veroorzaken Als u beschadiging...

Страница 39: ...instructies zijn bijgevoegd Gebruik anders de instructies die bij het materiaal zijn meegeleverd INBEDRIJFSTELLING Alvorens het apparaat op het lichtnet aan te sluiten dient u erop te letten of de sp...

Страница 40: ...raai het reservoir los Verwijder het materiaal dat overgebleven is en giet het terug in de verpakking Maak met een borsteltje het reservoir en de stijgbuis schoon Vul het reservoir met oplosmiddel of...

Страница 41: ...atig gebruik abnormale slijtage ongelukken of onjuiste behandeling LET OP AFVOEREN Het symbool van een container op wielen met een kruis erdoor geeft aan dat u zich dient te informeren over hoe dit so...

Страница 42: ......

Страница 43: ......

Страница 44: ......

Отзывы: