Reference Information
Toshiba
2-9
25
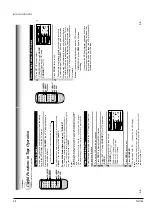
RECORDING
Timer Pr
ogramming Pr
ocedur
e
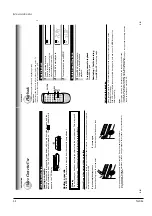
Example
:
T
o
record cable channel 25 in the SP
tape speed from
9:30 p.m. until 10:00 p.m. on
August 30.
T
oday is
August 25.
1
Load a cassette with the safety tab attached.
2
Press
PROG
. to display the MENU screen.
3
Select
“PROGRAM
” using
CURSOR
( )
or
( )
, and press
ENTER
.
4
Move to the next using
CURSOR
( )
, and select the channel number
25 by pressing
number buttons
2
and 5 or using
CURSOR (
▲
) or
(
▼
).
•
T
o
record a cable program from the connected cable box:
Enter the cable channel number using
CURSOR (
▲
), (
▼
) or by
pressing
number buttons.
If your cable box is not remote-controllable, choose the desired
channel (1 to 125) on the cable box.
T
o
make corrections:
Press
CURSOR ( )
to move back to the item, or
CURSOR ( )
to
forward.
(Continued)
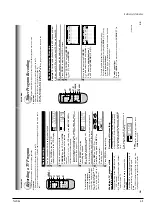
T
imer Program Recording
The programmable timer allows you to record up to 6 different programs over one month.
Preparation
•
Select the video channel (3 or 4) or video input mode on the TV.
•
Make sure that the clock is set correctly (page 15).
•
Store the channels on the VCR (pages 16 and 17).
•
If you record cable channels, finish the cable box set-up (pages 12), and turn on the cable box.
RECORDING
E
n
D : PROG
SET UP
PRESET
PROGRAM
CH DATE O
n
OFF SPD
- - -/-- -:- - -:- - -
- - -/-- -:- - -:- - -
- - -/-- -:- - -:- - -
- - -/-- -:- - -:- - -
- - -/-- -:- - -:- - -
- - -/-- -:- - -:- - -
E
n
D : PROG
SET UP
PRESET
PROGRAM
CH DATE O
n
OFF SPD
- - -/-- -:- - -:- - -
- - -/-- -:- - -:- - -
- - -/-- -:- - -:- - - - - -/-- -:- - -:- - -
- - -/-- -:- - -:- - -
2 5 -/-- -:- - -:- - SLP
▼
▼
▼
▼
▼
CANCEL
3
2,9
10
4
CURSOR
24
W
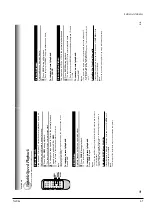
atching a TV pr
ogram while
recording another
1)
While recording, press
TV/VCR
to turn of
f
“VCR
” indicator
.
2)
Choose another channel using the channel
selector on the
TV
.
Skipping unnecessary scenes while
recording
Press
P
AUSE
to stop recording momentarily
.
T
o
resume recording, press
P
AUSE
again.
Note
The VCR automatically shifts to the stop mode if the
recording pause mode continues for 10 minutes.
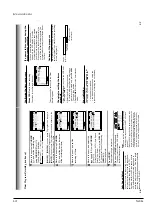
Basic Recording
1
Load a cassette with the safety tab attached.
2
Press
TV/VCR
so that the
“VCR
”
indicator appears in the VCR display
.
3
Select a channel to record with
CHANNEL
on the VCR, or
CH/TRK
or
number buttons
on the remote
control.
If you see
“L1
” or
“L2
” in the VCR display
, press
INPUT SELECT
so
that the channel number appears.
•
If you record cable channels via the cable box, make the output
channel number of the cable box or
“L1
” appear
, depending on your
connection. (See pages 1
1
–
12.)
4
Press
SP/SLP
to select the
recording tape speed.
SP:
Suitable for general recording with
better picture and sound quality
.
SLP:
Suitable for tripling recording time, but with less picture and
sound quality than using the SP tape speed.
5
Press
REC
on the VCR, or
simultaneously press both
REC
on
the remote control.
Recording starts.
6
Press
ST
OP
to stop recording.
Recording off time setting
By setting the recording of
f time, the recording
stops and the VCR is turned of
f automatically
.
While recording, press simultaneously both
REC
on the remote repeatedly to set the desired of
f
time.
Each time you press REC, each half-hour up to
about 4 hours appear cyclically
.
Notes
•
To cancel the recording in progress, press
POWER
on the VCR.
S
L
P
VCR
REC
TIMER
H
ST
S
L
P
S
VCR
REC
L
TIMER
S
S
L
P
VCR
REC
L
TIMER
S
S
L
P
VCR
REC
L
TIMER
Hi-Fi
STEREO
S
L
P
SAP
VCR
REC
L
R
TIMER
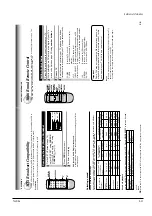
RECORDING
Recording a TV Program
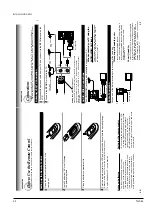
This section explains the basic recording operation.
Preparation
•
Select the video channel (3 or 4) or video input mode on the TV.
•
If you record cable channels via the cable box, finish the cable box set-up (pages 12), and turn on the cable
box.
T
o
record from other
connected equipment
In step
3
, press
INPUT SELECT
to switch the display as follows:
L1:
To record via the LINE IN 1
jacks on the rear panel.
L2:
To record via the LINE IN 2
jacks on the front panel.
TIMER
REC
INPUT SELECT
3
2
6
5
4
Содержание W603C
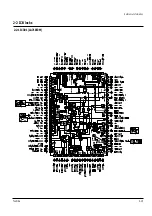
Страница 20: ...Reference Information Toshiba 2 13 2 2 1 IC301 LA71072M 2 2 IC Blocks ...
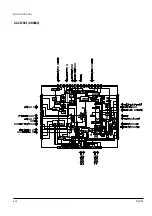
Страница 21: ...Reference Information 2 14 Toshiba 2 2 2 IC501 AN3662 ...
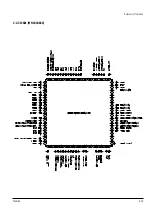
Страница 22: ...Reference Information Toshiba 2 15 2 2 3 IC601 MN101D02X ...
Страница 23: ...Reference Information 2 16 Toshiba MEMO ...
Страница 25: ...Product Specifications 3 2 Toshiba MEMO ...
Страница 56: ...Alignment and Adjustment Toshiba 5 11 Fig 5 21 Main PCB Top View VR501 Location for VR501 ...
Страница 57: ...5 12 Toshiba Alignment and Adjustment MEMO ...
Страница 59: ...Exploded View 6 2 Toshiba 6 1 Packing Assembly A702 A701 A702 Y101 Y102 UT01 ...
Страница 63: ...Exploded View 6 6 Toshiba MEMO ...
Страница 73: ...Replacement Parts List 7 10 Toshiba MEMO ...
Страница 74: ...Toshiba 8 1 8 Block Diagram ...
Страница 75: ...Block Diagram 8 2 Toshiba MEMO ...
Страница 76: ...Toshiba 9 1 9 PCB Diagrams 9 2 9 3 9 3 9 3 9 1 Main 9 2 VFD 9 3 Jack 9 4 Key ...
Страница 77: ...PCB Diagrams 9 2 Toshiba 9 1 Main ...
Страница 78: ...PCB Diagrams Toshiba 9 3 9 2 VFD 9 3 Jack 9 4 Key ...
Страница 79: ...PCB Diagrams 9 4 Toshiba MEMO ...
Страница 82: ...Schematic Diagrams Toshiba 10 3 10 1 S M P S Power ...
Страница 83: ...Schematic Diagrams 10 4 Toshiba IC601 VFD 10 2 Logic ...
Страница 85: ...Schematic Diagrams 10 6 Toshiba 10 3 A V ...
Страница 87: ...Schematic Diagrams 10 8 Toshiba 10 4 Hi Fi MTS ...
Страница 89: ...Schematic Diagrams 10 10 Toshiba 10 5 TM Block Input Ouput ...
Страница 90: ...Schematic Diagrams Toshiba 10 11 10 6 VFD ...
Страница 91: ...Schematic Diagrams 10 12 Toshiba 10 7 Remote Control ...

