


– 97 –
Fan motor
Fan motor
Fan motor
Connector of
u
pper fan motor
Ferrite core
Fan motor lead
fixed r
ubb
er
Propeller fan
Propeller fan
Propeller fan
Fan motor
Fan motor
Fan motor
Projection/Refrigerating
cycle
s
ide
Propeller fan
Propeller fan
Propeller fan
Loo
s
ened
b
y
Loo
s
ened
b
y
t
u
rning clockwi
s
e
t
u
rning clockwi
s
e
Flange n
u
t
Flange n
u
t
Loo
s
ened
b
y
t
u
rning clockwi
s
e
Flange n
u
t
Projection/Refrigerating
Projection/Refrigerating
cycle
s
ide
cycle
s
ide
Projection/Refrigerating
cycle
s
ide
Connector of
Connector of
lower fan motor
lower fan motor
Connector of
lower fan motor
Ferrite core
Ferrite core
Ferrite core
Fan motor lead
Fan motor lead
fixed r
ubb
er
fixed r
ubb
er
Fan motor lead
fixed r
ubb
er
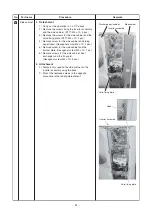
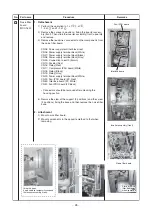
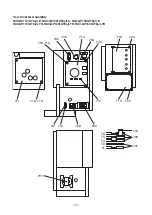
No
9
Part name
Fan motor
Procedure
1) Carry o
u
t work
s
of item 1 of
and work of
.
2) Remove the flange n
u
t fixing the fan motor and the propeller
fan.
• The flange n
u
t i
s
loo
s
ened
b
y t
u
rning it clockwi
s
e.
(When tightening it, t
u
rn it co
u
nterclockwi
s
e.)
3) Remove the propeller fan.
4) Remove the connector for the fan motor from the inverter.
(Remove the ferrite core of the lower fan motor
b
eca
us
e it i
s
us
ed.)
5) Remove the fan motor lead from the fan motor lead fixed
r
ubb
er of the penetrated part of the partition
b
oard.
6) Remove the fixing
s
crew
s
(4 piece
s
each) while
su
pporting
the fan motor
s
o that it doe
s
not fall down.
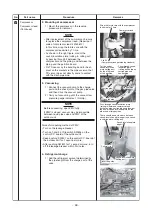
∗
Ca
u
tion
s
for a
ss
em
b
ling of fan motor
• Tighten the flange n
u
t with 4.95N•m (50kgf•cm).
• Adj
us
t length of the fan motor lead wire at the fan motor
lead fixed r
ubb
er
s
o that the fan motor lead i
s
not
s
lack-
ened; otherwi
s
e the fan motor lead may come to contact
with the propeller fan.
Attach the fan motor lead fixed r
ubb
er to the partition
b
oard
s
o that the projection i
s
s
et at the refrigerating
cycle
s
ide.
• Be
su
re
s
o that the reactor
b
ody doe
s
not contact with the
fan motor lead.
• Be
su
re to
bu
ndle the removed
bu
ndling
b
and with the
bu
ndling
b
and on the market.
• Nece
ss
arily attach the ferrite core of the lower fan motor
again. (Fix it with
bu
ndling
b
and on the market.)
REQUIREMENT
Be
su
re to fix the fan motor lead to the motor
b
a
s
e
us
ing the
metal
b
and of the motor
b
a
s
e
s
o that the fan motor lead
doe
s
not come to contact with the propeller fan.
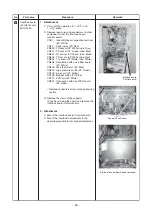
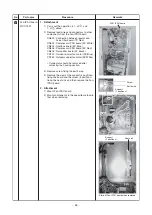
Part name
Содержание RAV-GP1101AT8-E
Страница 23: ... 23 4 WIRING DIAGRAM 4 1 Outdoor Unit RAV GP1101AT8 J E TR RAV GP1401AT8 J E TR RAV GP1601AT8 J E TR ...
Страница 103: ... 103 Outdoor Unit RAV GP1401AT8 E RAV GP1401AT8J E RAV GP1401AT8 TR RAV GP1401AT8J TR ...
Страница 105: ... 105 Outdoor Unit RAV GP1601AT8 E RAV GP1601AT8J E RAV GP1601AT8 TR RAV GP1601AT8J TR ...


