37
Viewing
・
Listening
and Operation
Introduction
Set up
Recording
Others
36
Viewing
・
Listening
and Operation
Introduction
Set up
Recording
Others
Number and Item
Description
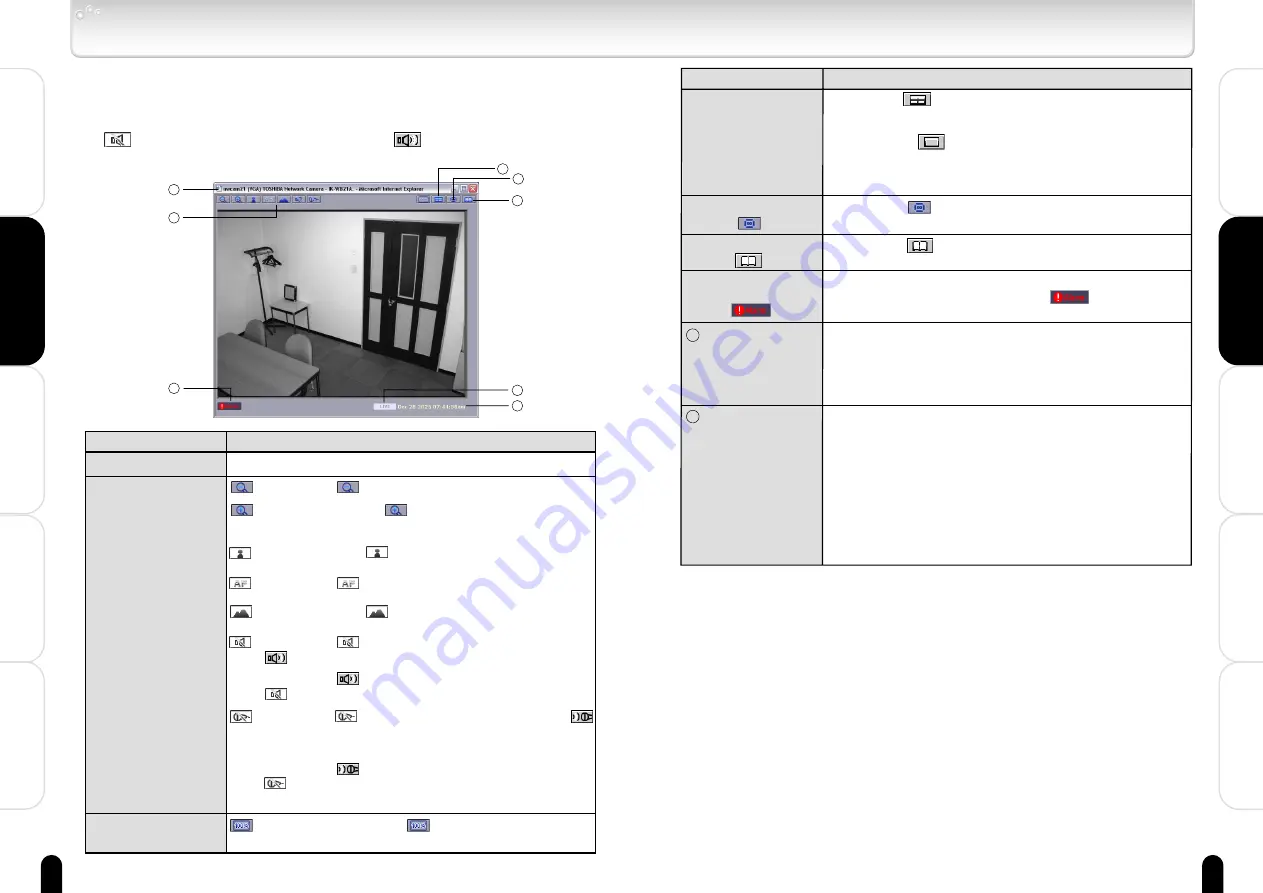
④ Screen changeover
Clicking the
button automatically displays a multi-
view screen with split frames in accordance with the
number of cameras set in Multi Screen setting (see page
90). Click the
button to return to the single-view
screen. A multi-view screen will not be displayed if the
Multi Screen Display function (see page 90) is set to
OFF.
⑤ Display controller
Clicking the button displays the controller in a
separate window.
⑥ Setup Menu Display
Clicking the button will display the Setup Menu
screen in other window.
⑦ Alarm notification
This is displayed when "Motion Detection" ( page 74) or
"Alarm In" (page 74) is activated. The disappears if it
is clicked.
8
Displayed images
When displaying present normal images, "LIVE" will be
displayed, and when displaying images from the Alarm
List or Record List, "PLAYBACK" will be displayed on
the screen. You can switch these views using the
controller.
9
Time and date
The current time and date of the network camera are
shown when "LIVE" is displayed, and the recorded time
and date* are shown when "PLAYBACK" is displayed
on the screen. When in PLAYBACK mode, S) or E) may
be shown with the time and date. "S)" and "E)" are
sometimes displayed in the PLAYBACK mode as date
and time data. "S)" means start of playback images
and "E)," end of playback images. In these modes,
images or date and time cannot be updated. Operate
playback on the controller.
■ Moving the screen center.
1
Click on any area in the Camera Image screen.
2
The camera moves so that the clicked point becomes
the center of the image.
■ Camera image screen
Number and Item
Description
① Camera name
② Operation Buttons
③ Operation Buttons
The name of the camera displaying live images.
: Each clicking of the button will zoom in on the
image. Can be zoomed in 22x at maximum..
: Clicking the button will zoom out.
: Equal size button. Click to reset to a viewer size
according to the resolution.
: Each click of the button will adjust the near focus.
: Clicking the button will set auto focusing.
: Each click of the button will adjust the far focus.
: Clicking the button will change the display to the
button and will output sound.
Clicking the button will change the display to the
button and will not output sound.
: Clicking the button will change the display to the
button and will output sound from the personal
computer microphone.
Clicking the button will change the display to the
button and will not output sound from the personal
computer microphone.
■ Audio
Audio In from the network camera can be heard through the Audio Out of
the personal computer.
Set audio input to "ON" in "Camera/Audio setting" on page 79 and set the
button of the Camera Image button to
.
Viewing and listening (Cont.)
1
5
7
8
3
2
6
4


