background image

Action

Yes

No

Step 3

Print a menu settings page, and then check to see if the internal option is
listed in the Installed Options list.

Is the internal option listed in the menu settings page?

Go to step 4.

Reinstall the internal
option.

Step 4

Check if the option is available in the printer driver.

It may be necessary to manually add the internal option in the printer
driver to make it available for print jobs. For more information, see

“Updating available options in the printer driver” on page 32

.

Is the internal option available in the printer driver?

Go to step 5.

Manually add the
internal option in the
printer driver.

Step 5

a

Check if the internal option is selected.

Note: 

From the application you are using, select the internal option.

For Mac OS X version 9 users, make sure the printer is set up in
Chooser.

b

Resend the print job.

Does the internal option operate correctly?

The problem is solved. Contact 

customer

support

.

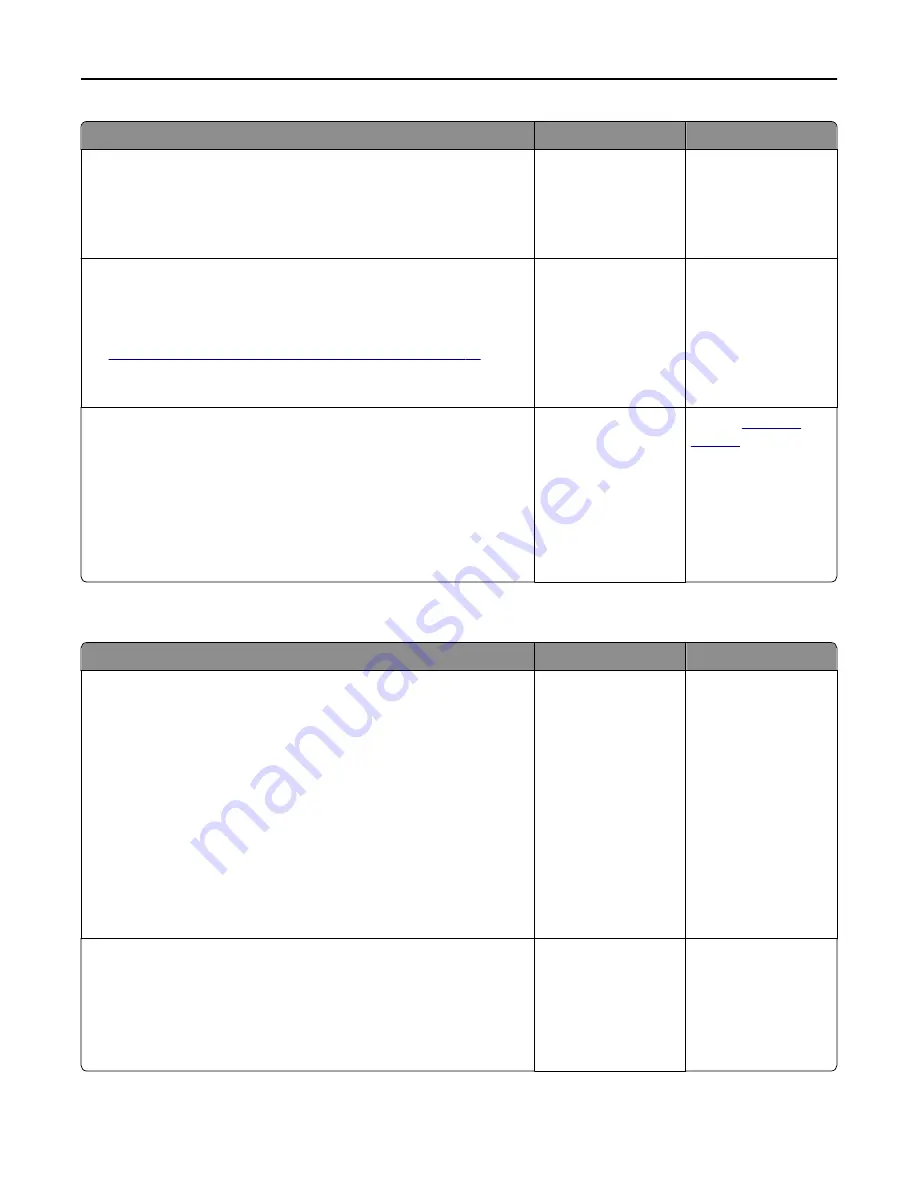
Tray problems

Action

Yes

No

Step 1

a

Pull out the tray, and then do one or more of the following:

Check for paper jams or misfeeds.

Check if the paper size indicators on the paper guides are aligned
with the paper size indicators on the tray.

If you are printing on custom

size paper, then make sure that the

paper guides rest against the edges of the paper.

Make sure the paper is below the maximum paper fill indicator.

Make sure paper lies flat in the tray.

b

Check if the tray closes properly.

Is the tray working?

The problem is solved. Go to step 2.

Step 2

a

Turn off the printer, then wait about 10 seconds, and then turn the
printer back on.

b

Resend the print job.

Is the tray working?

The problem is solved. Go to step 3.

Troubleshooting

170

Содержание eS305CP

Страница 1: ...Color Laser Printer User s Guide September 2014 Machine type s 5027 Model s 630 and its equivalent model ...

Страница 2: ...address of the computer 15 Finding the IP address of the printer 15 Accessing the Embedded Web Server 15 Customizing the home screen 16 Activating the home screen applications 16 Setting up Remote Operator Panel 18 Exporting and importing a configuration 18 Additional printer setup 19 Installing internal options 19 Installing hardware options 29 Setting up the printer software 31 Attaching cables ...

Страница 3: ...Printing information pages 64 Canceling a print job 65 Understanding the printer menus 66 Menus list 66 Paper menu 66 Reports menu 76 Network Ports menu 77 Security menu 85 Settings menu 88 Help menu 110 Saving money and the environment 111 Saving paper and toner 111 Saving energy 112 Recycling 115 Securing the printer 116 Using the security lock feature 116 Statement of Volatility 116 Erasing vol...

Страница 4: ...42 Restoring factory default settings 143 Clearing jams 144 Avoiding jams 144 Understanding jam messages and locations 145 x page jam clear standard bin 146 x page jam open front door to clear fuser 147 x page jam open front door 148 x page jam open front door to clear duplex 149 x page jam open tray x 151 x page jam clear manual feeder 152 x page jam clear multipurpose feeder 152 Troubleshooting ...

Страница 5: ...Notices 203 Product information 203 Edition notice 203 Power consumption 206 Index 213 Contents 5 ...

Страница 6: ... The printer weight is greater than 18 kg 40 lb and requires two or more trained personnel to lift it safely CAUTION POTENTIAL INJURY To reduce the risk of equipment instability load each tray separately Keep all other trays closed until needed CAUTION TIPPING HAZARD Floor mounted configurations require additional furniture for stability You must use either a printer stand or printer base if you a...

Страница 7: ...s happen a risk of fire or electrical shock results Inspect the power cord regularly for signs of such problems Remove the power cord from the electrical outlet before inspecting it Refer service or repairs other than those described in the user documentation to a service representative CAUTION SHOCK HAZARD Do not set up this product or make any electrical or cabling connections such as the fax fe...

Страница 8: ...the room meets the latest revision of the ASHRAE 62 standard or the CEN Technical Committee 156 standard Provide a flat sturdy and stable surface Keep the printer Clean dry and free of dust Away from stray staples and paper clips Away from the direct airflow of air conditioners heaters or ventilators Free from direct sunlight and humidity extremes Observe the recommended temperatures and avoid flu...

Страница 9: ...nel 2 Standard bin 3 250 sheet tray Tray 1 4 Manual feeder 5 Optional 650 sheet duo tray with integrated multipurpose feeder Tray 2 Note This tray is standard on the CS410dtn and CS510dte models 6 Optional 550 sheet tray Tray 3 Using the Embedded Web Server Note This feature is available only in network printers or printers connected to print servers If the printer is installed on a network then y...

Страница 10: ...e or menu settings page and then finding the TCP IP section Notes An IP address appears as four sets of numbers separated by periods such as 123 123 123 123 If you are using a proxy server then temporarily disable it to load the Web page correctly 2 Open a Web browser and then type the printer IP address in the address field 3 Press Enter The Embedded Web Server page appears Learning about the pri...

Страница 11: ...nt job or performing a power on reset with the main power switch wakes the printer from Sleep mode Pressing the Sleep button or the power switch causes the printer to wake from Hibernate Mode 5 Stop or Cancel button Stop all printer activity 6 Indicator light Check the status of the printer 7 USB port Connect a USB a flash drive to the printer Note Only the front USB port supports flash drives Und...

Страница 12: ...in Hibernate mode Understanding the home screen When the printer is turned on the display shows a basic screen referred to as the home screen Use the home screen buttons and icons to initiate an action Note Your home screen may vary depending on your home screen customization settings administrative setup and active embedded solutions Touch To 1 Change Language Change the primary language of the p...

Страница 13: ...ay also appear on the home screen Touch To Search Held Jobs Search current held jobs Jobs by user Access print jobs saved by user Profiles and Solutions Access profiles and solutions Features Feature Description Attendance message alert If an attendance message affects a function then this icon appears and the red indicator light blinks Warning If an error condition occurs then this icon appears P...

Страница 14: ...own 4 Accept button Save a setting 5 Cancel button Cancel an action or a selection Return to the previous screen Touch To Return to the home screen Open a context sensitive Help dialog on the printer control panel Scroll to the left Scroll to the right Understanding the printer control panel 14 ...

Страница 15: ...nected to a network or to a print server You can find the printer IP address From the top left corner of the printer home screen From the TCP IP section in the Network Ports menu By printing a network setup page or menu settings page and then finding the TCP IP section Note An IP address appears as four sets of numbers separated by periods such as 123 123 123 123 Accessing the Embedded Web Server ...

Страница 16: ...For more information see Finding information about the home screen applications on page 16 or see the documentation that came with the application Activating the home screen applications Finding information about the home screen applications Your printer comes with preinstalled home screen applications Before you can use these applications you must first activate and set up these applications usin...

Страница 17: ...Management Forms and Favorites 3 Click Add and then customize the settings Notes See the mouse over help beside each field for a description of the setting To make sure the location settings of the bookmark are correct type the correct IP address of the host computer where the bookmark is located For more information on obtaining the IP address of the host computer see Finding the IP address of th...

Страница 18: ...n settings into a text file and then import the file to apply the settings to other printers 1 Open a Web browser and then type the printer IP address in the address field Note View the IP address on the printer home screen The IP address appears as four sets of numbers separated by periods such as 123 123 123 123 2 Export or import a configuration file for one or multiple applications For one app...

Страница 19: ...nnectivity and memory capacity by adding optional cards Available internal options Note Some options are available only in select printer models Memory cards DDR3 DIMM Flash memory Fonts Firmware Forms Barcode Prescribe IPDS Hard disk Accessing the controller board CAUTION SHOCK HAZARD If you are accessing the controller board or installing optional hardware or memory devices sometime after settin...

Страница 20: ...ard access cover and then shift to the right to remove it 3 Locate the appropriate connector on the controller board Warning Potential Damage Controller board electronic components are easily damaged by static electricity Touch a metal surface on the printer before touching any controller board electronic components or connectors Additional printer setup 20 ...

Страница 21: ...1 Flash memory or font card connector 2 Printer hard disk connector 3 Memory card connector 4 Reattach the cover Additional printer setup 21 ...

Страница 22: ...nplug the power cord from the electrical outlet before continuing If you have any other devices attached to the printer then turn them off as well and unplug any cables going into the printer 1 Access the controller board For more information see Accessing the controller board on page 19 2 Unpack the memory card Warning Potential Damage Do not touch the connection points along the edge of the card...

Страница 23: ...d with the ridge 2 on the connector 4 Push the memory card straight into the connector and then push the card toward the controller board wall until it clicks into place 5 Close the controller board access cover Additional printer setup 23 ...

Страница 24: ...into the printer Warning Potential Damage Controller board electronic components are easily damaged by static electricity Touch a metal surface on the printer before touching any controller board electronic components or connectors 1 Access the controller board For more information see Accessing the controller board on page 19 2 Unpack the optional card Warning Potential Damage Avoid touching the ...

Страница 25: ...e options in the printer driver to make them available for print jobs For more information see Updating available options in the printer driver on page 32 Installing a printer hard disk Note This task requires a flathead screwdriver CAUTION SHOCK HAZARD If you are accessing the controller board or installing optional hardware or memory devices sometime after setting up the printer then turn the pr...

Страница 26: ...ontroller board electrical components or connectors 1 Access the controller board For more information see Accessing the controller board on page 19 2 Unpack the printer hard disk 3 Remove the screws attached to the printer hard disk mounting bracket and then remove the bracket 4 Locate the appropriate connector on the controller board Additional printer setup 26 ...

Страница 27: ...r board Note The plugs and receptacles are color coded 7 Close the controller board access cover Note When the printer software and any hardware options are installed you may need to manually add the options in the printer driver to make them available for print jobs For more information see Updating available options in the printer driver on page 32 Removing a printer hard disk Note This task req...

Страница 28: ...onic components are easily damaged by static electricity Touch something metal on the printer first before touching any controller board electronic components or connectors 1 Access the controller board For more information see Accessing the controller board on page 19 2 Unplug the printer hard disk interface cable from the controller board leaving the cable attached to the printer hard disk To un...

Страница 29: ...g the power cord from the electrical outlet before continuing If you have any other devices attached to the printer then turn them off as well and unplug any cables going into the printer Install the printer and any optional tray in the following order Optional 550 sheet tray Tray 3 650 sheet duo tray Tray 2 Printer Installing optional trays The printer supports two optional input sources a 550 sh...

Страница 30: ...well and unplug any cables going into the printer 1 Unpack the optional tray and the dust cover and then remove all packing material 2 Place the tray near the printer 3 Align the 650 sheet duo tray with the 550 sheet tray and then lower it into place Notes If you are installing both the optional trays then the 550 sheet tray Tray 3 must always be below the 650 sheet tray Tray 2 The standard 250 sh...

Страница 31: ...ay need to manually add the options in the printer driver to make them available for print jobs For more information see Updating available options in the printer driver on page 32 Setting up the printer software Installing the printer 1 Obtain a copy of the software installer package 2 Run the installer and then follow the instructions on the computer screen Additional printer setup 31 ...

Страница 32: ... Enter or click OK 2 Depending on your device do either of the following Press and hold the printer you want to update Right click the printer you want to update 3 From the menu that appears do either of the following For Windows 7 or later select Printer properties For earlier versions select Properties 4 Click the Configuration tab 5 Do either of the following Click Update Now Ask Printer Under ...

Страница 33: ... Printer power cord socket Connect the printer to a properly grounded electrical outlet Networking Notes Purchase a wireless network adapter before setting up the printer on a wireless network For more information contact the place where you purchased the printer A Service Set Identifier SSID is a name assigned to a wireless network Wired Equivalent Privacy WEP Wi Fi Protected Access WPA WPA2 and ...

Страница 34: ...red to as the network name Wireless Mode or Network Mode The mode is either infrastructure or ad hoc Channel for ad hoc networks The channel defaults to automatic for infrastructure networks Some ad hoc networks will also require the automatic setting Check with your system support person if you are not sure which channel to select Security Method There are three basic options for Security Method ...

Страница 35: ...ate to Network Ports Active NIC Auto Note Make sure to turn off the printer then wait for at least five seconds and then turn the printer back on 1 From the printer control panel navigate to Network Ports Network x Network x Setup Wireless Wireless Connection Setup 2 Select a wireless connection setup Use To Search for networks Show available wireless connections Note This menu shows all broadcast...

Страница 36: ...Embedded Web Server Before you begin make sure that Your printer is connected temporarily to an Ethernet network A wireless network adapter is installed in your printer and working properly For more information see the instruction sheet that came with your wireless network adapter 1 Open a Web browser and then type the printer IP address in the address field Notes View the printer IP address in th...

Страница 37: ... network connection This page also provides important information that aids network printing configuration Printing a menu settings page From the home screen navigate to Reports Menu Settings Page Printing a network setup page If the printer is attached to a network then print a network setup page to verify the network connection This page also provides important information that aids network prin...

Страница 38: ...Universal size is 215 9 x 359 9 mm 8 5 x 14 17 inches and is loaded only in the multipurpose feeder and manual feeder 1 From the home screen navigate to Paper Menu Universal Setup Units of Measure select a unit of measure 2 Touch Portrait Width or Portrait Height 3 Select the width or height and then touch Loading the 250 and 550 sheet tray The printer has one 250 sheet tray Tray 1 with an integra...

Страница 39: ...ength guide at the back of the tray to extend it 3 Squeeze and then slide the length guide tab to the correct position for the size of the paper being loaded Note Use the paper size indicators on the bottom of the tray to help position the guide Loading paper and specialty media 39 ...

Страница 40: ...the paper being loaded Note Use the paper size indicators on the bottom of the tray to help position the guides 5 Flex the sheets back and forth to loosen them and then fan them Do not fold or crease the paper Straighten the edges on a level surface Loading paper and specialty media 40 ...

Страница 41: ...ading the 650 sheet duo tray The 650 sheet duo tray Tray 2 consists of a 550 sheet tray and an integrated 100 sheet multipurpose feeder The tray is loaded in the same way as the 250 sheet tray and the optional 550 sheet tray and supports the same paper types and sizes The only differences are the look of the guide tabs and the location of the paper size indicators CAUTION POTENTIAL INJURY To reduc...

Страница 42: ...1 Length guide tab 2 Paper size indicator 3 Width guide tab Loading the multipurpose feeder 1 Push the multipurpose feeder latch to the left Loading paper and specialty media 42 ...

Страница 43: ...to loosen them and then fan them Do not fold or crease the paper Straighten the edges on a level surface Hold transparencies by the edges and then fan them Straighten the edges on a level surface Note Avoid touching the printable side of transparencies Be careful not to scratch them Flex a stack of envelopes back and forth to loosen them and then fan them Straighten the edges on a level surface Lo...

Страница 44: ...cialty media is below the maximum paper fill indicator located on the paper guides 1 Width guide tab 2 Maximum paper fill indicator 3 Width guide 4 Feeder extender 5 Paper size indicator 6 Load the paper and then adjust the width guide to lightly touch the edge of the paper stack Load paper card stock and transparencies with the recommended printable side facedown and the top edge entering the pri...

Страница 45: ...e paper size and type in the Paper menu to match the paper loaded in the tray Loading the manual feeder The standard 250 sheet tray has an integrated manual feeder that can be used to print on different types of paper one sheet at a time 1 Load a sheet of paper into the manual feeder Printable side facedown for one sided printing Printable side faceup for two sided duplex printing Note There are d...

Страница 46: ...per may cause jams Linking and unlinking trays The printer links trays when the specified paper size and type are the same When a linked tray becomes empty paper feeds from the next linked tray To prevent trays from linking assign a unique custom paper type name Linking and unlinking trays Note This feature applies only in network printers 1 Open a Web browser and then type the printer IP address ...

Страница 47: ...he address field Notes View the printer IP address on the printer home screen The IP address appears as four sets of numbers separated by periods such as 123 123 123 123 If you are using a proxy server then temporarily disable it to load the Web page correctly 2 Click Settings Paper Menu Custom Names 3 Select a custom name and then type a custom paper type name 4 Click Submit 5 Click Custom Types ...

Страница 48: ...s Paper Menu Custom Types 3 Select a custom paper type name and then select a paper type Note Paper is the factory default paper type for all user defined custom names 4 Click Submit Using the printer control panel 1 From the home screen navigate to Paper Menu Custom Types 2 Select a custom paper type name and then select a paper type Note Paper is the factory default paper type for all user defin...

Страница 49: ...erhead being considered for use before buying large quantities Before loading letterhead flex fan and straighten the stacks to prevent sheets from sticking together Page orientation is important when printing on letterhead Source Printing Printable side Paper orientation Trays One sided Faceup Load the sheet with the top edge entering the printer first Trays Two sided Facedown Load the sheet with ...

Страница 50: ...ttom edge entering the printer first Multipurpose feeder One sided Facedown Load the sheet with the top edge entering the printer first Multipurpose feeder Two sided Faceup Load the sheet with the bottom edge entering the printer first Note Check with the manufacturer or vendor to determine whether or not the preprinted letterhead is acceptable for laser printers Paper and specialty media guide 50...

Страница 51: ... best performance use envelopes made from 90 g m2 24 lb paper or 25 cotton Use only new envelopes from undamaged packages To optimize performance and minimize jams do not use envelopes that Have excessive curl or twist Are stuck together or damaged in any way Have windows holes perforations cutouts or embossing Have metal clasps string ties or folding bars Have an interlocking design Have postage ...

Страница 52: ...ighten the edges on a level surface Paper guidelines Select the correct paper or specialty media to reduce printing problems For the best print quality try a sample of the paper or specialty media before buying large quantities Paper characteristics The following paper characteristics affect print quality and reliability Consider these characteristics when evaluating new paper stock Weight The pri...

Страница 53: ...per is recommended Fiber content Most high quality xerographic paper is made from 100 chemically treated pulped wood This content provides the paperwith ahigh degreeofstabilityresultinginfewerpaperfeedingproblems and betterprintquality Papercontaining fibers such as cotton can negatively affect paper handling Unacceptable paper The following paper types are not recommended for use with the printer...

Страница 54: ...zardous emissions Using recycled paper and other office papers Recycled office paper produced specifically for use in laser electrophotographic printers may be used in your printer However no blanket statement can be made that all recycled paper will feed well Generally the following property guidelines apply to recycled paper Low moisture content 4 5 Suitable smoothness 100 200 Sheffield units or...

Страница 55: ...0 sheet duo tray which consists of a 550 sheet tray and an integrated 100 sheet multipurpose feeder The 550 sheet tray of the 650 sheet duo tray supports the same paper sizes as the optional 550 sheet tray The integrated multipurpose feeder supports different paper sizes types and weights Paper size and dimension Standard 250 sheet tray Manual feeder 650 sheet duo tray 550 sheet tray Duplex mode 5...

Страница 56: ... 148 x 210 mm 5 8 x 8 3 in to 216 x 356 mm 8 5 x 14 in 1 2 1 2 1 2 4 7 3 4 Envelope Monarch 98 x 191 mm 3 9 x 7 5 in X X 1 X X 1 The paper source supports paper size without size sensing 2 Universal is only supported in the standard 250and optional 550sheet tray if the paper size is from 148 x 215 9 mm 5 83 x 8 5 inches to 215 9 x 355 6 mm 8 5 x 14 inches 3Universal is only supported in the multip...

Страница 57: ...5 inches to 215 9 x 355 6 mm 8 5 x 14 inches 3Universal is only supported in the multipurpose feeder and manual feeder if the paper size is from 76 2 x 127 mm 3 x 5 inches to 215 9 x 359 9 mm 8 5 x 14 17 inches 4Universal is only supported in duplex mode if the width is between 210 mm 8 27 inches and 215 9 mm 8 5 inches and length is between 279 4 mm 11 inches and 355 6 mm 14 inches Supported pape...

Страница 58: ...0 sheet tray Duplex mode 550 sheet tray Multipurpose feeder Paper Plain Recycled Glossy Bond Letterhead Preprinted Colored Light Heavy Rough Cotton Custom Type x Card stock X Transparencies X X X Labels Paper X Envelope X X X X Paper and specialty media guide 58 ...

Страница 59: ...users a With a document open click File Print b Click Properties Preferences Options or Setup c Adjust the settings if necessary d Click OK Print For Macintosh users a Customize the settings in the Page Setup dialog 1 With a document open choose File Page Setup 2 Choose a paper size or create a custom size to match the paper loaded 3 Click OK b Customize the settings in the Print dialog 1 With a d...

Страница 60: ...u choose between a faster print speed or a higher toner yield Max Yield is the factory default setting Max Speed This lets you print in either black or color depending on what is set in the printer driver The printer prints in color unless Black Only is selected in the printer driver Max Yield This lets you switch from black to color based on the color content found on each page Frequent color mod...

Страница 61: ...into the USB port Notes A flash drive icon appears on the printer home screen when a flash drive is inserted If you insert the flash drive when the printer requires attention such as when a jam has occurred then the printer ignores the flash drive If you insert the flash drive while the printer is processing other print jobs then Busy appears After these print jobs are processed you may need to vi...

Страница 62: ... files from the flash drive Supported flash drives and file types Notes High speed USB flash drives must support the full speed standard Low speed USB devices are not supported USB flash drives must support the File Allocation Table FAT system Devices formatted with New Technology File System NTFS or any other file system are not supported Recommended flash drives File type Manyflashdrivesareteste...

Страница 63: ...he PIN is set from the computer It must be four digits using the numbers 0 9 Repeat Job Expiration Print and store print jobs in the printer memory Verify Job Expiration Print onecopy ofa print job and hold theremainingcopies It letsyouexamine if the first copy is satisfactory or not The print job is automatically deleted from the printer memory when all copies are printed Reserve Job Expiration S...

Страница 64: ...o Held jobs select your user name select the print job specify the number of copies Print For Macintosh users 1 With a document open choose File Print If necessary click the disclosure triangle to see more options 2 From the print options or Copies Pages pop up menu choose Job Routing 3 Select the print job type Confidential Repeat Reserve or Verify and then assign a user name For a confidential p...

Страница 65: ...h the print job you want to cancel and then touch Delete Selected Jobs Note If you press on the keypad then touch Resume to return to the home screen Canceling a print job from the computer For Windows users 1 Open the printers folder and then select your printer 2 From the print queue select the print job you want to cancel and then delete it For Macintosh users 1 From System Preferences in the A...

Страница 66: ...on Card Menu General Settings Flash Drive Menu Print Settings Print All Guides Color Quality Print Quality Printing Guide Print Defects Guide Information Guide Note A list of installed DLEs Download Emulators appears 1 This menu item appears only when a 650 sheet duo tray is attached Paper menu Default Source menu Use To Default Source Tray x Multipurpose Feeder Manual Paper Manual Envelope Set a ...

Страница 67: ...d Letterhead Preprinted Colored Paper Light Paper Heavy Paper Rough Cotton Custom Type x Specify the type of the paper loaded in each tray Notes Plain Paper is the factory default setting for Tray 1 Custom Type x is the factory default setting for all other trays If available a user defined name will appear instead of Custom Type x Use this menu to configure automatic tray linking Only the 250 she...

Страница 68: ...se Feeder Size to appear as a menu The multipurpose feeder does not automatically detect the paper size Make sure the paper size is set Multipurpose Feeder Type Plain Paper Card Stock Transparency Recycled Glossy Labels Bond Envelope Letterhead Preprinted Colored Paper Light Paper Heavy Paper Rough Cotton Custom Type x Specify the type of the paper loaded in the multipurpose feeder Notes Custom x ...

Страница 69: ...oaded Notes Plain Paper is the factory default setting From the Paper menu set Configure MP to Manual in order for Manual Paper Type to appear as a menu Manual Envelope Size 7 3 4 Envelope 9 Envelope 10 Envelope DL Envelope C5 Envelope B5 Envelope Other Envelope Specify the size of the envelope being manually loaded Note 10 Envelope is the U S factory default setting DL Envelope is the internation...

Страница 70: ...utions are allowed Off indicates that no size substitutions are allowed Setting a size substitution lets the print job continue without Change Paper appearing Paper Texture menu Use To Plain Texture Smooth Normal Rough Specify the relative texture of the plain paper loaded Note Normal is the factory default setting Card Stock Texture Smooth Normal Rough Specify the relative texture of the card sto...

Страница 71: ...ote Normal is the factory default setting Letterhead Texture Smooth Normal Rough Specify the relative texture of the letterhead loaded Note Normal is the factory default setting Preprinted Texture Smooth Normal Rough Specify the relative texture of the preprinted paper loaded Note Normal is the factory default setting Colored Texture Smooth Normal Rough Specify the relative texture of the colored ...

Страница 72: ...ransparencies loaded Note Normal is the factory default setting Recycled Weight Light Normal Heavy Specify the relative weight of the recycled paper loaded Note Normal is the factory default setting Glossy Weight Light Normal Heavy Specify the relative weight of the glossy paper loaded Note Normal is the factory default setting Heavy Glossy Weight Light Normal Heavy Specify the relative weight of ...

Страница 73: ...te Normal is the factory default setting Colored Weight Light Normal Heavy Specify the relative weight of the colored paper loaded Note Normal is the factory default setting Light Weight Light Specify that the relative weight of the paper loaded is light Heavy Weight Heavy Specify that the relative weight of the paper loaded is heavy Rough Cotton Weight Light Normal Heavy Specify the relative weig...

Страница 74: ...ex Off Determine and set two sided printing for all print jobs that specify Letterhead as the paper type Preprinted Loading Duplex Off Determine and set two sided printing for all print jobs that specify Preprinted as the paper type Colored Loading Duplex Off Determine and set two sided printing for all print jobs that specify Colored as the paper type Light Loading Duplex Off Determine and set tw...

Страница 75: ...ure Notes Inches is the US factory default setting Millimeters is the international factory default setting Portrait Width 3 8 5 inches 76 216 mm Set the width for portrait orientation Notes If the width exceeds the maximum then the printer uses the maximum width allowed 8 5 inches is the US factory default setting You can increase the width in 0 01 inch increments 216 mm is the international fact...

Страница 76: ...t a list of profiles stored in the printer Print Fonts PCL Fonts PostScript Fonts Print a report of all the fonts available for the printer language currently set in the printer Note A separate list is available for PCL and PostScript emulations Each emulation report contains print samples and information about the available fonts for each language Print Directory Print a list of all the resources...

Страница 77: ...e Notes On is the factory default setting If PCL SmartSwitch is disabled then the printer does not examine incoming data and it uses the default printer language specified in the Setup menu PS SmartSwitch On Off Set the printer to automatically switch to PS emulation when a print job requires it regardless of the default printer language Notes On is the factory default setting If PS SmartSwitch is...

Страница 78: ... Notes Off is the factory default setting The printer automatically restarts when the setting is changed from the control panel The menu selection is then updated Mac Binary PS On Off Auto Set the printer to process Macintosh binary PostScript print jobs Note Auto is the factory default setting Standard Network Setup OR Network x Setup Reports Network Card TCP IP IPv6 Wireless AppleTalk Show and s...

Страница 79: ...g A setting value of 0 disables the timeout A value between 1 and 9 is invalid Banner Page Off On Allow the printer to print a banner page Note Off is the factory default setting TCP IP menu To access the menu navigate to either of the following Network Ports Standard Network Standard Network Setup TCP IP Network Ports Network x Network x Setup TCP IP Note This menu is available only in network pr...

Страница 80: ...onitored and managed remotely using a Web browser Note Yes is the factory default setting WINS Server Address View or change the current WINS server address Enable DDNS Yes No View or change the current DDNS setting Note Yes is the factory default setting Enable mDNS Yes No View or change the current mDNS setting Note Yes is the factory default setting DNS Server Address View or change the current...

Страница 81: ...less network and enable network security Notes Start Push Button Method connects the printer to a wireless network when buttons on both the printer and the access point wireless router are pressed within a given period of time Start PIN Method connects the printer to a wireless network when a PIN on the printer is entered into the wireless settings of the access point Enable Disable WPS Auto detec...

Страница 82: ...d Web Server View Address Show the assigned AppleTalk address Note The address can be changed only from the Embedded Web Server Set Zone list ofzonesavailableon thenetwork Provide a list of AppleTalk zones available on the network Note The factory default setting is the default zone for the network If no default zone exists then the zone marked with an asterisk is the default setting Standard USB ...

Страница 83: ...ng Any jobs already buffered on the printer hard disk are printed before normal processing resumes The USB buffer size value can be changed in 1 K increments The maximum size allowed depends on the amount of memory in the printer the size of the other link buffers and whether Resource Save is set to On or Off To increase the maximum size range for the USB Buffer disable or reduce the size of the p...

Страница 84: ...ation Note 25 is the default SMTP gateway port Primary SMTP Gateway Port Secondary SMTP Gateway Secondary SMTP Gateway Port SMTP Timeout 5 30 Specify the amount of time in seconds before the server stops trying to send an e mail Note 30 is the factory default setting Reply Address Specify a reply address of up to 128 characters in the e mail sent by the printer Use SSL Disabled Negotiate Required ...

Страница 85: ...f failed login attempts before users are locked out You can choose from 1 to 10 attempts The factory default setting is 3 Failure time frame specifies the time frame during which failed login attempts can be made before users are locked out You can choose from 1 to 60 minutes The factory default setting is 5 minutes Lockout time specifies how long users are locked out after exceeding the login fai...

Страница 86: ...n the printer RAM are deleted Repeat Job Expiration Off 1 hour 4 hours 24 hours 1 week Set a time limit on how long the printer stores print jobs Verify Job Expiration Off 1 hour 4 hours 24 hours 1 week Set a time limit on how long the printer stores print jobs needing verification Reserve Job Expiration Off 1 hour 4 hours 24 hours 1 week Set a time limit on how long the printer stores print jobs ...

Страница 87: ...d on a computer Delete Log Yes No Specify whether or not audit logs are deleted Note Yes is the factory default setting Configure Log Enable Audit Yes No Enable Remote Syslog No Yes Remote Syslog Facility 0 23 Severity of Events to Log 0 7 Specify how and whether or not audit logs are created Notes Enable Audit determines if events are recorded in the secure audit log and remote syslog No is the f...

Страница 88: ...nter Language PCL Emulation PS Emulation Set the default printer language Notes PS Emulation is the factory default setting PS Emulation uses a PS interpreter for processing print jobs PCL Emulation uses a PCL interpreter for processing print jobs Setting a printer language as the default does not prevent a software program from sending print jobs that use another printer language Job Waiting On O...

Страница 89: ...e does not affect the ability of the printer to generate color output from flash drive print jobs Download Target RAM Flash Disk Set the storage location for downloads Notes RAM is the factory default setting Storing downloads in the RAM is temporary Storing downloads in a flash memory or on a printer hard disk places them in permanent storage Downloads remain in the flash memory or printer hard d...

Страница 90: ... all models You may need to install special hardware for some languages Show Supply Estimates Show estimates Do not show estimates View the estimates of the supplies on the control panel Embedded Web Server menu settings and device statistics reports Note Show estimates is the factory default setting Eco Mode Off Energy Energy Paper Paper Minimize the use of energy paper or specialty media Notes O...

Страница 91: ... Swiss French Korean Magyar Turkce Cesky Simplified Chinese Traditional Chinese Japanese Custom Key x Specify a language and custom key information for the display keyboard Paper Sizes U S Metric Specify the unit of measurement for paper sizes Notes U S is the factory default setting The initial setting is determined by your country or region selection in the initial setup wizard Understanding the...

Страница 92: ...ing for Left Side Date Time is the factory default setting for Right Side Displayed Information continued Black Toner Cyan Toner Magenta Toner Yellow Toner Waste Toner Bottle Fuser Transfer Module Customize the displayed information for the supplies Select from the following options When to display Do not display Display Message to display Default Alternate Default text entry Alternate text entry ...

Страница 93: ...Eco Settings Change the icons that appear on the home screen For each icon select from the following options Display Do Not display Date Format MM DD YYYY DD MM YYYY YYYY MM DD Format the date Note MM DD YYYY is the U S factory default setting DD MM YYYY is the international factory default setting Time Format 12 hour A M P M 24 hour clock Format the time Note 12 hour A M P M is the factory defaul...

Страница 94: ... Mode Disabled 1 240 Set theamount of timein minutes beforethe printer enters a lower power state Note 15 is the factory default setting Timeouts Sleep Mode Disabled 1 120 Set the amount of time in minutes the printer waits after a job is printed before it goes into a reduced power state Notes 20 is the factory default setting Lower settings conserve more energy but may require longer warm up time...

Страница 95: ...Timeouts Print Timeout Disabled 1 255 Set the amount of time in seconds the printer waits to receive an end of job message before canceling the rest of the print job Notes 90 is the factory default setting When the timer expires any partially printed page still in the printer is printed and then the printer checks to see if any new print jobs are waiting Print Timeout is available only when using ...

Страница 96: ...printer reprints jammed pages Notes Auto is the factory default setting The printer reprints jammed pages unless the memory required to hold the pages is needed for other printer tasks On sets the printer to always reprint jammed pages Off sets the printer to never reprint jammed pages Print Recovery Page Protect Off On Successfully print a page that may not have printed otherwise Notes Off is the...

Страница 97: ...s the factory default setting Color Color Black Only Generate color or black and white outputs Notes Color is the factory default setting This setting can generate color output only from a flash drive print job Collate 1 1 1 2 2 2 1 2 3 1 2 3 Stack the pages of a print job in sequence when printing multiple copies Note 1 2 3 1 2 3 is the factory default setting Sides Duplex 1 sided 2 sided Specify...

Страница 98: ...r Saver Ordering Notes Horizontal is the factory default setting Positioning depends on the number of page images and whether they are in portrait or landscape orientation This setting affects jobs only when Paper Saver is set to any value other than Off Separator Sheets Off Between Copies Between Jobs Between Pages Specify whether blank separator sheets are inserted Notes Off is the factory defau...

Страница 99: ...Duplex Binding Long Edge Short Edge Define binding for duplexed pages in relation to page orientation Notes Long Edge is the factory default setting This assumes binding along the long edge of the page left edge for portrait and top edge for landscape Short Edge assumes binding along the short edge of the page top edge for portrait and left edge for landscape Copies 1 999 Specify the default numbe...

Страница 100: ...12 Up 16 Up Print multiple pages on a single sheet of paper Notes Off is the factory default setting When the number of pages per sheet is selected each page is scaled so that the number of pages you want can be displayed on the sheet Paper Saver Ordering Horizontal Reverse Horizontal Reverse Vertical Vertical SpecifytheorderinwhichpagesareprintedonasinglesheetwhenusingPaperSaver Notes Horizontal ...

Страница 101: ... and flow charts Note Off is the factory default setting Color Saver On Off Reduce the amount of toner used for graphics and images Notes Off is the factory default setting On overrides the Toner Darkness setting RGB Brightness 6 to 6 Adjust the brightness of the output Note 0 is the factory default setting RGB Contrast 0 5 Adjust the contrast of the output Note 0 is the factory default setting RG...

Страница 102: ...olor conversions Select from the following options US CMYK Euro CMYK Vivid CMYK Off Note US CMYK is the U S factory default setting Euro CMYK is the international factory default setting Color Adjust Initiate a recalibration of color conversion tables and allow the printer to make adjustments for color variations in output Spot Color Replacement Assign specific CMYK values to named spot colors Not...

Страница 103: ...ng Log Action at Near Full None E mail Current Log E mail Delete Current Log E mail Delete Oldest Log Post Current Log Post Delete Current Log Post Delete Oldest Log Delete Current Log Delete Oldest Log Delete All Logs Delete All But Current Set how the printer responds when the hard disk is nearly full Notes None is the factory default setting The value defined in Log Near Full Level determines w...

Страница 104: ...installing a flash memory card in the printer The flash memory option card must not be read write or write protected This menu item appears only when a non defective flash memory card is installed Delete Downloads on Disk Delete Now Do Not Delete Delete downloads from the printer hard disk including all held jobs buffered jobs and parked jobs Notes Delete Now sets the printer to delete the downloa...

Страница 105: ... Print annotations in a PDF Note Do Not Print is the factory default setting PostScript menu Use To Print PS Error On Off Print a page containing the PostScript error Note Off is the factory default setting Lock PS Startup Mode On Off Enable users to disable the SysStart file Note Off is the factory default setting Font Priority Resident Flash Disk Establish the font search order Notes Resident is...

Страница 106: ...etting 12U PC 850 is the international factory default setting A symbol set is a set of alphabetical and numeric characters punctuation and special symbols Symbol sets support the different languages or specific programs such as math symbols for scientific text Only the supported symbol sets are shown PCL Emulation Settings Point Size 1 00 1008 00 Change the point size for scalable typographic fon...

Страница 107: ...e 203 mm setting sets the width of the page to allow the printing of eighty 10 pitch characters PCL Emulation Settings Auto CR after LF On Off Specify whether the printer automatically performs a carriage return CR after a line feed LF control command Note Off is the factory default setting PCL Emulation Settings Auto LF after CR On Off Specify whether the printer automatically performs a line fee...

Страница 108: ...ive Apple Chancery Arial MT Avant Garde Bodoni Bookman Chicago Clarendon Cooper Black Copperplate Coronet Courier Eurostile Garamond Geneva Gill Sans Goudy Helvetica Hoefler Text Intl CG Times Intl Courier Intl Univers Joanna MT Letter Gothic Lubalin Graph Marigold MonaLisa Recut Monaco New CenturySbk New York Optima Oxford Palatino StempelGaramond Taffy Times TimesNewRoman Univers Zapf Chancery N...

Страница 109: ...n 1 mm increments Backgrounds Do Not Print Print Specify whether to print backgrounds on HTML documents Note Print is the factory default setting Image menu Use To Auto Fit On Off Select the optimal paper size scaling and orientation Note On is the factory default setting It overrides scaling and orientation settings for some images Invert On Off Invert bitonal monochrome images Notes Off is the f...

Страница 110: ...uides Media Guide Provides a list of the paper sizes supported in trays and feeders Menu Map Provides a list of the printer control panel menus and settings Printing Guide Provides information about loading paper and other specialty media Color Quality Guide Provides information about solving color quality issues Print Quality Provides information about solving print quality issues Moving Guide Pr...

Страница 111: ...rs that work well with your printer see Using recycled paper and other office papers on page 54 Conserving supplies Use both sides of the paper If your printer model supports duplex printing then you can control whether print appears on one or two sides of the paper by selecting 2 sided printing from the Print dialog Place multiple pages on one sheet of paper You can print up to 16 consecutive pag...

Страница 112: ...e motors do not start until it is ready to print You may notice a short delay before the first page is printed The printer enters Sleep mode after one minute of inactivity Energy Paper Use all the settings associated with Energy and Paper modes Plain Paper Enable the automatic two sided duplex feature Turn off print log features 3 Click Submit Reducing printer noise Enable Quiet Mode to reduce pri...

Страница 113: ... low power saving mode Notes Three days is the default amount of time before the printer enters Hibernate mode Make sure to wake the printer from Hibernate mode before sending a print job A hard reset or a long press of the Sleep button wakes the printer from Hibernate mode If the printer is in Hibernate mode then the Embedded Web Server is disabled 1 From the home screen navigate to Settings Gene...

Страница 114: ...goes into a reduced power state or into the Ready state Note This feature is available only in network printers or printers connected to print servers Using the Embedded Web Server 1 Open a Web browser and then type the printer IP address in the address field Notes View the printer IP address in the TCP IP section in the Network Ports menu The IP address appears as four sets of numbers separated b...

Страница 115: ... brightness percentage you want for the display 4 Apply the changes Using the control panel 1 From the home screen navigate to Settings General Settings 2 In the Screen Brightness field enter the brightness percentage you want for the display 3 Apply the changes Recycling Recycling packaging hardware and other printing supplies Packaging hardware and supplies may be recycled through your local rec...

Страница 116: ...ring simple print jobs Non volatile memory Your printer may use two forms of non volatile memory EEPROM and NAND flash memory Both types are used to store the operating system device settings network information and bookmark settings and embedded solutions Hard disk memory Some printers have a hard disk drive installed The printer hard disk is designed for printer specific functionality This lets ...

Страница 117: ... data are completely erased is to physically destroy each hard disk where data is stored Erasing volatile memory Thevolatilememory RAM installedinyourprinterrequires apowersourcetoretaininformation Toerasethebuffered data simply turn off the printer Erasing non volatile memory Erase individual settings device and network settings security settings and embedded solutions by following these steps 1 ...

Страница 118: ... by a verification pass A secure overwrite is compliant with the DoD 5220 22 M standard for securely erasing data from a hard disk Highly confidential information should be wiped using this method 4 Press the up or down arrow button until Yes appears and then proceed with disk wiping Notes A status bar will indicate the progress of the disk wiping task Disk wiping can take from several minutes to ...

Страница 119: ... with the progress bar appears The printer performs a power on sequence and then the Configuration menu appears When the printer is fully turned on a list of functions appears on the printer display 3 Touch Disk Encryption Enable Note Enabling disk encryption will erase the contents of the printer hard disk 4 Touch Yes to proceed with disk wiping Notes Do not turn off the printer during the encryp...

Страница 120: ... manual feeder 3 Remove any dust lint and pieces of paper around the printer using a soft brush or vacuum 4 Dampen a clean lint free cloth with water and use it to wipe the outside of the printer Warning Potential Damage Do not use household cleaners or detergents as they may damage the finish of the printer 5 Make sure all areas of the printer are dry before sending a new print job Checking the s...

Страница 121: ...on the printer initial estimates assume future supplies consumption based on the International Organization for Standardization test methods and page content Average continuous black or composite CMY declared cartridge yield in accordance with ISO IEC 19798 Ordering supplies Note All life estimates for printer supplies assume printing on letter or A4 size plain paper Ordering toner cartridges To o...

Страница 122: ...le 3 Right side cover 4 Front door 1 Unpack the replacement waste toner bottle 2 Open the front door CAUTION HOT SURFACE The inside of the printer might be hot To reduce the risk of injury from a hot component allow the surface to cool before touching it Maintaining the printer 122 ...

Страница 123: ...3 Open the top door 4 Remove the right side cover 5 Remove the waste toner bottle 6 Pack the used waste toner bottle Maintaining the printer 123 ...

Страница 124: ...e the top door 10 Close the front door Replacing a black and color imaging kit 1 Open the front door CAUTION HOT SURFACE The inside of the printer might be hot To reduce the risk of injury from a hot component allow the surface to cool before touching it Maintaining the printer 124 ...

Страница 125: ...2 Open the top door 3 Remove the toner cartridges Maintaining the printer 125 ...

Страница 126: ...4 Remove the right side cover 5 Remove the waste toner bottle 6 Lift the blue levers on the imaging kit and then pull the imaging kit until it stops Maintaining the printer 126 ...

Страница 127: ...otes Color imaging kit includes the imaging kit and the cyan magenta yellow and black developer units Black imaging kit includes the imaging kit and the black developer unit 9 Pack the used imaging kit Note When replacing the black imaging kit save the cyan magenta and yellow developer units Dispose only the black developer unit Maintaining the printer 127 ...

Страница 128: ...rom the developer units 12 Insert the yellow cyan magenta and black developer units into the matching color slots 13 Remove the red packing strip from the imaging kit Warning Potential Damage Do not touch the shiny photoconductor drum under the imaging kit Doing so may affect the quality of future print jobs Maintaining the printer 128 ...

Страница 129: ...14 Align and then insert the imaging kit 15 Push the blue levers down until the imaging kit is fully seated into place Maintaining the printer 129 ...

Страница 130: ...16 Insert the waste toner bottle 17 Insert the right side cover Maintaining the printer 130 ...

Страница 131: ...t the toner cartridges 19 Close the top door 20 Close the front door Replacing toner cartridges 1 Slide the release latch on the right side of the printer and then open the top door Maintaining the printer 131 ...

Страница 132: ...2 Remove the toner cartridge by lifting the handle and then gently pulling it away from the imaging kit 3 Unpack the new toner cartridge and then remove its packaging Maintaining the printer 132 ...

Страница 133: ...ent toner cartridge came in before disposing Replacing a developer unit Replace the developer unit when a print quality defect occurs or when damage occurs to the printer 1 Open the front door CAUTION HOT SURFACE The inside of the printer might be hot To reduce the risk of injury from a hot component allow the surface to cool before touching it Maintaining the printer 133 ...

Страница 134: ...2 Open the top door 3 Remove the toner cartridges Maintaining the printer 134 ...

Страница 135: ...4 Remove the right side cover 5 Remove the waste toner bottle 6 Lift the blue levers on the imaging kit and then pull the imaging kit until it stops Maintaining the printer 135 ...

Страница 136: ...Potential Damage Do not touch the underside of the imaging kit This could damage the imaging kit 8 Remove the used developer unit 9 Gently shake the replacement developer unit side to side before removing it from its packaging 10 Remove the red shipping cover from the developer unit Maintaining the printer 136 ...

Страница 137: ...11 Insert the developer unit 12 Align and then insert the imaging kit 13 Push the blue levers down until the imaging kit is fully seated into place Maintaining the printer 137 ...

Страница 138: ...14 Insert the waste toner bottle 15 Insert the right side cover Maintaining the printer 138 ...

Страница 139: ...tlet Disconnect all cords and cables from the printer before moving it Lift the printer off the optional tray and then set it aside instead of trying to lift the tray and printer at the same time Note Use the handholds located on both sides of the printer to lift it Warning Potential Damage Damage to the printer caused by improper moving is not covered by the printer warranty Moving the printer to...

Страница 140: ... Keep the printer in an upright position Avoid severe jarring movements Shipping the printer When shipping the printer use the original packaging Maintaining the printer 140 ...

Страница 141: ...ddress field Notes View the printer IP address in the TCP IP section in the Network Ports menu The IP address appears as four sets of numbers separated by periods such as 123 123 123 123 If you are using a proxy server then temporarily disable it to load the Web page correctly 2 Click Reports and then click the type of report you want to view Configuring supply notifications from the Embedded Web ...

Страница 142: ...y must be replaced to continue printing 1 The printer generates an e mail about the status of the supply when supply notification is enabled 2 The printer stops when some supplies become empty to prevent damage 4 Click Submit Modifying confidential print settings Note This feature is available only in network printers or printers connected to print servers 1 Open a Web browser and then type the pr...

Страница 143: ...ter Settings Restoring factory default settings If you want to keep a list of the current menu settings for reference then print a menu settings page before restoring the factory default settings For more information see Printing a menu settings page on page 37 If you want a more comprehensive method of restoring the printer factory default settings then perform the Wipe All Settings option For mo...

Страница 144: ...f paper Incorrect loading of paper Do not remove a tray while the printer is printing Do not load a tray while the printer is printing Load it before printing or wait for a prompt to load it Do not load too much paper Make sure the stack height is below the maximum paper fill indicator Clearing jams 144 ...

Страница 145: ...p bent or curled paper Flex fan and straighten paper before loading it Do not use paper that has been cut or trimmed by hand Do not mix paper sizes weights or types in the same tray Make sure the paper size and type are set correctly on the computer or printer control panel Store paper according to manufacturer recommendations Understanding jam messages and locations When a jam occurs a message in...

Страница 146: ...clear duplex 23y xx Open the front door and then remove the jammed paper 5 Tray x x page jam open tray x 24y xx Pull the indicated tray out and then remove the jammed paper 6 Manual feeder x page jam clear manual feeder 251 xx Remove the jammed paper 7 Multipurpose feeder x page jam clear multipurpose feeder 250 xx Push the paper release lever to lift the paper rollers and then remove the jammed p...

Страница 147: ... of the printer might be hot To reduce the risk of injury from a hot component allow the surface to cool before touching it 2 Pull the green lever to open the fuser cover 3 Hold down the fuser cover and then remove the jammed paper Note Make sure all paper fragments are removed Clearing jams 147 ...

Страница 148: ...on touch screen printer models select Next Clear the jam press OK and then press to confirm x page jam open front door 1 Open the front door CAUTION HOT SURFACE The inside of the printer might be hot To reduce the risk of injury from a hot component allow the surface to cool before touching it Clearing jams 148 ...

Страница 149: ...gments are removed 3 Close the front door 4 From the printer control panel touch to clear the message and continue printing For non touch screen printer models select Next Clear the jam press OK and then press to confirm x page jam open front door to clear duplex 1 Open the front door Clearing jams 149 ...

Страница 150: ...hing it 2 Firmly grasp the jammed paper on each side and then gently pull it out Note Make sure all paper fragments are removed 3 Close the front door 4 From the printer control panel touch to clear the message and continue printing For non touch screen printer models select Next Clear the jam press OK and then press to confirm Clearing jams 150 ...

Страница 151: ...am is located 2 Firmly grasp the jammed paper on each side and then gently pull it out Note Make sure all paper fragments are removed 3 Insert the tray 4 From the printer control panel touch to clear the message and continue printing For non touch screen printer models select Next Clear the jam press OK and then press to confirm Clearing jams 151 ...

Страница 152: ...3 Insert the tray 4 From the printer control panel touch to clear the message and continue printing For non touch screen printer models select Next Clear the jam press OK and then press to confirm x page jam clear multipurpose feeder 1 Push the paper release lever in the multipurpose feeder to access the jammed paper and then gently pull it out Note Make sure all paper fragments are removed Cleari...

Страница 153: ...2 Flexthesheetsofpaperbackandforthtoloosenthem andthenfanthem Donotfoldorcreasethepaper Straighten the edges on a level surface 3 Reload paper into the multipurpose feeder Clearing jams 153 ...

Страница 154: ...til it rests lightly against the edge of the paper stack 5 From the printer control panel touch to clear the message and continue printing For non touch screen printer models select Next Clear the jam press OK Clearing jams 154 ...

Страница 155: ...nd then select Finished changing paper on the printer control panel to clear the message and continue printing For non touch screen printer models press to confirm Note Make sure the paper size and type are specified in the Paper menu on the printer control panel Cancel the print job Change paper source to paper type paper size Try one or more of the following Load the correct size and type of pap...

Страница 156: ...The type can be a black imaging kit or a black and color imaging kit You may need to order an imaging kit If necessary select Continue on the printer control panel to clear the message and continue printing For non touch screen printer models press to confirm Type imaging kit nearly low 84 xy Note The type can be a black imaging kit or a black and color imaging kit If necessary select Continue on ...

Страница 157: ...rd disk contains print jobs that were stored when the hard disk was installed in a different printer model From the printer control panel select Continue to clear the message For non touch screen printer models press to confirm Defective flash detected 51 Try one or more of the following Replace the defective flash memory card From the printer control panel select Continue to ignore the message an...

Страница 158: ...t memory for Flash Memory Defragment operation 37 Try one or more of the following From the printer control panel select Continue to stop the defragmentation and continue printing For non touch screen printer models press to confirm Delete fonts macros and other data from the printer memory Install additional printer memory Insufficient memory some Held Jobs were deleted 37 The printer deleted som...

Страница 159: ...ring Try one or more of the following Load the indicated tray or feeder with the correct size and type of paper To use the tray with the correct paper size or type select Finished loading paper on the printer control panel For non touch screen printer models press to confirm Note If the printer finds a tray that has the correct paper type and size then it feeds from that tray If the printer cannot...

Страница 160: ...rol panel to clear the message and continue printing Cancel the current job Load Manual Feeder with custom type name Try one or more of the following Load the feeder with the correct size and type of paper Depending on your printer model touch Prompt each page paper loaded or press on the printer control panel to clear the message and continue printing Cancel the current job Load Manual Feeder wit...

Страница 161: ...ing For non touch screen printer models press to confirm Memory full 38 Try one or more of the following From the printer control panel select Cancel job to clear the message For non touch screen printer models press to confirm Install additional printer memory Network x software error 54 Try one or more of the following From the printer control panel select Continue to continue printing For non t...

Страница 162: ...nter press and hold and the button on the printer control panel simultaneously for 15 seconds For non touch screen printer models press and simultaneously for 15 seconds to clear the message and continue printing If you do not want to accept these risks then remove the third party supply or part from your printer and then install a genuine supply or part Note For the list of supported supplies vis...

Страница 163: ...g material from the indicated location 2 From the printer control panel touch Continue to clear the message For non touch screen printer models press to confirm Remove paper from standard output bin Remove the paper stack from the standard bin Replace color cartridge 0 estimated pages remain 88 xy Replace the indicated toner cartridge to clear the message and continue printing For more information...

Страница 164: ...e you purchased the printer Replace maintenance kit 0 estimated pages remain 80 xy The printer is scheduled for maintenance Contact customer support or your service representative and then report the message Replace missing color cartridge 31 xy Install the indicated toner cartridge to clear the message For more information see the Replacing supplies section of the User s Guide Replace missing typ...

Страница 165: ...nt jobs SMTP server not set up Contact system administrator From the printer control panel touch Continue to clear the message Note If the message appears again then contact your system support person Some held jobs were not restored From the printer control panel select Continue to clear the message For non touch screen printer models press to confirm Note Held jobs that are not restored remain i...

Страница 166: ...n resend the print job Too many flash options installed 58 1 Turn off the printer 2 Unplug the power cord from the electrical outlet 3 Remove the extra flash memory 4 Connect the power cord to a properly grounded electrical outlet 5 Turn the printer back on Too many trays attached 58 1 Turn off the printer 2 Unplug the power cord from the electrical outlet 3 Remove the extra trays 4 Connect the po...

Страница 167: ...inter turned on Go to step 2 Turn on the printer Step 2 Check if the printer is in Sleep mode or Hibernate mode Is the printer in Sleep mode or Hibernate mode Press the Sleep button to wake the printer from Sleep mode or Hibernate mode Go to step 3 Step 3 Check if one end of the power cord is plugged into the printer and the other to a properly grounded electrical outlet Is the power cord plugged ...

Страница 168: ...n the printer and the other to the computer print server option or other network device Is the printer cable securely attached to the printer and the computer print server option or other network device Go to step 9 Connect the printer cable securely to the printer and the computer print server option or other network device Step 9 Makesuretoinstallallhardwareoptionsproperlyandremoveanypacking mat...

Страница 169: ...the printer controller board b Print a menu settings page and then check if the card is listed in the Installed Options list Is the card listed in the Installed Options list The problem is solved Contact customer support Cannot detect internal option Action Yes No Step 1 Turn off the printer then wait for about 10 seconds and then turn the printer back on Does the internal option operate correctly...

Страница 170: ...l option For Mac OS X version 9 users make sure the printer is set up in Chooser b Resend the print job Does the internal option operate correctly The problem is solved Contact customer support Tray problems Action Yes No Step 1 a Pull out the tray and then do one or more of the following Check for paper jams or misfeeds Check if the paper size indicators on the paper guides are aligned with the p...

Страница 171: ... the printer driver to make it available for print jobs For more information see Updating available options in the printer driver on page 32 Is the tray available in the printer driver The problem is solved Contact customer support Paper feed problems Jammed pages are not reprinted Action Yes No a Turn on jam recovery 1 From the printer control panel navigate to Settings General Settings Print Rec...

Страница 172: ... 2 a Load paper from a fresh package Note Paper absorbs moisture due to high humidity Store paper in its original wrapper until you use it b Resend the print job Do paper jams still occur frequently Go to step 3 The problem is solved Step 3 a Review the tips on avoidingjams For more information see Avoiding jams on page 144 b Follow the recommendations and then resend the print job Do paper jams s...

Страница 173: ...nt a network setup page or the menu settings pages and then locate the IP address in the TCP IP section Note An IP address appears as four sets of numbers separated by periods such as 123 123 123 123 b Click Settings Apps Apps Management System tab Log c From the Filter menu select an application status d From the Application menu select an application and then click Submit Does an error message a...

Страница 174: ...om the wrong tray or on the wrong paper Action Yes No Step 1 a Check if you are printing on paper that is supported by the tray b Resend the print job Did the job print from the correct tray or on the correct paper The problem is solved Go to step 2 Step 2 a From the Paper menu on the printer control panel set the paper size and type to match the paper loaded in the tray b Resend the print job Did...

Страница 175: ...Step 3 Reduce the complexity of the print job by eliminating the number and size of fonts the number and complexity of images and the number of pages in the job Did the job print and collate correctly The problem is solved Contact customer support Error message about reading the flash drive appears Action Yes No Step 1 Check if the flash drive is inserted into the front USB port Note The flash dri...

Страница 176: ... damage to the fuser The printer speed may be reduced if printing for long periods of time or printing at elevated temperatures Action Yes No Place letter or A4 size paper in the tray and then resend the print job Does the print speed increase The problem is solved Contact customer support Print jobs do not print Action Yes No Step 1 a From the document you are trying to print open the Print dialo...

Страница 177: ...e problem is solved Go to step 6 Step 6 a Remove and then reinstall the printer software For more information see Installing the printer on page 31 b Resend the print job Do the jobs print The problem is solved Contact customer support Print job takes longer than expected Action Yes No Step 1 Change the environmental settings of the printer a From the printer control panel navigate to Settings Gen...

Страница 178: ...ts appear on prints Action Yes No a Check if the distance between the defects is equal to one of the following 25 1 mm 0 98 in 29 8 mm 1 17 in 43 9 mm 1 72 in 45 5 mm 1 79 in 94 2 mm 3 70 in b Ifthedistancebetweenthedefectsequals25 1mm 0 98in 29 8mm 1 17in or 94 2mm 3 70in then replacethephotoconductor unit c If the distance between the defects equals 43 9 mm 1 72 in or 45 5 mm 1 79 in then replac...

Страница 179: ...problem is solved Go to step 2 Step 2 a Fromtheprintercontrol panel setthepapersizeandtypeinthePaper menu to match the paper loaded in the trays to be linked Note The paper size and type must match for trays to be linked b Resend the print job Do the trays link correctly The problem is solved Contact customer support Multiple language PDF files do not print Action Yes No Step 1 a Check ifthe print...

Страница 180: ...problem is solved Contact customer support Print quality problems Characters have jagged or uneven edges Action Yes No Step 1 a Printafontsamplelisttocheckifthefontsyouareusingaresupported by the printer 1 From the printer control panel navigate to Menus Reports Print Fonts 2 Select PCL Fonts or PostScript Fonts b Resend the print job Are you using fonts that are supported by the printer Go to ste...

Страница 181: ...e tray From the printer control panel change the paper type to match the paper loaded in the tray Step 3 a Depending on your operating system specify the paper size from Printing Preferences or from the Print dialog b Resend the print job Is the page or image clipped Go to step 4 The problem is solved Step 4 a Remove and then reinstall the imaging kit Warning Potential Damage Do not expose the ima...

Страница 182: ...xpose the imaging kit to direct light for more than 10 minutes Extended exposure to light may cause print quality problems Warning Potential Damage Do not touch the underside of the imaging kit This could damage the imaging kit b Resend the print job Did the gray background disappear The problem is solved Contact customer support Horizontal voids appear on prints Action Yes No Step 1 a Make sure y...

Страница 183: ...Warning Potential Damage Do not touch the underside of the imaging kit This could damage the imaging kit b Resend the print job Do horizontal voids appear on prints Go to step 4 The problem is solved Step 4 Replace the imaging kit and then resend the print job Do horizontal voids appear on prints Contact customer support The problem is solved Incorrect margins on prints Action Yes No Step 1 a Move...

Страница 184: ...th guides in the tray to the correct positions for the size of the paper loaded Are the width and length guides positioned correctly Go to step 2 Adjust the width and length guides Step 2 From the printer control panel set the paper type and weight in the Paper menu to match the paper loaded in the tray Do the paper type and weight match the type and weight of the paper in the tray Go to step 3 Sp...

Страница 185: ...ep 2 The problem is solved Step 2 From the printer control panel set the paper size and type in the Paper menu to match the paper loaded in the tray Is the tray set to the size and type of the paper loaded in the tray Go to step 3 Do one or more of the following Specify the paper size from the tray settings to match the paper loaded in the tray Change the paper loaded in the tray to match the pape...

Страница 186: ...regularities still appear Go to step 6 The problem is solved Step 6 Replace the imaging kit and then resend the print job Do print irregularities still appear Contact customer support The problem is solved Print is too dark Action Yes No Step 1 a From the Quality menu on the printer control panel select Color Adjust b Resend the print job Is the print still too dark Go to step 2 The problem is sol...

Страница 187: ...t job Is the print still too dark Go to step 5 The problem is solved Step 5 Check if the paper loaded in the tray has texture or rough finishes Are you printing on textured or rough paper From the printer control panel set the paper texture in the Paper menu to match the paper loaded on the tray Go to step 6 Step 6 a Load paper from a fresh package Note Paper absorbs moisture due to high humidity ...

Страница 188: ... the paper loaded in the tray Step 4 a Depending on your operating system specify the paper type texture and weight from Printing Preferences or from the Print dialog b Resend the print job Is the print still too light Go to step 5 The problem is solved Step 5 Make sure that the paper has no texture or rough finishes Are you printing on textured or rough paper From the printer control panel set th...

Страница 189: ...Extended exposure to light may cause print quality problems Warning Potential Damage Do not touch the underside of the imaging kit This could damage the imaging kit 3 Reinstall the imaging kit b Resend the print job Is the printer still printing blank pages Go to step 2 The problem is solved Step 2 Replace the imaging kit and then resend the print job Is the printer still printing blank pages Cont...

Страница 190: ...hadow images appear on prints Action Yes No Step 1 Checkifthepaperloadedinthetrayhasthecorrectpapertypeandweight Is paper with the correct paper type and weight loaded in the tray Go to step 2 Load paper with the correct paper type and weight in the tray Step 2 From the printer control panel set the paper type and weight in the Paper menu to match the paper loaded in the tray Do the printer settin...

Страница 191: ... the print still skewed Go to step 2 The problem is solved Step 2 a Check if you are printing on a paper that is supported by the tray b Resend the print job Is the print still skewed Contact customer support The problem is solved Streaked horizontal lines appear on prints Action Yes No Step 1 a Depending on your operating system specify the tray or feeder from Printing Preferences or the Print di...

Страница 192: ...rapper until you use it b Resend the print job Do streaked horizontal lines appear on prints Go to step 4 The problem is solved Step 4 a Remove and then reinstall the imaging kit Warning Potential Damage Do not expose the imaging kit to direct light for more than 10 minutes Extended exposure to light may cause print quality problems Warning Potential Damage Do not touch the underside of the imagin...

Страница 193: ...pecified in the tray settings Step 3 a Load paper from a fresh package Note Paper absorbs moisture due to high humidity Store paper in its original wrapper until you use it b Resend the print job Do streaked vertical lines appear on prints Go to step 4 The problem is solved Step 4 a Remove and then reinstall the imaging kit Warning Potential Damage Do not expose the imaging kit to direct light for...

Страница 194: ...ading appears on prints Action Yes No Step 1 a Remove and then reinstall the imaging kit Warning Potential Damage Do not expose the imaging kit to direct light for more than 10 minutes Extended exposure to light may cause print quality problems Warning Potential Damage Do not touch the underside of the imaging kit This could damage the imaging kit b Resend the print job Does fog or shading disappe...

Страница 195: ...the tray Step 2 Resend the print job Does the toner still rub off Contact customer support or your service representative The problem is solved Toner specks appear on prints Action Yes No Replace the imaging kit and then resend the print job Do toner specks appear on prints Contact customer support The problem is solved Uneven print density Action Yes No Replace the imaging kit and then resend the...

Страница 196: ...recommended type of paper b Resend the print job Do vertical voids appear on prints Go to step 4 The problem is solved Step 4 a Remove and then reinstall the imaging kit Warning Potential Damage Do not expose the imaging kit to direct light for more than 10 minutes Extended exposure to light may cause print quality problems Warning Potential Damage Do not touch the underside of the imaging kit Thi...

Страница 197: ...ersion tables that translate the color into the appropriate amounts of cyan magenta yellow and black toner needed to produce the color you want The object information determines the application of color conversion tables For example it is possible to apply one type of color conversion table to text while applying a different color conversion table to photographic images What is manual color correc...

Страница 198: ... is obtained by passing the CMYK or RGB combination labeled on the box through the selected color conversion table By examining Color Samples sets you can identify the box whose color is the closest to the color you want The color combination labeled on the box can then be used for modifying the color of the object in a software program For more information see the help information of your operati...

Страница 199: ...olor sample range will appear 6 Click Print Prints on color transparencies appear dark when projected Note This problem occurs when projecting transparencies with reflective overhead projectors To obtain the highest projected color quality transmissive overhead projectors are recommended Action Yes No Step 1 From the printer control panel make sure the paper type setting is set to Transparency Is ...

Страница 200: ...Step 2 From the Quality menu on the printer control panel do the following a Select Color Correction and then select Manual b SelectManual Color and then selecttheappropriatecolor conversion table for the affected object type c Resend the print job Does the color of the print match the color of the file on the computer screen The problem is solved Contact customer support The print appears tinted ...

Страница 201: ...us is Connected Note If the status is Not Connected then the connection may be intermittent or the network cable may be defective Contact your system support person for a solution and then print another network setup page c Open a Web browser and then type the printer IP address d Press Enter Does the Embedded Web Server open The problem is solved Go to step 4 Step 4 Check if the cable connections...

Страница 202: ...lay and the troubleshooting steps you have already taken to find a solution You need to know your printer model type and serial number For more information see the label at the back of the printer The serial number is also listed on the menu settings page For customer support contact the place where you purchased your printer Troubleshooting 202 ...

Страница 203: ...sed in 48 C F R 12 212or48C F R 227 7202 asapplicable Consistentwith48C F R 12 212or48C F R 227 7202 1through227 7207 4 as applicable the Commercial Computer Software and Commercial Software Documentation are licensed to the U S Government end users a only as Commercial Items and b with only those rights as are granted to all other end users pursuant to the terms and conditions herein Federal Comm...

Страница 204: ... To assure compliance with FCC regulations on electromagnetic interference for a Class B computing device use a properly shielded and grounded cable such as Lexmark part number 1021231 for parallel attach or 1021294 for USB attach Use of a substitute cable not properly shielded and grounded may result in a violation of FCC regulations Any questions regarding this compliance information statement s...

Страница 205: ...osal Do not dispose of the printer or supplies in the same manner as normal household waste Consult your local authorities for disposal and recycling options Static sensitivity notice This symbol identifies static sensitive parts Do not touch in the areas near these symbols without first touching the metal frame of the printer Temperature information Ambient operating temperature 15 6 to 32 2 C 60...

Страница 206: ...i Vältä lasersäteelle altistumista GEFAHR Unsichtbare Laserstrahlung beim Herausnehmen von Druckkassetten und offener Sicherheitssperre Laserstrahl meiden ΚΙΝΔΥΝΟΣ Έκλυση αόρατης ακτινοβολίας laser κατά την αφαίρεση των κασετών και την απασφάλιση της μανδάλωσης Αποφεύγετε την έκθεση στην ακτινοβολία laser VESZÉLY Nem látható lézersugárzás fordulhat elő a patronok eltávolításakor és a zárószerkezet...

Страница 207: ...and120minutes Setting theSleepModeTimeouttoalowvaluereducesenergyconsumption butmayincreasetheresponsetimeoftheproduct Setting the Sleep Mode Timeout to a high value maintains a fast response but uses more energy Off mode If this product has an off mode which still consumes a small amount of power then to completely stop product power consumption disconnect the power supply cord from the electrica...

Страница 208: ...the Class B limits of EN 55022 and safety requirements of EN 60950 1 Regulatory notices for wireless products This section contains the following regulatory information pertaining to wireless products that contain transmitters for example but not limited to wireless network cards or proximity card readers Modular component notice Wireless equipped models contain the following modular component s R...

Страница 209: ...her toute interférence radio au service faisant l objet d une licence cet appareil doit être utilisé à l intérieur et loin des fenêtres afin de garantir une protection optimale Si le matériel ou son antenne d émission est installé à l extérieur il doit faire l objet d une licence L installateur de cet équipement radio doit veiller à ce que l antenne soit implantée et dirigée de manière à n émettre...

Страница 210: ...rklærerherved atdetteproduktoverholderdevæsentligekravogøvrigerelevante krav i direktiv 1999 5 EF Deutsch Hiermit erklärt Lexmark International Inc dass sich das Gerät dieses Gerät in Übereinstimmung mit den grundlegenden Anforderungen und den übrigen einschlägigen Bestimmungen der Richtlinie 1999 5 EG befindet Ελληνική ΜΕ ΤΗΝ ΠΑΡΟΥΣΑ Η LEXMARK INTERNATIONAL INC ΔΗΛΩΝΕΙ ΟΤΙ ΑΥΤΟ ΤΟ ΠΡΟΪΟΝ ΣΥΜΜΟΡΦΩ...

Страница 211: ...y a všetky príslušné ustanovenia smernice 1999 5 ES Slovensko Lexmark International Inc izjavlja da je ta izdelek v skladu z bistvenimi zahtevami in ostalimi relevantnimi določili direktive 1999 5 ES Svenska Härmed intygar Lexmark International Inc att denna produkt står i överensstämmelse med de väsentliga egenskapskrav och övriga relevanta bestämmelser som framgår av direktiv 1999 5 EG Patent ac...

Страница 212: ...is product or service is subject to the reasonable non discriminatory terms in the Intellectual Property Rights IPR Disclosure of Certicom Corp at the IETF for Suite B Cryptographic Suites for IPSec implemented in the product or service The use of this product or service is subject to the reasonable non discriminatory terms in the Intellectual Property Rights IPR Disclosure of Certicom Corp at the...

Страница 213: ...ustom string 155 Change paper source to custom type name 155 Change paper source to paper type paper size 155 checking an unresponsive printer 167 checking status of parts and supplies 120 checking the printer status using the Embedded Web Server 141 checking the status of parts and supplies 120 cleaning exterior of the printer 120 interior of the printer 120 cleaning the printer 120 Close door 15...

Страница 214: ...2 45 tips on using 51 environmental settings conserving supplies 111 display brightness adjusting 114 Eco Mode 112 Hibernate mode 113 Hibernate Timeout 113 Quiet Mode 112 Schedule Power Modes 114 Sleep Mode 113 Erase Temporary Data Files menu 86 erasing hard disk memory 118 erasing non volatile memory 117 erasing volatile memory 117 Error reading USB drive Remove USB 157 Error reading USB hub Remo...

Страница 215: ...6 47 Load paper source with custom string 159 Load paper source with custom type name 159 Load paper source with paper size 159 Load paper source with paper type paper size 160 Load Manual Feeder with custom string 160 Load Manual Feeder with custom type name 160 Load Manual Feeder with paper size 160 Load Manual Feeder with paper type paper size 160 loading 250 sheet tray 38 550 sheet tray 38 650...

Страница 216: ...e jam open front door to clear duplex 149 in fuser area 147 in manual feeder 152 in multipurpose feeder 152 in standard bin 146 Tray 1 151 Tray 2 151 Paper Loading menu 74 paper size setting 38 Paper Size Type menu 67 paper sizes supported by the printer 55 Paper Texture menu 70 paper type setting 38 paper types supported by printer 57 where to load 57 Paper Weight menu 72 paper weights supported ...

Страница 217: ...ay not have printed 39 157 Configuration change some held jobs were not restored 57 157 Defective flash detected 51 157 Error reading USB drive Remove USB 157 Error reading USB hub Remove hub 157 Incompatible tray x 59 157 Incorrect paper size open paper source 34 158 Insert Tray x 158 Insufficient memory for Flash Memory Defragment operation 37 158 Insufficient memory to collate job 37 158 Insuff...

Страница 218: ...inting forms 59 printing from a flash drive 61 printing from a mobile device 63 printing in black and white 59 Push Button Configuration method using 35 Q Quality menu 100 Quiet Mode 112 R recycled paper using 54 111 recycling hardware 115 packaging 115 supplies 115 reducing noise 112 Reinstall missing or unresponsive color cartridge 31 xy 162 Reload printed pages in Tray x 163 remaining pages num...

Страница 219: ...ess adjusting 60 Too many flash options installed 58 166 Too many trays attached 58 166 touch screen buttons using 13 transparencies loading 42 tips on using 51 trays linking 46 47 unlinking 46 47 troubleshooting an application error has occurred 173 cannot open Embedded Web Server 200 checking an unresponsive printer 167 contacting customer support 202 FAQ about color printing 197 solving basic p...

Страница 220: ...ites 59 using Hibernate mode 113 using Max Speed and Max Yield 60 using recycled paper 111 using Schedule Power Modes 114 using the Embedded Web Server 9 using the printer control panel 11 using the touch screen buttons 13 Utilities menu 104 V verify print jobs 63 printing from a Macintosh computer 64 printing from Windows 64 vertical voids appear on prints 196 viewing reports 141 volatile memory ...

Отзывы: