background image

7

1

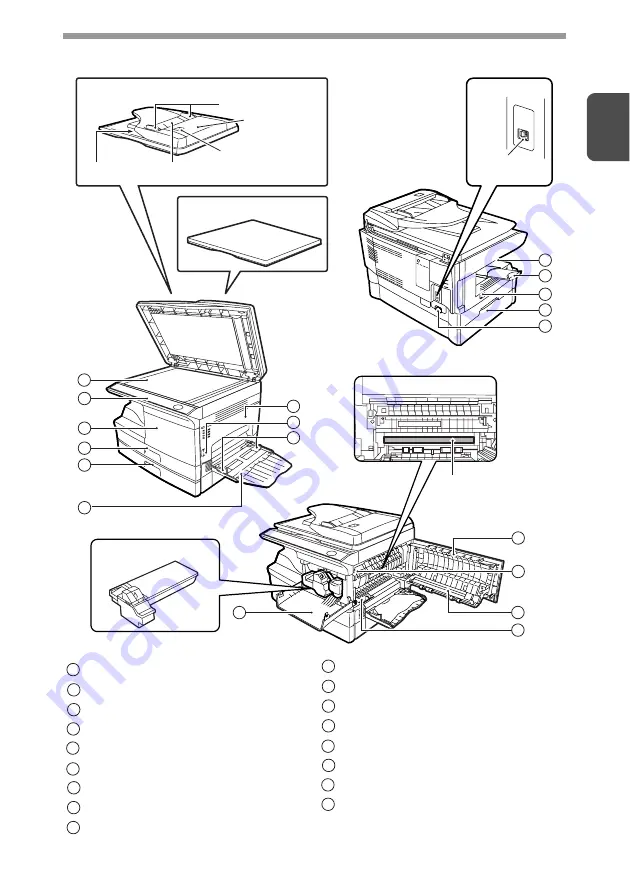
PART NAMES

Interface

USB 
connector

Original cover

Original guides

Document feeder tray

Peep hole

Document
feeder cover

Photoconductive
drum

Toner cartridge

ADF (Peripheral device)

Exit area

2

3

4

5

1

7

9

8

10

11

15

16

17

7

3

12

13

6

14

Document glass

Operation panel

Front cover

Paper tray 1

Paper tray 2 (Peripheral device)

Multi-bypass tray

Side cover

Side cover open button

Bypass tray paper guides

1

2

3

4

5

6

7

8

9

Paper output tray

Paper output tray extension

Power switch

Handle

Power cord socket

Fusing unit release lever

Transfer charger

Charger cleaner

10

11

12

13

14

15

16

17

Содержание e-Studio 202S

Страница 1: ......

Страница 2: ......

Страница 3: ...tion You should be aware however that Toshiba Tec Corporation does not itself extend any warranties either express or implied directly to you the end user and no one is authorized to make any representations or warranties on behalf of Toshiba Tec Corporation Specifically TOSHIBA TEC CORPORATION DOES NOT EXTEND TO YOU THE END USER ANY EXPRESS WARRANTY OR ANY IMPLIED WARRANTY OF MERCHANTABILITY FITN...

Страница 4: ...ning the unit off wait 10 to 15 seconds before turning it back on Do not cover the unit with a dust cover cloth or plastic film while the power is on Doing so may prevent heat radiation damaging the unit Use of controls or adjustments or performance of procedures other than those specified herein may result in hazardous radiation exposure The socket outlet shall be installed near the unit and shal...

Страница 5: ...damp resulting in paper misfeeds Trademark acknowledgements Microsoft Windows Windows 98 Windows Me Windows 2000 Windows XP Windows Vista and Internet Explorer are registered trademarks or trademarks of Microsoft Corporation in the U S A and other countries Macintosh is a trademark of Apple Inc registered in the U S and other countries Adobe the Adobe logo Acrobat the Adobe PDF logo and ReaderTM a...

Страница 6: ...1 2 2001 SAFETY PRECAUTIONS This Digital Copier is rated Class 1 and complies with 21 CFR 1040 10 and 1040 11 of the CDRH standards This means that the equipment does not produce hazardous laser radiation For your safety observe the precautions below Do not remove the cabinet operation panel or any other covers The equipment s exterior covers contain several safety interlock switches Do not bypass...

Страница 7: ... EXPOSURE ADJUSTMENT PHOTO COPYING 41 REDUCTION ENLARGEMENT ZOOM 43 SELECTING THE PAPER TRAY 43 5 SPECIAL FUNCTIONS DESCRIPTION OF SPECIAL FUNCTIONS 44 TONER SAVE MODE 45 USER PROGRAMS 46 DISPLAYING TOTAL NUMBER OF COPIES 47 6 MAINTENANCE TONER CARTRIDGE REPLACEMENT 48 SCAN HEAD LOCKING SWITCH 50 CLEANING THE UNIT 51 7 TROUBLESHOOTING THE UNIT TROUBLESHOOTING 53 STATUS INDICATORS 54 MISFEED REMOVA...

Страница 8: ...nt feeder and lower paper tray are installed on the machine For some functions and procedures the explanations assume that devices other than the above are installed Wherever e STUDIOXXXX appears in this manual please substitute your model name for xxxx Illustrations of driver screens and other computer screens show the screens that appear in Windows XP Home Edition Some of the names that appear i...

Страница 9: ...2 3 4 5 1 7 9 8 10 11 15 16 17 7 3 12 13 6 14 Document glass Operation panel Front cover Paper tray 1 Paper tray 2 Peripheral device Multi bypass tray Side cover Side cover open button Bypass tray paper guides 1 2 3 4 5 6 7 8 9 Paper output tray Paper output tray extension Power switch Handle Power cord socket Fusing unit release lever Transfer charger Charger cleaner 10 11 12 13 14 15 16 17 ...

Страница 10: ...hine when the ADF is used p 60 Display Displays the specified copy quantity zoom copy ratio user program code and error code 1 2 3 4 5 6 7 8 SCAN key and indicator p 25 p 33 ONLINE key and indicator Lights up when the unit is used as a printer and scanner For description of the ONLINE indicator see INDICATORS ON THE OPERATION PANEL p 25 Start key and indicator Copying is possible when the indicato...

Страница 11: ...ation panel p 10 If you use the unit in a country other than the country where the unit was purchased you will need to make sure that your local power supply is compatible with your model If you plug the unit into an incompatible power supply irreparable damage to the unit will result Only insert the power cord into a properly grounded wall socket Do not use extension cords or power strips The uni...

Страница 12: ...e set with the Auto clear time setting p 46 elapses after a job is finished or when the clear key is pressed twice The initial settings of the operation panel are shown below When copying has begun in this state the settings in the following table are used Power off methods If not used for a certain period of time the unit will automatically enter auto power shut off mode p 44 in order to minimize...

Страница 13: ... tray Special papers such as transparency film labels and envelopes must be fed one sheet at a time through the multi bypass tray Type of paper feeding Type of media Size Weight Paper tray Standard paper Letter 8 1 2 x 11 Legal 8 1 2 x 14 Invoice 5 1 2 x 8 1 2 A4 210mm x 297mm A5 148mm x 210mm B5 182mm x 257mm 15 lbs to 21 lbs 56g m2 to 80g m2 Multi bypass tray Standard paper and thick paper Lette...

Страница 14: ...d length Squeeze the lever of paper guide and slide the guide to match with the width of the paper Move paper guide to the appropriate slot as marked on the tray 3 Fan the paper and insert it into the tray Make sure the edges go under the corner hooks Do not load paper above the maximum height line Exceeding the line will cause a paper misfeed A B Paper guide B Paper guide A ...

Страница 15: ... will result in document skew or a paper jam When not using the unit for an extended period remove all paper from the paper tray and store it in a dry place If paper is left in the unit for an extended period the paper will absorb moisture from the air resulting in paper jams When adding new paper to the paper tray remove the old paper already contained in the tray Placing new paper on top of the ...

Страница 16: ...28g m2 8 1 2 x 11 A4 is the maximum size The multi bypass tray 1 Open the multi bypass tray and extend the tray The multi bypass tray can hold maximum of 50 sheets of paper Capacity will vary depending on the type of paper loaded The original image must be smaller than the paper or media for copying If the original image is bigger than the paper or media this may cause smudges on the edges of the ...

Страница 17: ...r synthetic materials Do not use envelopes that are filled with air or envelopes that have labels or stamps attached Envelopes of which the surface is not flat because of embossing may cause the copies prints to become smudged Under high humidity and temperature conditions the glue flaps on some envelopes may become sticky and be sealed when copied printed Use only envelopes which are flat and cri...

Страница 18: ...ty that monitors the machine and informs you of the printing status the name of the document currently being printed and error messages Scanner driver The scanner driver allows you to use the scanning function of the machine with TWAIN compliant and WIA compliant applications Desktop Document Manager Desktop Document Manager is an integrated software environment that makes it easy to manage docume...

Страница 19: ... machine does not support printing from a Macintosh environment 4 Administrator s rights are required to install the software using the installer Computer type IBM PC AT or compatible computer equipped with a USB2 0 1 1 1 Operating system 2 3 Windows 98 Windows Me Windows 2000 Professional 4 Windows XP 4 Windows Vista 4 Display 1024 x 768 dots resolution and 16 bit color or higher is recommended H...

Страница 20: ...rstand the contents of the software license and then click the Yes button 6 Read the Readme First in the Welcome window and then click the Next button The screen images in this manual are mainly for Windows XP With other versions of Windows some screen images may be different from those in this manual In the following explanations it is assumed that the mouse is configured for right hand operation...

Страница 21: ... show information on packages that are selected 9 Select Connected to this computer and click the Next button Follow the on screen instructions If you are using Windows Vista and a security warning window appears be sure to click Install this driver software anyway If you are running Windows 2000 XP and a warning message appears regarding the Windows logo test or digital signature be sure to click...

Страница 22: ...structions After the installation a message prompting you to restart your computer may appear In this case click the Yes button to restart your computer In Windows 98 Me 2000 if the following screen appears click the Skip button or the Continue button as appropriate to continue the Desktop Document Manager installation If Skip is selected the Desktop Document Manager installation will continue wit...

Страница 23: ...the Desktop Document Manager setup screen will appear Follow the instructions in the screen to set up Desktop Document Manager If you are using Windows Vista and a security warning window appears be sure to click Install this driver software anyway If you are running Windows 2000 XP and a warning message appears regarding the Windows logo test or digital signature be sure to click Continue Anyway ...

Страница 24: ...ert the cable into the USB connector on the machine 2 Insert the other end of the cable into your computer s USB port USB is available with a PC AT compatible computer that was originally equipped with USB and had Windows 98 Windows Me Windows 2000 Professional Windows XP or Windows Vista preinstalled Do not connect the USB cable before installing the printer driver The USB cable should be connect...

Страница 25: ... Perform steps 2 through 6 in INSTALLING THE SOFTWARE p 18 2 Click the Custom button 3 Click the MFP Driver button Click the Display Readme button to show information on packages that are selected 4 Select Connected via the network and click the Next button To configure the appropriate settings in the print server see the operation manual or help file of your operating system ...

Страница 26: ...ke the selections and click the Next button Follow the on screen instructions 8 You will return to the window of step 3 Click the Close button This completes the installation of the software If you are using Windows Vista and a security warning window appears be sure to click Install this driver software anyway If you are running Windows 2000 XP and a warning message appears regarding the Windows ...

Страница 27: ...d During print online ONLINE indicator The ONLINE key is pressed and on line and off line are changed On Indicates the unit is ready for printing or scanning is being performed On line Blinking Printing or data is being received from a computer Off Copying is being performed Off line Power save indicator On Indicates the unit is in a power save mode Blinking Indicates that the unit is initializing...

Страница 28: ...t Settings and click Printers 3 Click the TOSHIBA e STUDIOXXXX printer driver icon and from the File menu select Properties On Windows Vista select Properties from the Organize menu 4 Click Printing Preferences button in the General tab On Windows 98 Me click the Setup tab The printer driver setup screen will appear For problems with the printer function see the online manual or the help file for ...

Страница 29: ...print settings see the online manual or the help file for the printer driver If copying is being performed when printing is started copying will continue After copying is complete printing will be executed when the clear key is pressed twice the ONLINE key is pressed to switch the unit to the online state or approximately 60 seconds auto clear time elapse The auto clear time varies with a user pro...

Страница 30: ...ect Control Panel and click Hardware and Sound and then click Scanners and Cameras 2 In the Properties screen click the Events tab 3 Click the Select an event button and select ScanMenu SC1 from the pull down menu Select TOSHIBA Button Manager S in Start this program and click Apply 4 Repeat step 3 to set ScanMenu SC2 through ScanMenu SC6 Click the Select an event button and select ScanMenu SC2 fr...

Страница 31: ...e Scanner events and select ScanMenu SC2 from the pull down menu Select TOSHIBA Button Manager S in Start this program and click Apply Do the same for each ScanMenu through ScanMenu SC6 When the settings have been completed click the OK button to close the screen When the settings have been completed in Windows start the Button Manager Adjust detailed settings and then scan an image from the unit ...

Страница 32: ...uring the scan settings in Button Manager see the online manual or the help file This is the corresponding setting in the Button Manager to automatically send image s in full color at 75 dpi to Desktop Document Manager using the operation panel SC1 SCAN key selection This dialog shows the SC1 event set to go directly to Button Manager With the Button Manager set to send the image to Desktop Docume...

Страница 33: ...send scanned images to any application that can be selected in Button Manager This can be done with the Windows OS showing the Event Manager selection dialog or directly into a selected application if the Button Manager is the only allowed handler for device events from the TOSHIBA e STUDIOXXXX This is done by changing the Windows device settings for the e STUDIOXXXX in the Scanner and Camera devi...

Страница 34: ...canner camera device register with the Windows Event Manager and shown as available in the registered applications The path an event takes to get to the user s selected application depends upon the event settings for the device Scanner SCAN key pressed Event Manager Windows OS Event Manager selection dialog Displayed on screen User selects an application The user application opens This is the Wind...

Страница 35: ...ation numbers are initially as follows To check the settings see Scan Button Destination Setting Dialog Box p 30 and then open the settings window of the Button Manager Scanning is not possible during a copy job If the SCAN key is pressed during a print job the scan job will be stored When scanning an original that has been placed in the ADF only one original can be placed unless you are using Des...

Страница 36: ...TWAIN setting screen when scanning checkbox selected in the Scan Button Destination Setting Dialog Box p 30 the TWAIN settings screen p 35 will automatically appear Check the settings and then press the start key again or click the Scan button in the TWAIN setting screen to start scanning The scanned data will be transferred to the application Scanning is not possible during a copy and print job T...

Страница 37: ...AIN S and click the Select button 4 Select Acquire Image from the File menu or click the Acquire button 5 Set the configuration for scanning refer to the online manual and help file and click the Scan button Scan is started If you use more than one scanning device select the scanner you want to use through the application The method for accessing the Select Scanner option depends upon the applicat...

Страница 38: ...anner and Camera Wizard appears Click Next and establish the basic settings for scanning For information on the settings see the Windows XP help file After completing each setting click Next 4 Select a name format and folder for the scanned image For information on the image name file format and folder see the Windows XP help file 5 Scanning begins When scanning ends select the next task you wish ...

Страница 39: ...nglishA folder and then double click the e STUDIO202S pdf icon The following window will appear 5 Click to read the online manual To close the online manual click the button located at the top right of the window VIEWING THE ONLINE MANUAL The Software CD ROM that accompanies the machine contains an online manual in PDF format To view the manual in PDF format Acrobat Reader or Adobe Reader of Adobe...

Страница 40: ...r tray p 10 or multi bypass tray p 12 and check the paper size p 9 If paper is not loaded see page 10 2 Place the original If you are using the document glass see Using the document glass p 37 If you are using the ADF see Using the ADF Peripheral device p 38 When copying onto paper larger than 8 1 2 x 11 A4 size pull out the paper output tray extension 4 Start copying Press the start key 3 Select ...

Страница 41: ...ntly close the original cover ADF After placing the original be sure to close the ADF If left open parts outside of the original will be copied black causing excessive use of toner In addition toner may scatter inside the machine or the toner cartridge may suffer damage If you start a print job while a copy job is in progress the print job will begin when the copy job is completed The scanning fun...

Страница 42: ...e feeding originals in the document feeder tray be sure to remove any staples or paper clips from them Before placing curled or wavy originals into the document feeder tray be sure to flatten them If not original misfeeds may result If the original is placed correctly in the ADF the ADF indicator will light up If the original is not placed correctly the ADF indicator will not light If the ADF is n...

Страница 43: ...py density manually or to copy photographs the exposure level can be adjusted in five steps manually 1 Press the exposure mode selector key to select the MANUAL mode or PHOTO mode 2 Use the light and dark keys to adjust the exposure level If exposure level 2 is selected the two left handmost indicators for that level will light up simultaneously Also if level 4 is selected the two right handmost i...

Страница 44: ... hold down the exposure mode selector key for approximately 5 seconds The PHOTO indicator will go out and the AUTO indicator will begin to blink One or two light and dark indicators corresponding to the automatic exposure level which has been selected will light up 4 Press the light or dark key to lighten or darken the automatic exposure level as desired If exposure level 2 is selected the two lef...

Страница 45: ...nd the zoom ratio will be displayed in the display SELECTING THE PAPER TRAY Press the tray select key Each time you press the tray select key the location indicated by the paper feed location indicator changes in the following order paper tray 1 paper tray 2 multi bypass tray Peripheral device To verify a zoom setting without changing the zoom ratio press and hold down the copy ratio display key W...

Страница 46: ... longer time before starting copying To copy from the auto power shut off mode press the start key Then make desired copier selections and press the start key using the normal copying procedure Auto clear The unit returns to the initial settings a preset amount of time after the end of job This preset amount of time auto clear time can be changed Resolution of AUTO MANUAL mode You can set the copy...

Страница 47: ...ht up indicating the standard toner mode is active 3 To enter the toner save mode press the light key The light and dark indicator marked 1 will light up indicating the toner save mode is selected 4 Press the exposure mode selector key The PHOTO indicator will stop blinking and light up steadily The light and dark indicator marked 3 will light up The toner save mode is now active To return to the ...

Страница 48: ...ber for the program will blink on the right side of the display 4 Select the desired parameter using the right copy quantity key The entered parameter number will blink on the right of the display Program No Mode Parameters 1 Auto clear time 1 10 sec 2 30 sec 3 60 sec 4 90 sec 5 120 sec 6 OFF 2 Preheat mode 1 30 sec 2 60 sec 3 5 min 4 30 min 5 60 min 6 120 min 7 240 min 3 Auto power shut off mode ...

Страница 49: ... Example Total number of copies is 1 234 25 Copy effective paper width setting function Bypass tray 1 Large LETTER A4 width 2 Small INVOICE B5R width 26 Copy effective paper width setting function Tray 1 1 Large LETTER A4 width 2 Small INVOICE B5R width 27 Copy effective paper width setting function Tray 2 Only operates when a lower paper tray is installed 1 Large LETTER A4 width 2 Small INVOICE B...

Страница 50: ... open the side cover while pressing the side cover open button 2 Push gently on both sides of the front cover to open the cover Be sure to use only genuine TOSHIBA parts and supplies After the unit stops it may be possible to make a few more copies by taking the toner cartridge out of the unit shaking it horizontally then reinstalling it If copying is not possible after this operation replace the ...

Страница 51: ... shutter Pull the shutter out of the toner cartridge as shown in the illustration Discard the shutter After removing the toner cartridge do not shake it or tap on it Doing so may cause toner to leak from the cartridge Put the old cartridge immediately in the bag contained in the box of the new cartridge Dispose of the old toner cartridge in accordance with local regulations Grasp the toner cartrid...

Страница 52: ...llustration and turn the center knob counter clockwise 90 degrees until you hear a click When closing the covers be sure to close the front cover securely and then close the side cover If the covers are closed in the wrong order the covers may be damaged Even after a new toner cartridge is installed the start indicator may not light up indicating copying cannot be restarted toner is not sufficient...

Страница 53: ...roller with a soft clean cloth If necessary dampen the cloth with a glass cleaner Do not spray flammable cleaner gas Gas from the spray may come in contact with the internal electrical components or high temperature parts of the fusing unit creating a risk of fire or electrical shock Before cleaning be sure to turn the power switch off and remove the power cord from the outlet Do not use thinner b...

Страница 54: ... by holding the tab Set the charger cleaner onto the right end of the transfer charger gently slide the cleaner to the left end and then remove it Repeat this operation two or three times 4 Return the charger cleaner to its original position Close the side cover by pressing the round projections near the side cover open button 5 Turn the power switch on p 9 Slide the charger cleaner from the right...

Страница 55: ...st dirt smudges appear on copies Document glass or ADF dirty Clean regularly 51 Original smudged or blotchy Use a clean original Striped copies Is transfer charger clean Clean the transfer charger 52 Paper misfeeds frequently Non standard paper used Use standard paper If using special papers feed the paper through the multi bypass tray 11 Paper curled or damp Store paper flat in the wrapper in a d...

Страница 56: ...move the misfed originals referring to the description of E Misfeed in the ADF Peripheral device 59 Power save indicator is steadily lit The unit is in the preheat mode Press any key to cancel the preheat mode 44 The unit is in the auto power shut off mode Press the start key to cancel the auto power shut off mode 44 The paper tray indicator is blinking The paper tray is not pushed in correctly or...

Страница 57: ...feed area p 56 A letter and a number appear alternately The scan head locking switch is locked Unlock the scan head locking switch 50 A letter and a number appear alternately The unit will not function Turn the power switch off remove the power cord from the outlet and contact your authorized service representative While pressing the start key 02 is displayed Check the toner cartridge and make sur...

Страница 58: ...nd projections near the side cover open button The misfeed indicator will go out and the start indicator will light up The fusing unit is hot Do not touch the fusing unit when removing misfed paper Doing so may cause a burn or other injury Do not touch the photoconductive drum green portion when removing the misfed paper Doing so may damage the drum and cause smudges on copies If the paper has bee...

Страница 59: ...jections near the side cover open button The misfeed indicator will go out and the start indicator will light up The fusing unit is hot Do not touch the fusing unit when removing misfed paper Doing so may cause a burn or other injury Do not touch the photoconductive drum green portion when removing the misfed paper Doing so may cause smudges on copies Do not remove the misfed paper from above the ...

Страница 60: ...r will light up D Misfeed in the lower paper feed area Peripheral device 1 Open the lower side cover under the multi bypass tray and remove the misfed paper If the misfeed indicator blinks and the misfed paper is not seen from the area of the lower side cover pull out the lower paper tray and remove the misfed paper Then close the lower paper tray 2 Close the lower side cover 3 Close the side cove...

Страница 61: ... document feeder tray Press the ADF jam release lever see below while you remove the original Close the document feeder cover Open and close the ADF to clear the ADF misfeed indicator If the misfed original cannot be easily removed proceed to C B Open the ADF and rotate the roller to remove the misfed original from the exit area If the misfed original cannot be easily removed proceed to C C If the...

Страница 62: ...Remove any originals that have not yet been scanned from the document feeder tray For the original s stuck in the ADF do not remove manually This may cause a machine malfunction See the step 3 3 Press the copy ratio display key The originals that were being scanned in the ADF will be discharged and the number of original sheets to be returned will blink in the display Place the displayed number of...

Страница 63: ...EPLACEMENT SHOULD ONLY BE DONE BY AN AUTHORIZED TOSHIBA SERVICE TECHNICIAN Contact your authorized service representative as soon as possible MAINTENANCE REQUIRED When maintenance indicator lights up service by an authorized TOSHIBA service technician is required Contact your authorized service representative as soon as possible ...

Страница 64: ...chine and a greater choice of paper size readily available for copying The procedures for loading paper in the paper tray of paper feed unit changing the paper size and selecting the paper tray are same as for the paper tray in the machine See LOADING THE PAPER TRAY p 12 and SELECTING THE PAPER TRAY p 43 Be sure to use only genuine TOSHIBA parts and supplies Some options may not be available in so...

Страница 65: ...ter driver icon and from the File menu select Properties In Windows Vista from the Organize menu select Properties In Windows 98 Me click the TOSHIBA e STUDIOXXXX printer driver icon select Properties from the File menu and then click the Setup tab 4 Click the Configuration tab 5 Select Two trays for Input tray option and click OK The printer driver closes This completes the settings needed to use...

Страница 66: ...ter First copy time 7 Approximately 8 0 seconds When user program 24 is set to OFF 10 7 seconds When user program 24 is set to ON paper 8 1 2 x 11 A4 exposure mode AUTO copy ratio 100 Copy ratio Document glass Variable 25 to 400 in 1 increments total 376 steps Fixed 50 65 78 129 and 200 50 71 86 100 141 200 ADF Variable 50 to 200 in 1 increments total 151 steps Fixed 50 65 78 129 and 200 50 71 86 ...

Страница 67: ...e of the machine in use 8 Not including toner cartridge Bit depth 1 bit or 8 bit pixel Sensor Color CCD Scanning speed Max 2 88ms line Memory 8 MB Power supply Local voltage 10 For this machine s power supply requirement see the name plate located on the back of the machine Power consumption Max 1 0kW Overall dimensions Width 31 5 8 802mm Depth 17 5 8 445mm Weight Approximately 8 36 5 lbs 16 6kg U...

Страница 68: ...1 2 x 14 A5 to A4 Paper weight 15 lbs to 21 lbs 56g m2 to 80g m2 Paper capacity One paper tray with capacity for 250 sheets of 21 lbs bond 80g m2 paper Weight 6 6 lbs 3kg Dimensions 19 1 2 W x 15 5 8 D x 3 1 2 H 495mm W x 395mm D x 88mm H Power supply Drawn from the unit As a part of our policy of continuous improvement TOSHIBA reserves the right to make design and specification changes for produc...

Страница 69: ...ransfer charger 52 Clear key 8 41 47 Conventions used in this manual and online manual 6 Copy flow 38 Copy quantity 41 Copy quantity key 8 41 46 Copy ratio display key 8 43 Copy ratio selector indicator 8 43 Copy ratio selector key 8 43 D Dark key 8 41 Desktop Document Manager 16 Developer replacement required indicator 8 54 Developer required 61 Display 8 Displaying total number of copies 47 Docu...

Страница 70: ...mes 7 Photo copying 41 Photoconductive drum 7 Power cord socket 7 Power off 10 Power on 9 Power save indicator 8 25 Power save modes 44 Power switch 7 Preheat mode 44 46 Prevention of OC copies when the original cover ADF is up function 44 46 Printer driver 16 Proper storage 3 R Reduction enlargement zoom 43 Resolution of AUTO MANUAL mode 44 46 Roller rotating knob 58 S Scan head locking switch 50...

Страница 71: ...the original ADF 40 Document glass 39 Opening the printer driver 26 Power off 10 Power on 9 Printing 27 Removing paper jams ADF 59 Fusing area 57 Lower paper feed area 58 Paper feed area 56 Transport area 58 Scanning Button Manager 28 Scanner and Camera Wizard 36 TOSHIBA TWAIN 35 Selecting the paper tray 43 Setting a large original 40 Setting the copy quality AUTO 42 MANUAL 41 PHOTO 41 Setting the...

Страница 72: ...able only to the 220V model 230V model and 240V model VAROITUS LAITTEEN KÄYTTÄMINEN MUULLA KUIN TÄSSÄ KÄYTTÖOHJEESSA MAINITULLA TAVALLA SAATTAA ALTISTAA KÄYTTÄJÄN TURVALLISUUSLUOKAN 1 YLITTÄVÄLLE NÄKYMÄTTÖMÄLLE LASERSÄTEILYLLE VARNING OM APPARATEN ANVÄNDS PÅ ANNAT SÄTT ÄN I DENNA BRUKSANVISNING SPECIFICERATS KAN ANVÄNDAREN UTSÄTTAS FÖR OSYNLIG LASERSTRÅLNING SOM ÖVERSKRIDER GRÄNSEN FÖR LASERKLASS ...

Страница 73: ...es cause harmful interference to radio or television reception which can be determined by turning the equipment off and on the user is encouraged to try to correct the interference by one or more of the following measures Reorient or relocate the receiving antenna Increase the separation between the equipment and receiver Connect the equipment into an outlet on a circuit different from that to whi...

Страница 74: ...TINSE1890QSZZ R080520F8300 TTEC 2008 07 ...

Отзывы: