1
Description of Each Component
7
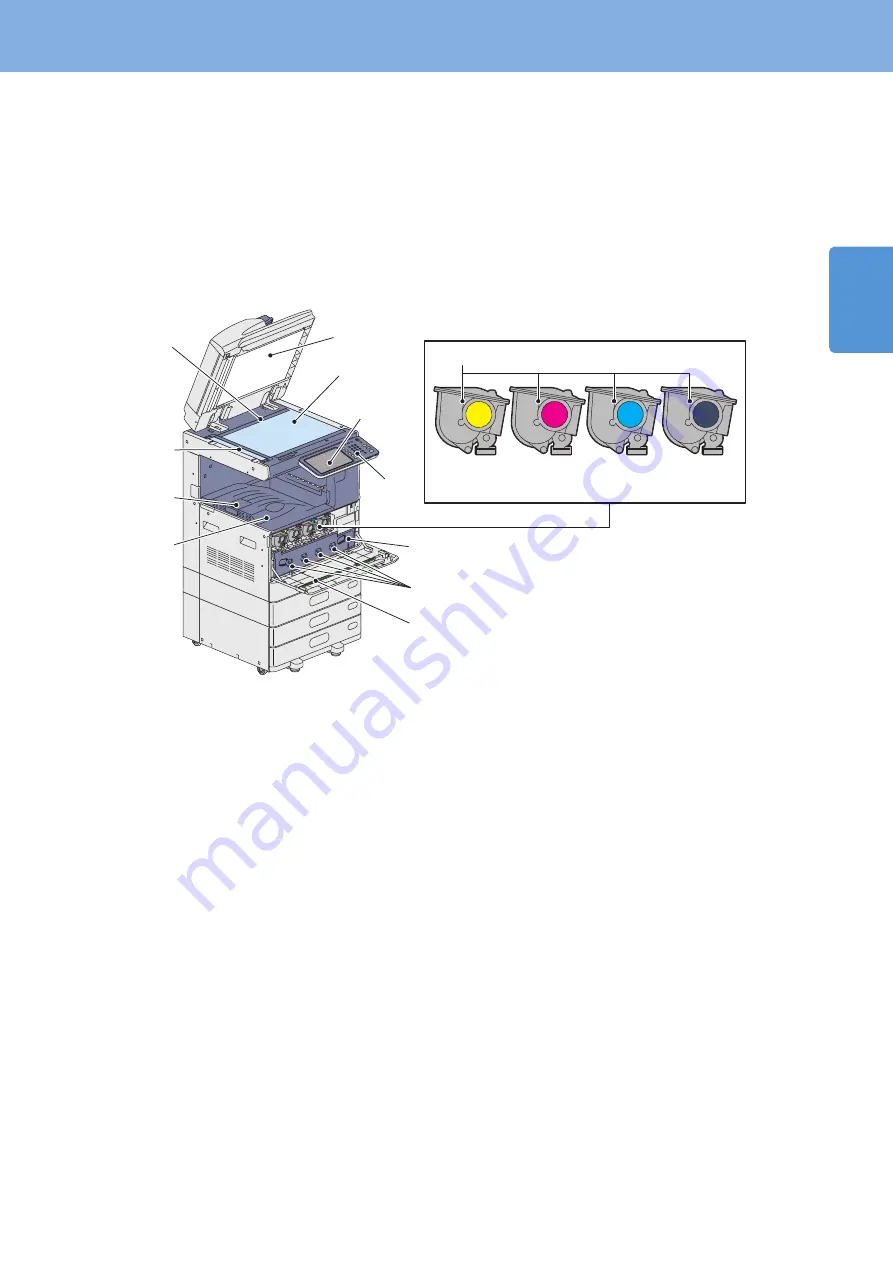
Left / Inner side
1.
Platen sheet
Use this to hold the original on the original glass to scan it.
&
P.42 “Regular Cleaning” in this manual
.
Original glass
Use this to copy three-dimensional originals, book-type
originals and special paper such as OHP film or tracing
paper, as well as plain paper.
.
Touch panel
Use this to set and operate various types of functions such
as copying, scanning and faxing. This also displays
messages, such as when paper runs out or paper misfeeds
occur.
&
P.10 “Touch panel” in this manual
4.
Control panel
Use this to set and operate various types of functions such
as copying and faxing.
&
P.8 “Control panel” in this manual
5.
Toner cartridge
When toner runs out, the message appears on the touch
panel. Replace the cartridge following the procedure
below.
&
P.36 “Replacing Toner Cartridge” in this manual
6.
Waste toner box
When “Dispose of used toner” appears on the touch panel,
replace the waste toner box according to the following
procedures.
&
P.37 "Replacing Waste Toner Box" in this manual
7.
Main charger cleaners
If unevenness occurs on the copied or printed paper, clean
the main chargers according to the following procedures.
&
P.43 "Cleaning the main chargers and LED print heads"
8.
LED print head cleaner
If unevenness occurs on the copied or printed paper, clean
the LED print head according to the following procedures.
&
P.43 "Cleaning the main chargers and LED print heads"
9.
Exit tray
Printed paper exits into this tray.
10.
Paper exit stopper
Use this to prevent the exiting paper from falling. Open
this when you make many copies or prints on a larger size
of paper such as A3, B4, LD and LG.
11.
Scanning area
The data of originals transported from the Reversing
Automatic Document Feeder are scanned here.
&
P.42 “Regular Cleaning” in this manual
1.
Original scale
Use this to check the size of an original placed on the
original glass.
Yellow
Magenta
Cyan
Black
10
12
11
9
5
3
4
6
8
7
2
1
15.
Front cover
Open this cover when you replace the toner cartridge and
clean the charger.
16.
Main power switch
Use this switch to turn the power of the equipment ON or
OFF.
&
P.12 “Turning Power ON/OFF” in this manual
17.
Alarm lamp
This orange lamp lights when a paper misfeed has
occurred in the Reversing Automatic Document Feeder.
18.
Document lamp
This blue lamp lights when the originals are placed on the
original feeder tray. It also blinks while the originals are
being scanned.
Содержание E studio 2010C
Страница 1: ...MULTIFUNCTIONAL DIGITAL COLOR SYSTEMS Quick Start Guide ...
Страница 46: ...44 MEMO ...
Страница 47: ...Troubleshooting 46 Chapter 4 TROUBLESHOOTING ...
Страница 51: ...Chapter 5 ADVANCED FUNCTIONS Advanced Functions 50 ...
Страница 80: ...78 MEMO ...
Страница 83: ...Printed in China FC 2050C 2550C FC 2051C 2551C OME120002B0 ...


