background image

5

Getting started

Installing the Stand or Wall Mount Bracket 

Accessories List

Installing the Wall Mount Bracket

CAUTION

• 

Be sure to disconnect the AC power cord before installing a stand or 
wall mount brackets.

• 

The display on your TV is fragile. Make sure the TV screen is not 
scratched or damaged by hard objects or from pressure. 

• 

After the installation is complete, make sure the TV is steady on a table 
or firmly attached to a wall mount, before removing all protective film, 
if any.

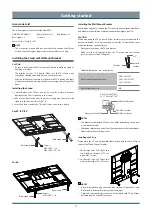
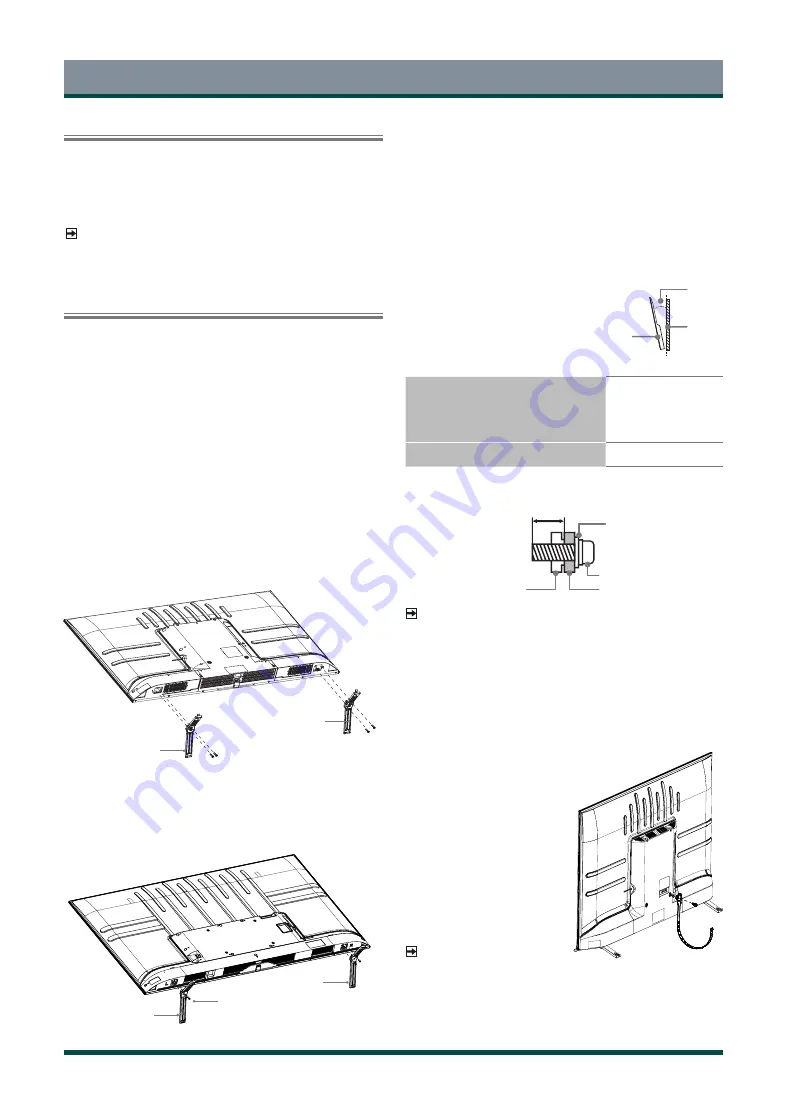
Installing the Stand

1. Carefully place your TV face-down on a soft, flat surface to prevent 

damage to the TV or scratching to the screen.

2. Take out the Base Stand from the accessory bag and then insert the 

stand into the bottom slots of the TV. 

3. Secure the Base Stand to the TV with 4 screws in accessory tightly.

 NOTE

• 

The accessories may be different from the list above due to different 
models, countries/regions, please refer to the actual accessory bag.

Before mounting the TV, remove the TV stand if you have already attached it, 
and make sure the wall mount bracket supports the weight of your TV.

CAUTION

When mounting the TV on a wall, follow instructions provided with the 
wall mount bracket. If it is not correctly mounted, the TV may fall and cause 
property damage or personal injury.

• 

Place spacers between the TV and bracket.

• 

Make sure the tilt angle between the TV screen and the vertical 
surface is no more than 15 degrees.

≤15°

TV screen

Vertical 
surface

Wall Mount Bracket

Wall Mount Screw
Wall Mount Spacer

Rear cover of the TV

 NOTES

• 

The diameter and length of the screws differ depending on the wall 
mount bracket model.

• 

Wall mount bracket is optional. Your TV may not have wall mount bracket. 
Please refer to the actual accessories.

• 

Standard dimensions are shown below.

The following accessories are included with TV:

OWNER’S MANUAL× 1 

Remote Control × 1        AAA Battery × 2 

Base Stand × 2 

Screw × 4 

Power Cord × 1(only for


65")

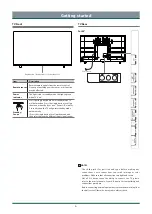
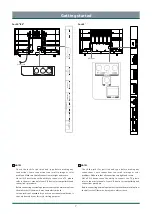
For 43

"

/50

"

/55

"

For 65

"

Wall mount hole pattern (mm)

200 × 200


(43")

200 × 300


(50"/55")

300 × 200


(65")

Wall mount screw size 

M6


 NOTES

• 

Insecure installation may cause the tilt or falling of the product, and 

further lead to personal injuries or product damages.

• 

P-clip and corresponding screws may not included with TV set, please 

purchase them by yourself if necessary.

Screws:

M5×12(65")  ×4

Base stand

Base stand

8.0-10.0 mm(50

"

/55

"

)

9.5 -11.5 mm(43

"

/65

"

)

Screws:

M4×16(43")  ×4 

M4×12(50"/55")  ×4

Base stand

Base stand

Installing the P-Clip

Please place the TV on a horizontally stable surface, and then use P-Clip


to 

connect the TV and the wall or pillar.

1. Fix the larger side of P-Clip to the 

screw hole on the back of TV set 
with a M6×12 screw.

2. Fix the other side of P-Clip to the 

wall or pillar with a ST4×25 screw.

Содержание 43C350KP

Страница 1: ...65E350KP Owner s Record You will find the model number and serial number on the back of the TV Record these numbers in the spaces provided below Refer to them whenever you call upon your Toshiba dealer regarding this product Model number Serial number ES A211305 1 ...

Страница 2: ...te control Please read all safety and operating instructions in this manual carefully and keep this manual for future reference LED TV is LCD Panel with LED Backlight Contents Contents 1 Important Safety Precautions 2 Getting started 5 Accessories List 5 Installing the Stand or Wall Mount Bracket 5 TV Front 6 TV Rear 6 Terminals 8 Wired Setup 9 Wireless Setup 9 Connecting with an HDMI ARC Cable 9 ...

Страница 3: ... poor Never drape a newspaper tablecloth or curtain on the TV When installing the TV against a wall always keep the TV at least 10cm away from the wall Never place the TV on a soft unstable surface such as a carpet or a cushion The inside of this TV will overheat if the ventilation holes are covered blocked or sealed which may result in a fire 7 Never place the TV near a heater or in direct sunlig...

Страница 4: ...such as air refreshers cleaning agents etc on or near the TV pedestal Studies indicate that plastics may weaken and crack over time from the combination effects of chemical agents and mechanical stress such as weight of TV Failure to follow these instructions could result in serious injury and or permanent damage to TV and TV pedestal 1 Remove the power plug before cleaning Never use solvents such...

Страница 5: ...te within the same radio frequency range and may interfere with one another If you use BluetoothTM and Wireless LAN devices simultaneously you may occasionally experience a less than optimal network performance or even lose your network connection If you should experience any such problem immediately turn off either your BluetoothTM or Wireless LAN device Actual performance can vary including lowe...

Страница 6: ...operty damage or personal injury Place spacers between the TV and bracket Make sure the tilt angle between the TV screen and the vertical surface is no more than 15 degrees 15 TV screen Vertical surface Wall Mount Bracket Wall Mount Screw Wall Mount Spacer Rear cover of the TV NOTES The diameter and length of the screws differ depending on the wall mount bracket model Wall mount bracket is optiona...

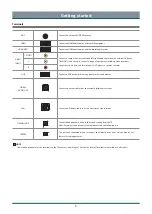
Страница 7: ...herwise it may cause electric shock For 43 Item Description Remote sensor Receive remote signals from the remote control Do not put anything near the sensor as its function may be affected Power indicator The light is red in standby mode the light is green when TV is on Standby Source Press the single button when in standby mode TV will be turned on Press the single button to call up the menu when...

Страница 8: ...e it may cause electric shock Service jack is not available for you to connect an external device It can only be used by our factory for testing purposes For 65 AC Input For 50 55 Power cord NOTES Check the jacks for position and type before making any connections Loose connections can result in image or color problems Make sure that all connections are tight and secure Not all A V devices have th...

Страница 9: ...ce The VIDEO can be used to connect a range of equipment including video recorders camcorders decoders satellite receivers DVD players or games consoles L R USB Connect a USB device for browsing photos music and movies DIGITAL AUDIO OUT Connect an optical cable from an external digital audio system LAN Connect an Ethernet cable to access a network or the Internet HEADPHONE Connect headphones to li...

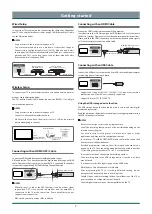
Страница 10: ...n HDMI Cable Connect an HDMI cable from an external A V equipment Some devices such as DVD player require HDMI signal to be set to output in the device s settings Please consult your device user manual for instructions Please note that the HDMI connector provides both video and audio signals so it s not necessary to connect an audio cable DVD Blu Ray AV receiver Set top Box HDMI cable not included...

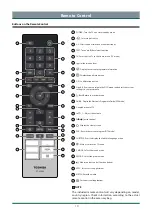
Страница 11: ... menu 12 GUIDE Display the Electronic Programme Guide DTV mode 13 Google Assistant ofTV 14 Adjust the volume 15 P Switch channel 16 Display the Home screen 17 PVR Record the current program DTV mode 18 SUBTITLE Press to display the Subtitle Language menu 19 Mute or restore the TV sound 20 S MODE Select the sound mode 21 P MODE Select the picture mode 22 Media content control function buttons 23 AP...

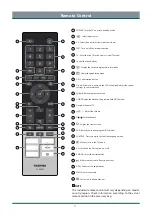
Страница 12: ...ectronic Programme Guide DTV mode 13 Google Assistant ofTV 14 Adjust the volume 15 P Switch channel 16 Display the Home screen 17 PVR Record the current program DTV mode 18 SUBTITLE Press to display the Subtitle Language menu 19 Mute or restore the TV sound 20 AD Set the Audio Description on or off 21 P MODE Select the picture mode 22 Media content control function buttons 23 APPS Fast access to a...

Страница 13: ...ash immediately If you do not intend to use the remote control for a long time remove the batteries Remove depleted batteries immediately to prevent battery acid from leaking into the battery compartment Pairing the Remote Control 1 Pair the remote to the TV after you power it on Make sure your remote is close to this TV around 3 meters Press and hold the button at least 3 seconds to start pairing...

Страница 14: ...croll through channels an information banner appears on the top of the screen Viewing a channel list After you have done an automatic channel scan if you re using an antenna or receiving your channels through a cable provider you can view your list of channels by pressing OK button on your remote You will see the channel list display on the screen Creating and editing Favorites List To quickly acc...

Страница 15: ...oose to Manual stop or automatically match the programme time Standby record If you press the power button during recording TV will go into standby mode but the recording process is still going on If you press power button again and wake up the TV recording process will not be affected After recording the recorded file will be automatically saved to the disk Recording List Viewing the recorded pro...

Страница 16: ...change the size of the displayed image e g changing the height width ratio for the purpose of public display or commercial gain may infringe on copyright laws If the aspect ratio of the selected format is different from the one of the TV transmission or video programme it can cause a difference in vision When using PC connected via HDMI terminal the moving image quality may be deteriorated Advance...

Страница 17: ...Digital Audio Delay Adjust the digital audio output delay time to sync sound from an external speaker with the images on the TV Lip Sync Synchronize the displayed image with the audio output Equalizer Boost the volume at different frequencies Headphone Mode Change the way audio is sent through the type of device that s connected to your TV Audio Out port NOTE Some models don t support this functio...

Страница 18: ...ou select this option the screen will not display the picture You can only listen to the audio Press any button except the button buttons and button to restore operation Sleep Timer Set the sleep timer to automatically turn the TV off within a specified time off 10 Minutes 20 Minutes 30 Minutes 40 Minutes 50 Minutes 60 Minutes 90 Minutes and 120 Minutes Settings Settings lets you configure the TV ...

Страница 19: ... whether the Ethernet is connected Proxy settings You can set the proxy server NOTE HTTP proxy is used by the browser but may not used by other apps IP settings Configure the IP setting for your network connection Content Sharing Allow to view videos images and music shared from another device in your network Accounts Sign In You can use multiple Google Accounts on your TV You may also be able to ...

Страница 20: ... HDMI CEC Control feature may not work Storage You can view the TV storage Home screen Customise channels Add or delete the app channel row from Home screen Enable video previews Enable or disable the video previews Enable audio previews Enable or disable the audio previews Reorder apps Reorder games Rearrange the Apps screen Android TV Home Android TV Core Services See the information of open sou...

Страница 21: ...n the mode when TV is reconnected with AC power Auto Sleep Set the amount of time that you d like for TV auto power off without any activity Off 3H 4H NOTE This function may not be available in your country region Store Mode Home Mode uses less energy Select Store Mode if the TV will be on display in a retail setting Store Mode effects E Streamer and other demo functions Support Setup assistant Se...

Страница 22: ...play next you can also manually add a programmes to play next by long pressing on a programmes in the Home screen Recommended content Here the premium content will display on the screen you can quickly enter these contents what you want Apps Numerous factory installed apps are available for you to choose from for your entertainment preferences Installing an App To install an app 1 From the Home sc...

Страница 23: ...ose whether to go to the Media When your USB device is connected to the TV that doesn t show Media page press the button on your remote and browse down to click Media To browse through content based on the type that you wish to access 1 Navigate to the appropriate menu tab on the screen and select All Media Videos Photos Music 2 Click on the name of the folder that contains your content 3 Make you...

Страница 24: ...nnected an external source to my TV but I get no picture and or sound Check the correct connection on the external source and the input connection on the TV Make sure you have made the correct selection for the input mode for the incoming signal Sound and picture distorted or appear wavy Some electrical appliances may affect TV set If you turn off the appliance and the interference goes away then ...

Страница 25: ...en t playing this may help resolve the problem The Problem Possible Solutions The TV is hot Watching TV for an extended period of time causes the panel to generate heat The heat from the panel is dissipated through internal vents running along the top of the TV However after extended use you may feel hot when touch it This heat however is not a defect and does not affect the TV s functionality The...

Страница 26: ...840 2160 3840 2160 Audio power 10W 10W 10W 10W Power consumption 150W 200W Power supply 100 240V 50 60Hz Receiving systems Analog PAL D K B G I SECAM D K B G Digital DVB T T2 DVB C Wireless LAN Module specifications Model ZDGF7668AU C 43 ZDGF7668AU F 50 ZDGF7668AU T 55 65 Frequency Range 2 4 2 4835GHz 5 15 5 85GHz Output Power Max 2 4 2 4835GHz 18dBm 5 15 5 25GHz 14 5dBm 5 25 5 35GHz DFS Band 14 5...

Страница 27: ...igh 10 Level 5 Y 11 H 265 mkv 3840X2160 60fps 100Mbps Main Main10 Profile High Tier Level 5 1 Y 12 Motion JPEG mkv 1080P 30fps 10Mbps Y 13 VP9 mkv 3840X2160 60fps 100Mbps Profile0 2 Y 14 AVI Mpeg2 4 divx avi 1080P 60fps 40Mbps MPEG2 MP HL MPEG4 Simple Profile and Advanced Simple Profile Level 5 Y avi N divx 15 H 264 divx avi 3840X2160 60fps 135Mbps Main Profile and High 10 Level 5 Y avi N divx 16 ...

Страница 28: ...800 3 66 3840000 7 BMP bmp 9600x6400 3 66 3840000 Audio Number Audio Codec file type File Extension Name Bit Rate Sampling rate 1 MPEG1 2 Layer1 MP3 32kbps 448kbps 16kHz 48kHz 2 MPEG1 2 Layer2 MP3 8kbps 384kbps 16kHz 48kHz 3 MPEG1 2 Layer3 MP3 8kbps 320kbps 16kHz 48kHz 4 AAC HEAAC m4a aac 24kbps 384kbps 8kHz 48kHz 5 WMA wma 128bps 320kbps 8kHz 48kHz 6 WMA Pro wma 768kbps 96kHz 7 LPCM N A work with...

Страница 29: ... could otherwise be caused by unsuitable waste handling of this product The recycling of materials will help conserve natural resources Please do not therefore dispose of your old electrical and electronic equipment with your household waste For more detailed information about recycling of this product please contact your local city office your household waste disposal service or the shop where yo...

Отзывы: