background image

21

Chapter 2: Connecting your TV

Signal names for mini D-sub 15-pin connector

Pin 
No.

Signal 
name

Pin 
No.

Signal 
name

Pin 
No.

Signal 
name

1

R

6

Ground

11

NC

2

G

7

Ground

12

NC 

3

B

8

Ground

13

H-sync

4

NC *

9

NC

14

V-sync

5

NC 

10

Ground

15

NC 


*

NC=Not connected

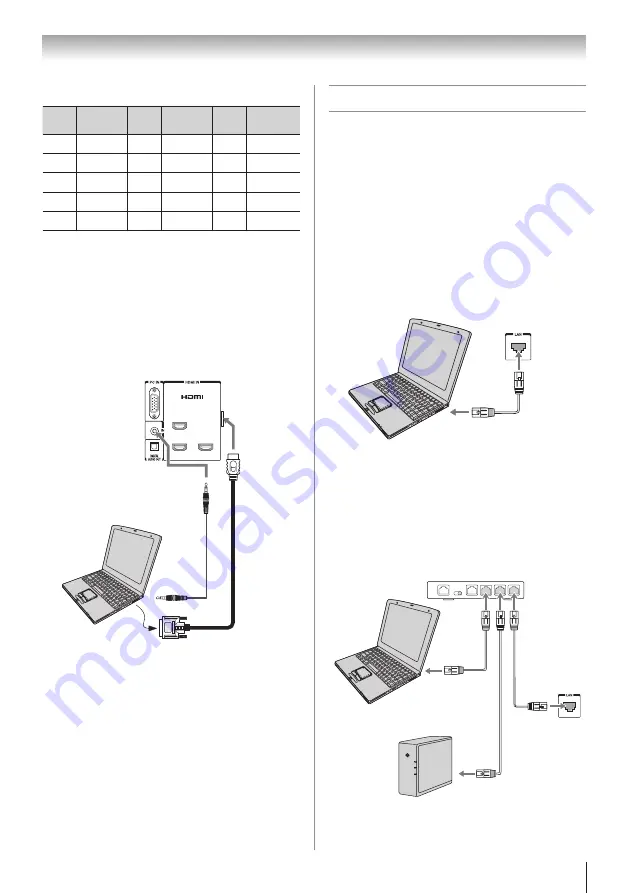
To connect a PC to the HDMI terminal on the TV:

When connecting a PC with a DVI terminal to the 
HDMI terminal on the TV, use an HDMI-to-DVI 
adapter cable and analog audio cables.
When connecting a PC with an HDMI terminal, use 
an HDMI cable (type A connector). Separate analog 
audio cables may not be necessary, depending on PC 
hardware and setup (

 page 15).

1

2

4

3

PC/HDMI 3

(AUDIO)

PC audio 

output

PC audio 

cable

TV back panel

Computer

The HDMI input can accept and display VGA, SVGA, 
XGA, WXGA, SXGA, 480i (60Hz), 480p (60Hz), 720p 
(60Hz), 1080i (60Hz), and 1080p (24Hz/60Hz) signal 
formats. For detailed signal specifications, see page 76.

Note:


The edges of the images may be hidden.


If receiving a 480i (HDMI), 480p (HDMI), 720p, 

1080i, or 1080p signal program, Native mode 

scales the video to display the entire picture within 

the borders of the screen (i.e. no overscanning).

Connecting a home network

The LAN port allows your Toshiba TV to connect to 
your home network.
You can use this home network to access photos, 
movies, and music files that are stored on a DLNA 
CERTIFIED™ Server and play them on your TV.

Connecting the TV directly to a PC 

without an Internet connection

You will need:

• 

Crossover LAN cable

TV back panel 

Connecting the TV to a home network 

without an Internet connection

You will need:

• 

Standard LAN cables

• 

Router with Hub

Computer

HDMI-to-
DVI 
adapter 
cable

TV back panel 

Computer

Router with Hub 

NAS

Содержание 24SL415U

Страница 1: ...rogram For details please contact your TV antenna installer cable provider or satellite provider 2011 TOSHIBA CORPORATION All Rights Reserved Owner s Record The model number and serial number are on the back and side of your TV Record these numbers in the spaces below Refer to these numbers whenever you communicate with your Toshiba dealer about this TV http support toshiba com Model number Serial...

Страница 2: ...joy your new product please keep these safety tips in mind The Issue The home theater entertainment experience is a growing trend and larger flat panel displays are popular purchases However flat panel displays are not always supported on the proper stands or installed according to the manufacturer s recommendations Flat panel displays that are inappropriately situated on dressers bookcases shelve...

Страница 3: ...table The TV may fall causing serious personal injury death or serious damage to the TV Important Safety Instructions 1 Read these instructions 2 Keep these instructions 3 Heed all warnings 4 Follow all instructions 5 Do not use this apparatus near water 6 Clean only with dry cloth 7 Do not block any ventilation openings Install in accordance with the manufacturer s instructions 8 Do not install n...

Страница 4: ... cabinet or any other place with poor ventilation The slots and openings are provided to protect the TV from overheating and to help maintain reliable operation of the TV Leave a space of at least 4 four inches around the TV 30 Always place the back of the television at least four 4 inches away from any vertical surface such as a wall to allow proper ventilation 31 Never allow anything to rest on ...

Страница 5: ...ing on the LCD screen These actions will damage the LCD screen If you need to clean the LCD screen follow the instructions in item 37 on pages 4 and 5 Service 46 WARNING RISK OF ELECTRIC SHOCK Never attempt to service the TV yourself Opening and removing the covers may expose you to dangerous voltage or other hazards Failure to follow this WARNING may result in death or serious injury Refer all se...

Страница 6: ...e TV as described on below 6 VESA Mounting Pattern TV Size Hole Pattern HxV Screw Size 24 100x100 mm M4 32 200x200 mm M6 40 200x200 mm M6 unit in mm Removing the Pedestal Stand 1 Carefully lay the front of the unit face down on a flat cushioned surface such as a quilt or blanket Leave the stand protruding over the edge of the surface Note Extreme care should always be used when removing the pedest...

Страница 7: ...Note that this is not intended to prohibit transmission of control or signaling information or the use of repetitive codes where required by the technology If this device is going to be operated in 5 15 5 25GHz frequency range then it is restricted in indoor environment only Important Any changes or modifications not expressly approved by the party responsible for compliance could void the user s ...

Страница 8: ...om Dolby Laboratories Dolby and the double D symbol are trademarks of Dolby Laboratories Audyssey Dynamic Volume controls volume levels to eliminate loud spikes and raise soft dialog for more enjoyable television and movie viewing Audyssey EQ provides clear accurate and natural sound right out of the box Together these technologies ensure you enjoy your audio experience as much as your video Manuf...

Страница 9: ...AT WAS ENCODED BY A CONSUMER ENGAGED IN A PERSONAL AND NON COMMERCIAL ACTIVITY AND OR WAS OBTAINED FROM A VIDEO PROVIDER LICENSED TO PROVIDE VC 1 VIDEO NO LICENSE IS GRANTED OR SHALL BE IMPLIED FOR ANY OTHER USE ADDITIONAL INFORMATION MAY BE OBTAINED FROM MPEG LA LLC SEE HTTP WWW MPEGLA COM THIS PRODUCT IS LICENSED UNDER THE MPEG 4 VISUAL PATENT PORTFOLIO LICENSE FOR THE PERSONAL AND NON COMMERCIA...

Страница 10: ...35 Using closed captions 36 Analog CC mode 36 Digital CC settings 36 Setting the PIN code 37 Entering a new PIN code 37 Changing or deleting your PIN code 37 Forgotten PIN code 37 Using parental controls 37 Blocking TV programs and movies by rating V Chip 37 Downloading an additional rating system 38 Displaying ratings 39 Unlocking programs 39 Locking specific channels 39 Locking video input 39 Se...

Страница 11: ...yer 64 Media Player Specifications 64 Basic operation 64 Viewing Movie files 65 Playing Music files 66 Viewing Photo files 67 Using the Wallpaper feature 69 Chapter 9 Troubleshooting 70 General troubleshooting 70 LED indications 73 Chapter 10 Appendix 74 Specifications 74 Acceptable signal formats for PC IN and HDMI terminals 75 PC IN signal formats 75 HDMI signal formats 76 Remote Control functio...

Страница 12: ...ns and input signal content page 49 Dynamic Volume Audyssey Dynamic Volume eliminates inconsistent TV volume when changing channels or viewing commercials page 54 Media Player lets you view photo files and play music or movie files page 64 ENERGY STAR qualified Chapter 1 Introduction Overview of installation setup and use Follow these steps to set up your TV and begin using its many exciting featu...

Страница 13: ...rol effective range on page 23 3無 Touch Sensor These are available when touched POWER To turn the TV on and off VOL To adjust the volume level When a menu is onscreen these keys function as left right menu navigation buttons CH pq To change the channel When a menu is onscreen these keys function as up down menu navigation buttons MENU To access the menu When a menu is onscreen the MENU key on the ...

Страница 14: ...can be configured in the Configuring shared inputs menu page 31 6無 HDMI IN High Definition Multimedia Interface input receives digital audio and uncompressed digital video from an HDMI device or uncompressed digital video from a DVI device HDMI connection is necessary to receive 1080p signals TV back panel connections For an explanation of cable types and connections see pages 15 22 7無 USB port To...

Страница 15: ...deo HDMI cable with HDMI Logo Use it with devices built in HDMI output An HDMI cable delivers digital audio and video in its native format Separate audio cables are not required pages 18 19 Note HDMI cables provide the best audio and picture quality Optical audio cable Optical audio cable is for connecting receivers with Dolby Digital or PCM pulse code modulation optical audio input to the TV s DI...

Страница 16: ...To view the antenna or Cable signal Select the ANT CABLE video input source on the TV To view basic and premium Cable channels Turn OFF the VCR Select the ANT CABLE video input source on the TV Tune the TV to channel 3 or 4 whichever channel the Cable box output is set to Use the Cable box controls to change channels Standard A V cables Coaxial cable To view the VCR or camcorder video Turn ON the ...

Страница 17: ...ems A 1080i signal will provide the best picture performance 1080p is not supported To view antenna or Cable channels Select the ANT CABLE video input source on the TV To view the DVD player Turn ON the DVD player Select the ColorStream HD video input source on the TV To view satellite programs using the component video connections Turn on the satellite receiver Select the ColorStream HD video inp...

Страница 18: ...ing an HDMI or DVI device to the HDMI input The HDMI input on your TV receives digital audio and uncompressed digital video from an HDMI source device or uncompressed digital video from a DVI Digital Visual Interface source device This input is designed to accept HDCP High Bandwidth Digital Content Protection program material in digital form from EIA CEA 861 D compliant 1 consumer electronic devic...

Страница 19: ...ation manual Note This feature is limited to models incorporating Toshiba s HDMI CEC Control feature However Toshiba is not liable for those operations See the individual instruction manuals for compatibility information When using an external AV amplifier The picture and sound may not be properly synchronized In this case adjust the delay time of the sound on the AV amplifier Note The control ran...

Страница 20: ...nufactured under license from Dolby Laboratories Dolby and the double D symbol are trademarks of Dolby Laboratories continued Analog RGB computer cable Optical audio cable Connecting a personal computer PC With either the PC IN or HDMI connection you can watch your computer s display on the TV and hear the sound from the TV s speakers To connect a PC to the PC IN terminal on the TV When connecting...

Страница 21: ...ay VGA SVGA XGA WXGA SXGA 480i 60Hz 480p 60Hz 720p 60Hz 1080i 60Hz and 1080p 24Hz 60Hz signal formats For detailed signal specifications see page 76 Note The edges of the images may be hidden If receiving a 480i HDMI 480p HDMI 720p 1080i or 1080p signal program Native mode scales the video to display the entire picture within the borders of the screen i e no overscanning Connecting a home network ...

Страница 22: ...e over which wireless LAN can reach may vary depending on surrounding electromagnetic environment obstacles access point design and configuration and client design and software hardware configurations The actual transmission speed will be lower than the theoretical maximum speed The Built in WLAN Adapter is based on the IEEE 802 11n specification and may not be fully compatible with or support som...

Страница 23: ... of batteries in a designated disposal area Always consider the environment when disposing of batteries Always follow applicable laws and regulations If the remote does not operate correctly or if the operating range is reduced replace the batteries Always replace both batteries with new ones Never mix battery types or use new and used batteries together Always remove batteries from the remote if ...

Страница 24: ...s the NET TV menu p 60 Accesses Netflix p 61 Accesses the main TV menu system p 26 28 Returns to the previous menu Displays Channel Browser p 33 Scrolls the left Moves to the previous next page Selects the picture size p 46 Accesses the sleep timer p 43 Turns the TV on and off Freezes the picture p 48 Displays TV status information as well as program details when available p 44 Displays hides the ...

Страница 25: ...ct a time zone 3無 Daylight Saving Time Time Zone Daylight Saving Time Eastern Off Local Time Setting Select On or Off Press 4無 Location To use the TV for displaying in a store showroom please select Store Home mode is recommended for normal use ENERGY STAR qualified Home Location Select Home for normal home use Press Chapter 4 Initial Setup and Menu 5無 ANT CABLE To select Antenna Then select Next ...

Страница 26: ...p 6 If you selected Antenna previously select Cable If you selected Cable previously select Antenna 4無 Scan again 7無 Support Information The Support Information screen appears Press Note Refer to this information if there is any problem and you need to contact Customer Support This can be confirmed from the following operation at any time Settings SETUP System Information Navigating the menu syste...

Страница 27: ...Advanced Picture Settings 50 Expert Picture Settings 52 TheaterLock 52 SOUND MTS 53 Balance 53 Bass 53 Treble 53 Advanced Sound Settings 54 Dynamic Volume Audyssey Dynamic Volume 54 Dynamic Range Control 54 1st Layer 2nd Layer 3rd Layer Page Settings APPLICATIONS Widgets 62 NET TV 60 Media Player 64 Channel Browser 33 Favorites Browser 34 On Timer 43 Sleep Timer 43 PREFERENCES HDMI CEC Control Set...

Страница 28: ... Licenses 60 System Information 45 Reset TV 45 Quick menu Quick menu helps you access some options more quickly Press to display the Quick menu and press or to select the option Note Quick menu items differ depending on the current mode Quick menu Item Page PICTURE 46 52 Picture Mode 49 Repeat 66 67 68 SOUND 53 54 Background Music 68 Speakers 40 HDMI CEC Player Control 41 Interval Time 68 Device I...

Страница 29: ...Store for the TV location For normal home use select Home 1無 Settings SETUP Location 2無 Press t or u to select Home Press ANT CABLE IN This setting configures the antenna input source for the ANT CABLE terminal 1無 Settings SETUP ANT CABLE In 2無 Press t or u to select the input source Antenna or Cable for the ANT CABLE input Press Storing channels in memory optional To make sure your TV stop only o...

Страница 30: ...alog channel DTV Digital channel Skipping channels To prevent a channel from being viewed you can set it to be skipped 1無 Settings SETUP TV Settings 2無 Press p or q to select Channel Options Press The list of channels appears 3無 Move to the column Press p or q to select a channel to skip Press The box is selected To clear the selection press Note You cannot tune skipped channels using or Use butto...

Страница 31: ...ress p or q to select Input Labeling Press 3無 Press p or q to select the item you want to label Press t or u to select Amplifier Cable DVD Game PC Recorder Satellite or VCR or press the GREEN button to select User Input Note When User Input is selected by pressing the GREEN button the Software Keyboard window will appear Input the desired characters up to 10 characters using the Software Keyboard ...

Страница 32: ... ANT CABLE Video 1 ColorStream HD1 HDMI 1 HDMI 2 HDMI 3 HDMI 4 except 24SL415U PC BD DVD Video 1 ColorStream HD1 HDMI 1 HDMI 2 HDMI 3 HDMI 4 except 24SL415U PC AUX ANT CABLE Video 1 ColorStream HD1 HDMI 1 HDMI 2 HDMI 3 HDMI 4 except 24SL415U PC Note The TV mode select button will be restricted to the ANT CABLE input To set Auto Input 1無 Settings PREFERENCES Auto Input 2無 Set Enable Auto Input to O...

Страница 33: ...e control to enter the major channel number Press the dash button Enter the sub channel number For example to select digital channel 125 1 press 1 2 5 1 Press Chapter 6 Basic features Using the Channel Browser The Channel Browser is a helpful navigational interface for all of your channels and inputs Features Navigate the contents of all of your inputs Keep a list of your favorite channels Keep a ...

Страница 34: ...t the item you want to tune to 2無 Press 3無 Press to close the Channel Browser Favorites Browser You can quickly create a favorite channels inputs list that is integrated into the Channel Browser To add a favorite channel or input 1無 Tune to the channel or input 2無 Press and hold for 3 seconds Note Additions are added to the beginning of the Favorites list on the left side of the Channel Browser To...

Страница 35: ...turn Selecting the video input to view To select the video input to view 1無 Press on the remote control or TV control panel 2無 Change the input Press 0 6 for 24 0 7 for 32 40 Repeatedly press p or q Press Repeatedly press HDMI CEC for 24 for 32 40 Note You can label the video input sources according to the specific devices you have connected to the TV Labeling video inputs on page 31 You can skip ...

Страница 36: ...or signal reception is non standard Digital CC settings You can customize the closed caption display characteristics Note These settings are available for digital channels only You cannot set Caption Text and Background as the same color Mode Description Caption Size Auto Small Standard Large Caption Text Type Auto Mono w Serif Prop w Serif Mono w o Serif Prop w o Serif Casual Cursive Small Capita...

Страница 37: ...ode is cleared 3無 Enter a new PIN code Using parental controls Blocking TV programs and movies by rating V Chip Some TV programs and movies include signals that classify the content of the program as unsuitable for younger viewers The V Chip feature in this TV detects the signals and blocks the programs according to the ratings you select Note The V Chip feature in this TV supports the U S V Chip ...

Страница 38: ...Toshiba The additional rating system is an evolving technology therefore availability content and format may vary Rating system Independent rating system for broadcasters Ratings Description and Content themes TV MA Mature Audience Only This program is specifically designed to be viewed by adults and therefore may be unsuitable for children under 17 L Crude or indecent language S Explicit sexual a...

Страница 39: ...n page 37 1無 Settings SETUP TV Settings 2無 Press p or q to select Channel Options Press The list of channels appears 3無 Press u and then p or q to select a channel in the lock column then press 4無 You must enter your PIN code to be able to lock channels Note If no PIN code has been set a warning appears 5無 The box is selected To clear the selection press Locking video input You can lock video inpu...

Страница 40: ...rns off and you must use the remote control to turn it on To unlock the control panel Select Off in Step 4 above Using HDMI CEC Control This feature uses CEC technology and allows you to control Toshiba HDMI CEC compatible devices from the TV remote control via HDMI connection When Enable HDMI CEC Control in the HDMI CEC Control Setup menu is set to On the following HDMI CEC Control functions are ...

Страница 41: ...mplifier Note Confirm that a connected HDMI CEC device such as DVD player etc is selected for the Amplifier input source Note You can also use this function when the amplifier is connected to the TV s DIGITAL AUDIO OUT terminal not HDMI connection Select a digital audio input mode on the amplifier These functions depend on the device connected Other HDMI CEC Control functions When Enable HDMI CEC ...

Страница 42: ... information banner will appear when this feature is set to On and you watch HDMI input If you press when this feature is set to Off only the normal banner will appear Using your PC with the TV Adjusting the image If the edges of the picture are hidden readjust Horizontal Position and Vertical Position If the picture is affected by interference readjust Clock Phase and Sampling Clock 1無 Select PC ...

Страница 43: ...Press Note If you do not operate the TV for 1 hour after it is powered on by the On Timer feature it turns off To cancel the timer 1無 Settings APPLICATIONS On Timer 2無 Press p or q to select Enable On Timer 3無 Press t or u to select Off Setting the sleep timer You can set the TV to turn off after a specific amount of time maximum 12 hours Using the remote control 1無 Press 2無 Set the time until the...

Страница 44: ...2無 Press p or q to select No Signal Power Down Press 3無 Press p or q to highlight the item you want to change 4無 Press t or u to select Off or On Press Note Default setting for each input is On A warning message will appear 1 minute before turning off Displaying TV status information To display TV status information Press The following information will be displayed if applicable Current input ANT ...

Страница 45: ...ctory Defaults You can reset all settings and channels 1無 Settings SETUP Reset TV 2無 Enter your PIN code if a PIN code has been set 3無 A confirmation screen appears Select Yes and press The TV will turn off automatically To cancel the reset Press t or u to select No Press Power failure If power is lost while you are watching the TV the Last Mode Memory feature automatically turns on the TV when po...

Страница 46: ... screen is open do one of the following Repeatedly press PIC SIZE Press the corresponding number button Press or and Note Some picture sizes may not be available depending on the format of the signal being received Using these functions to change the picture size i e changing the height width ratio for any purpose other than your private viewing may be prohibited under the Copyright Laws of the Un...

Страница 47: ...s stretched horizontally to fill the width of the screen but not stretched vertically for 1080i 1080p and 720p program sources The edges of the picture may be hidden Picture Size TheaterWide 1 for 4 3 format programs The center of the picture remains close to its original proportions but the left and right edges are stretched horizontally to fill the screen TheaterWide 2 for letter box programs A ...

Страница 48: ...om the ColorStream HD or VIDEO input A 480i 480p 720p 1080i 1080p or VGA 60 72 75 Hz signal from the HDMI 1 2 3 4 except 24SL415U input Note The auto aspect ratio feature is not applicable to the PC input 1無 Settings PREFERENCES Display Settings 2無 Press p or q to select Auto Aspect 3無 Press t or u to select On Press Using the 4 3 Stretch When 4 3 Stretch is activated the TV displays 4 3 programs ...

Страница 49: ...by pressing when the input mode is ColorStream HD PC VIDEO or HDMI Adjusting the picture quality The adjustments you make to picture quality under a picture mode are saved to that picture mode Selection Pressing Pressing Backlight darker lighter Contrast lower higher Brightness darker lighter Color paler deeper Tint reddish greenish Sharpness softer sharper Backlight Adjusts the brightness of the ...

Страница 50: ...tment range is from 0 to 10 Press Note When the Picture Mode is set to AutoView the level range is from 5 to 5 DynaLight The DynaLight feature automatically strengthens the black coloring of dark areas in the video according to the level of darkness 1無 Settings PICTURE Advanced Picture Settings 2無 Press p or q to select DynaLight 3無 Press t or u to select On or Off Press Static Gamma The static ga...

Страница 51: ...l the adjustment when selecting a point select Cancel on the screen To reset the adjustments of all points to the factory defaults select Reset on the screen Press Note If the Auto Brightness Sensor is set to Off this feature will not be available ColorMaster The ColorMaster feature allows you to adjust standard colors 1無 Settings PICTURE Advanced Picture Settings 2無 Press p or q to select ColorMa...

Страница 52: ...s p or q to select White Balance Press 3無 Press p or q to select Window Display 4無 Press t or u to select On 5無 Adjust picture settings Setting Type You can adjust the white balance setting 1無 Settings PICTURE Expert Picture Settings 2無 Press p or q to select White Balance Press 3無 Press p or q to select 2P White Balance 4無 Press p or q to select Red Offset Green Offset Blue Offset Red Gain Green ...

Страница 53: ...aining another language music or other audio information For example you will hear the other language instead of the program s normal audio 1無 Settings SOUND MTS 2無 Press t or u to select SAP Press Note If there is no sound in SAP mode select Stereo Using the MTS button If you press when an analog channel is tuned The Analog Audio bar will appear and display Stereo SAP Mono as the options If you p...

Страница 54: ... This feature provides a consistent sound volume between television programs commercials and between the loud and soft passages of movies 1無 Settings SOUND Dynamic Volume 2無 Press t or u to select Low High or Off Note If Dynamic Range Control is set to On this feature will be not available This feature does not affect the audio signal output from the DIGITAL AUDIO OUT terminal Using advanced sound...

Страница 55: ... much less than the electromagnetic energy emitted by wireless devices like mobile phones Because Wireless LAN products operate within the guidelines found in radio frequency safety standards and recommendations TOSHIBA believes Wireless LAN is safe for use by consumers These standards and recommendations reflect the consensus of the scientific community and result from deliberations of panels and...

Страница 56: ...as succeeded appears press To cancel searching for the AP Press while searching for the AP A message will appear Press t or u to select Yes Press Easy Setup using a PIN Personal Identification Number 1無 Settings PREFERENCES Network Setup 2無 Press p or q to select Wireless Setup Press 3無 Press p or q to select Easy Setup Press 4無 Press t or u to select PIN 5無 Press q to select Start Scan Press 6無 S...

Страница 57: ...message will appear Press t or u to select Yes Press Note Settings are not saved if is pressed before Done is selected Wireless Information The settings configured in Wireless Setup can be confirmed 1無 Network Wireless Information 2無 When the AP connection succeeds a Wireless Information screen will appear Note Press the RED button to check the availability of surrounding APs Note This feature is ...

Страница 58: ... use the same IP address for any other device The IP address you use should be a private address If you do not know the correct values to use please contact your network administrator or internet service provider DNS Setup Note When the DHCP function of the router connected to this TV is Off set Auto Setup to Off and manually set the DNS address es Your internet service provider should have provid...

Страница 59: ...ed To enter text using the software keyboard 1無 Highlight the desired character on the onscreen software keyboard 2無 Press 3無 Repeat Steps 1 and 2 until you have entered all desired text 4無 Press the BLUE button to save your settings and return to the previous screen Note If is pressed changes are not saved and the software keyboard window is closed A B H I J K L M U T S R Q P O V W X Y Z N C D E ...

Страница 60: ...television s software Using the NET TV feature Note You need to connect to the Internet before using this feature page 21 Services may not be currently available in your area User registration or login may be required to use some services NET TV menu 1無 Press From the Menu Network NET TV 2無 Press t or u to select an icon Press Note When you access the NET TV menu for the first time a welcome scree...

Страница 61: ...ps for HDX video To close VUDU Press To deactivate your device 1無 PREFERENCES VUDU Deactivation 2無 Press t or u to select Yes Press YouTube YouTube is a video sharing service managed by YouTube LLC This TV allows you to view YouTube content 1無 Press From the Menu Network NET TV 2無 Press t or u to select YouTube Press 3無 Press p q t or u to select the file you want to view Press To close YouTube Pr...

Страница 62: ...Internet and TV experience powered by the Yahoo Connected TV platform Yahoo TV Widgets allow you to Track your stocks and stay current with financial news Share photos with friends and family Watch your favorite web videos 1無 Press From the Menu Settings APPLICATIONS Widgets The Dock is the horizontal list of snippets appearing at the bottom of your TV screen A snippet is a shortcut which launches...

Страница 63: ...get select Add Widget to My Profile and press The Owner PIN is needed to install widgets for profiles that have been protected through the Limit Profile indicator under the Profile Widget Profile Settings menu Refer to the Profile Widget Administrative Controls menu to set the Owner PIN Using other Yahoo Widgets The Yahoo News Widget provides the latest headline news for business entertainment pol...

Страница 64: ... device is inserted If Auto Start is disabled or if you want to connect to a DMS on the network you must manually start the Media Player from the menu To change the Auto Start setting 1無 Settings APPLICATIONS Media Player 2無 Press p or q to select Setup Press 3無 Press p or q to highlight USB Auto Start Press t or u to select On or Off Auto Start 1無 Insert a USB device into the USB terminal A promp...

Страница 65: ... of contents on page 64 Press or to begin playback Note Depending on the file size it may take some time to start playback 2無 Press to stop playback 3無 If playback finishes before is pressed the screen returns to the list Note When the repeat mode is set to All the next file will start playing automatically To pause playback Press during playback To resume normal playback press Note PAUSE or opera...

Страница 66: ...MPEG2 PS NTSC MPEG2 TS NTSC H 264 Audio LPCM MPEG1 Layer1 MPEG1 Layer2 MPEG2 Layer2 Dolby Digital AC3 AAC Maximum number of files 1000 per folder Note Some files may not be played Playing Music files Basic Playback 1無 Select a file page 64 Press or to begin playback Note Depending on the file size it may take some time to start playback 2無 Press to stop playback If playback finishes before is pres...

Страница 67: ...data in each image file 1無 Press p q t or u to move the highlight by one window If all of the photos will not fit in one screen when pressing t at the top left thumbnail the screen will move to the previous page Similarly when pressing u at the bottom right thumbnail the screen will move to the next page 2無 When you select a folder press to move to the next layer Press to move back to the previous...

Страница 68: ... which the picture files will be played This feature is not available when there is no music that can be selected To rotate the image While viewing the image in Single View mode or Slideshow mode press p or q to rotate the image 90 degrees To return to the thumbnail Press while in Single View mode or Slide Show mode To display file status information 1無 Press The information will be displayed at t...

Страница 69: ...3無 Press p or q to select the appropriate device Press 4無 Press p q t or u to select the photo you want to copy from the USB or DMS to the TV Press Photo Edit 1無 Settings PREFERENCES Wallpaper Setup The preview screen appears 2無 Press p or q to select Photo Edit Press 3無 Press p or q to select Rotate or Delete 4無 Set the following items as required Rotate Press to rotate the image 90 clockwise Del...

Страница 70: ...bleshooting Cannot view external signals or channel 3 or 4 If you cannot view signals from external devices connected to Video 1 ColorStream HD1 HDMI 1 HDMI 2 HDMI 3 HDMI 4 except 24SL415U PC or from channel 3 or 4 ensure the Input Lock is set to Off page 39 Poor color or no color The station may be having broadcast difficulties Try another channel Check the Input mode when you use Shared Inputs p...

Страница 71: ...code entering screen is displayed press 4 times within 5 seconds The old PIN code is cleared page 37 The V Chip feature is available for U S V Chip systems only page 37 No HDMI CEC Control operation The HDMI CEC Control feature is available for Toshiba HDMI CEC compatible devices Ensure HDMI cables with the HDMI Logo are used When the connected HDMI CEC device does not work correctly after you hav...

Страница 72: ... even if the push button is pressed If the available router AP list is not displayed in Easy Setup PIN or Assisted Setup the power of the router AP may be OFF Check that it is ON and then try re starting the scan for available routers APs Refer to the router AP s instruction manual NET TV or Widget problems If the date and time display on the NET TV menu is wrong turn off the TV and turn it on aga...

Страница 73: ...en The TV is operating properly No light The power is off or standby Green blinks System booting After a while the screen appears Red blinks Power On Failure Turn off the TV and unplug the power cord After 1 minute plug the power cord in again and turn on the TV If the problem persists after trying the solutions In the U S visit TAIS Consumer Solutions on the web at www support toshiba com or call...

Страница 74: ... 7 V p p 75 ohm PB 0 7 V p p 75 ohm Suggested formats 1080i 720p 480p 480i AUDIO 200 mV rms 22 k ohm or greater Chapter 10 Appendix HDMI INPUT HDMI compliant HDCP compliant Suggested formats See table on page 76 HDMI Audio 2 channel Linear PCM 32 44 1 48 kHz sampling frequency 16 20 24 bits per sample DIGITAL AUDIO OUTPUT Optical type PC INPUT 15 Pin D sub Analog RGB Wireless connection Standard I...

Страница 75: ...is recommended to set the refresh rate of your PC to 60 Hz The PC IN on this TV does not accept the Sync on Green Composite Sync and Interlace signals Format Resolution V Frequency H Frequency Pixel Clock Frequency VESA Standard DMT VGA 640 480 59 940 60 Hz 31 469 31 500 kHz 25 175 25 200 MHz l 72 809 Hz 37 861 kHz 31 500 MHz l 75 000 Hz 37 500 kHz 31 500 MHz l SVGA 800 600 56 250 Hz 35 156 kHz 36...

Страница 76: ...cy VESA Standard VGA 640 480 59 940 Hz 31 469 kHz 25 175 MHz l 72 809 Hz 37 861 kHz 31 500 MHz l 75 000 Hz 37 500 kHz 31 500 MHz l SVGA 800 600 56 250 Hz 35 156 kHz 36 000 MHz l 60 317 Hz 37 879 kHz 40 000 MHz l 72 188 Hz 48 077 kHz 50 000 MHz l 75 000 Hz 46 875 kHz 49 500 MHz l XGA 1024 768 60 004 Hz 48 363 kHz 65 000 MHz l 70 069 Hz 56 476 kHz 75 000 MHz l 75 029 Hz 60 023 kHz 78 750 MHz l WXGA ...

Страница 77: ... 9 0 0 0 0 0 0 0 0 digital separator 10 10 10 100 INPUT TV Input Input Input VOL Volume up down Volume up down 1 Volume up down 1 Volume up down 1 Volume up down 1 Volume up down 1 Volume up down Volume up down QUICK Quick Menu MUTE Mute Mute 1 Mute 1 Mute 1 Mute 1 Mute 1 Mute Mute CH RTN Last channel Last channel Last channel CHpq Channel up down Channel up down Channel up down Channel up down Ch...

Страница 78: ... Stop PAUSE STEP Pause 2 Pause Pause Pause Pause Pause Pause SKIP Skip FWD DAY 2 Skip FWD Skip FWD Skip FWD RED Red Red Red GREEN Green Green Green YELLOW Yellow Yellow Yellow BLUE HOME Blue Home Blue Blue SLEEP TV Sleep PIC SIZE TV Picture size MTS AUDIO MTS Audio Audio CC SUBTITLE C Caption Subtitle Subtitle SET UP Setup Setup REC Record Record Record Record 3 Double click Record Double click No...

Страница 79: ...vice code setup 1無 Find the code for your device brand in the remote control device code table page 82 87 If multiple codes are listed try each one separately until you find one that works 2無 Press a mode select button CABLE SAT BD DVD or AUX 3無 While holding down input the 4 digit code for your device 4無 Point the remote at the device Press to test the code Result Meaning The device responds Vali...

Страница 80: ...ed to the TV device mode State Meaning Locked default The remote operates the TV s volume except the AUX mode even when the TV is not the cur rent device mode Unlocked The remote operates the volume of the device associated with the current device mode Each device mode has its own volume if the device ID has volume data Locked to a specific device mode The remote operates the volume of the device ...

Страница 81: ...MI 1 6 HDMI 2 7 HDMI 3 8 HDMI 4 except 24SL415U 9 PC 0 ANT CABLE MUTE Mute On GREEN 1 Native Picture Size 2 4 3 Picture Size 3 TheaterWide 1 Picture Size 4 TheaterWide 2 Picture Size 5 TheaterWide 3 Picture Size 6 Full Picture Size 7 Normal Picture Size 8 Dot by Dot Picture Size MUTE 1 2 Mute On YELLOW 1 AutoView Picture Mode 2 Sports Picture Mode 3 Standard Picture Mode 4 Movie 1 Picture Mode 5 M...

Страница 82: ... CIPHER 0025 VISIONTEC 0106 VIEWSAT 0021 ZENITH 0024 0025 0094 0095 0100 Cable Brand Code ABC 0081 0078 0065 0079 0123 ADELPHIA 0045 ALLEGRO 0039 0059 AMERICAST 0052 ANTRONIX 0033 0077 0124 ARCHER 0033 0077 0082 0124 AT T 0068 BELL 0069 BELL SOUTH 0052 CABLETENNA 0033 CABLEVIEW 0033 CABLEVISION 0045 CENTURY 0082 CHARTER 0045 CITIZEN 0082 CLEARMAX 0042 COLOR VOICE 0040 COMCAST 0045 0073 0121 COMTRO...

Страница 83: ...025 1019 1029 1030 1081 DENZEL 1059 DESAY 1152 DIAMOND VISION 1047 DIGITREX 1053 DISNEY 1117 DRIVE 1153 DUAL 1103 1048 1059 DURABRAND 1066 1093 1048 1103 1167 DVD2000 1031 EMERSON 1093 1117 1167 ESA 1103 FISHER 1101 FUNAI 1117 GE 1079 1094 GOLDSTAR 1093 1167 GO VIDEO 1100 1060 1032 1009 1052 1004 1007 1170 GPX 1100 GRADIENTE 1092 1103 1040 GREENHILL 1094 HAAZ 1102 1046 HARMAN KARDON 1114 HD DVD 11...

Страница 84: ... 1066 VENTURER 1104 1066 1172 WHARFEDALE 1112 WESTINGHOUSE 1084 WHITE WESTINGHOUSE 1117 X BOX 1079 XENIUS 1092 YAMAHA 1130 1122 1131 1158 1159 1178 YAMAKAWA 1056 1059 1065 ZENITH 1061 1093 1167 DVD Recorders Brand Code ASTAR 1050 1095 APEX 1054 ASPIRE 1057 1036 BROKSONIC 1067 BUSH 1068 COBY 1095 CYBERHOME 1064 EMERSON 1117 GO VIDEO 1052 1098 1100 1135 HITACHI 1018 1113 HUGHES 1117 HUGHES NETWORK 1...

Страница 85: ...KODAK 2033 2046 LG 2047 2090 2076 2074 LLOYD 2047 2000 LOGIK 2086 LXI 2047 2033 MAGNAVOX 2046 2056 2090 2047 2062 2060 2056 2047 2088 2089 MAGNIN 2007 MARANTZ 2056 2024 2011 2012 2081 2046 2004 2021 MARTA 2033 MATSUSHITA 2046 MEI 2046 MEMOREX 2056 2033 2024 2022 2005 2090 2007 2062 2047 2048 2023 2000 2046 MGA 2015 2018 MGN TECHNOLOGY 2007 MIDLAND 2029 MINOLTA 2030 2077 MITSUBISHI 2015 2016 2030 2...

Страница 86: ...044 2039 SHARP 2063 2062 2047 2082 2018 2092 SHINTOM 2065 2067 2030 2086 2037 SHOGUN 2007 SIGNATURE 2047 SINGER 2046 2086 SONY 2064 2068 2065 2066 2067 2070 2069 2071 2072 STS 2030 2046 2077 SUPERSCAN 2088 SYLVANIA 2000 2047 2056 2015 2060 2088 2046 2047 2087 SYMPHONIC 2047 2047 2088 2000 2087 TANDY 2047 2024 TASHIKO 2033 TATUNG 2017 TEAC 2047 2000 2017 TECHNICS 2046 TEKNIKA 2047 2033 2073 2000 20...

Страница 87: ...RANTZ 4074 4042 NAD 4076 NELSON 4019 NEO 4044 NEXXTECH 4020 4019 4004 ONKYO 4078 4079 OPTIMUS 4024 4035 4002 4012 4034 4036 4037 PANASONIC 4093 4092 4014 4043 4014 4015 4016 4013 4017 PHILIPS 4061 4068 4043 4042 4042 4042 4083 PIONEER 4036 4040 4034 4041 4033 4038 4037 4036 4039 RADIO SHACK 4036 4037 4038 4075 4073 RCA 4031 4046 4023 4036 4037 4038 4048 4045 4047 4073 4075 RIO 4063 4025 SAMSUNG 40...

Страница 88: ... includes wall mounts custom cabinets and other installation methods that do not provide for direct and immediate access to the product for service purposes Labor service charges for set installation setup adjustment of customer controls and installation or repair of antenna satellite or cable systems are not covered by this limited warranty 6 Reception or other problems caused by inadequate anten...

Страница 89: ...n Complete and mail the enclosed product registration card or register your LCD Television online at http support toshiba ca warranty Registration of your LCD Television will enable TCL to contact you in the unlikely event of a product safety notice Failure to complete the product registration does not diminish your warranty rights THE ABOVE WARRANTIES ARE SUBJECT TO THE FOLLOWING CONDITIONS 1 You...

Страница 90: ...spute controversy or disagreement whether for breach of warranty breach of contract tort including negligence under a statute or under any other law or form of action against any of the Related Parties arising out of or otherwise relating to i this warranty ii the Television iii any oral or written representations statements brochures press releases advertising announcement point of sale display o...

Страница 91: ...n do so by visiting following web page For USA www support toshiba com For Canada www toshiba ca support You may obtain the complete Corresponding GPL and LGPL Source code from Toshiba for a period of three 3 years after our last shipment of this product by contacting Toshiba Consumer Solutions at 800 631 3811 There will be a charge of no more than the cost of physically performing source distribu...

Страница 92: ...VE LEBANON TN 37087 U S A TOSHIBA OF CANADA LTD HEAD OFFICE 191 McNABB STREET MARKHAM ONTARIO L3R 8H2 CANADA AutoView ColorStream GameTimer and TheaterWide are registered trademarks of Toshiba America Information Systems Inc Channel Browser DynaLight ColorMaster NET TV SurfLock and TheaterLock are trademarks of Toshiba America Information Systems Inc ...

Отзывы: