4.
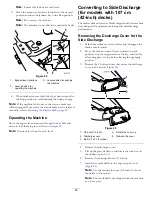
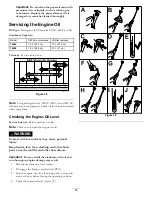
Remove the 2 knobs and curved washers that secure
the right baffle to the mower (
Figure 28
1.
Knob
3.
Baffle stud coming through
the mower
2.
Curved washer
5.
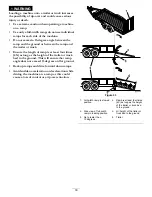
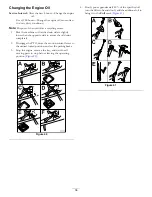
Remove the right baffle and lower the grass deflector
over the discharge opening as shown in
and
Figure 29
1.
Right baffle
3.
Discharge opening
2.
Curved washer and knob
6.
Install fasteners into the holes in the top of the mower
to prevent flying debris.
WARNING
Open holes in the mower expose you and
others to thrown debris which can cause
severe injury.
•
Never operate the mower without hardware
mounted in all holes in the mower housing.
•
Install the hardware in the mounting holes
when you remove the mulching baffle.
7.
Install the right mower blade; refer to
.
8.
Lift up the grass deflector. Install 2 bolts (5/16 x 3/4
inch) to the two holes along the deck cutout.
9.
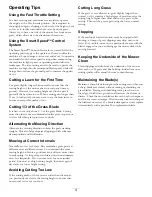
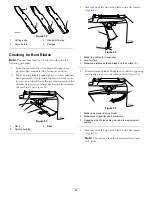
Install the cutoff baffle to the mower deck (
).
Note:
Use the 2 locknuts (5/16 inch) to secure the
baffle to the mower deck.
Note:
The cutoff baffle was shipped with the machine
as a loose part.
G015321
1
2
3
Figure 30
1.
Bolt (5/16 x 3/4 inch)
3.
Locknut (5/16 inch)
2.
Cutoff baffle
10.
Torque the fasteners to 7 to 9 N-m (14 to 18 ft-lb).
11.
Lower the grass deflector over the discharge opening.
Important:
Ensure that the mower has a hinged
grass deflector that disperses clippings to the side
and down toward the turf, while in side discharge
mode.
28
Содержание timecutter zs 4200t
Страница 12: ...121 0772 1 Fast 4 Choke 2 Continuous variable setting 5 Power take off PTO blade control switch 3 Slow 12 ...
Страница 13: ...121 0773 1 Fast 4 Choke 2 Continuous variable setting 5 Power take off PTO blade control switch 3 Slow 13 ...
Страница 55: ...Schematics Electrical Diagram Rev A 55 ...
Страница 56: ...Notes 56 ...
Страница 57: ...Notes 57 ...
Страница 58: ...Notes 58 ...


