3.
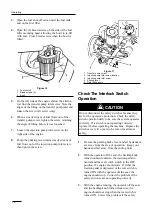
Open the fuel shut-off valve under the fuel tank
and on the fuel filter.
4.
Open the (2) bleed screws on the side of the fuel
filter mounting head, allowing the bowl to re-fill
with fuel. Close bleed screws when the bowl is
filled.
Figure 16
1. Fuel shutoff
2. Bleed screws (2)
3. Bowl
5.
On the left side of the engine (below the alterna-
tor) find the transfer pump inlet screw. Note the
angle of the fitting on the transfer pump inlet and
loosen the screw (left screw only).
6.
When a steady stream of fuel flows out of the
transfer pump screw, tighten the screw, retaining
the angle of fitting before it was loosened.
7.
Loosen the injection pump inlet screw on the
right side of the engine.
8.
Pump the priming lever until a steady stream of
fuel flows out of the injection pump inlet screw,
then tighten the screw.
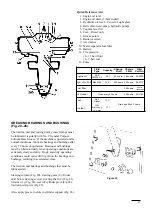
Figure 17
1. Transfer pump screw
2. Injection pump Inlet screw location
3. Injection pump inlet screw
4. Priming lever
5. Note fitting angle
Check The Interlock Switch
Operation
1.
Be sure the parking brake is set and all bystanders
are away from the area of operation. Keep your
hands and feet away from the cutting units.
2.
With the operator off the seat, the backlap knob
turned counterclockwise, the traction pedal in
neutral and the reel switch switch in the OFF
position, the engine should start. If either the
traction pedal is depressed or the reel switch is
turned ON with the operator off the seat, the
engine should stop. Correct the problem if the
safety switches are not operating correctly.
3.
With the engine running, the operator off the seat
and the backlap knob turned clockwise, the
engine should not stop when the reel switch is
turned ON. Correct the problem if the safety
18
Operating
Do not disconnect the safety switches because they
are for the operator’s protection. Check the safety
switch operation dally to be sure the system operates
correctly. If a switch is not operating correctly,
replace it before operating the machine. Replace the
switches every two years to be sure of maximum
safety.
CAUTION
Содержание REELMASTER 2300-D
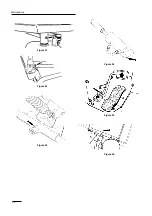
Страница 24: ...Figure 21 Figure 22 Figure 23 Figure 24 Figure 25 Figure 26 24 Maintenance ...
Страница 29: ......

