
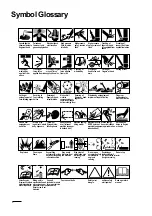


14
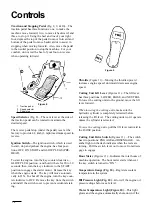
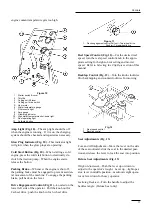
Traction and Stopping Pedal (Fig. 8, 9, & 10)—The
traction pedal has three functions: one, to make the
machine move forward; two, to move it backward; and
three, to stop it. Using the heel and toe of your right
foot, depress the top of the pedal to move forward and
bottom of the pedal to move backward or to assist in
stopping when moving forward. Also, move the pedal
to the neutral position to stop the machine. For your
comfort, do not rest the heel of your foot on reverse
when operating forward.
Figure 8
1. Traction pedal
2. Speed
selector
3. Pedal
stop
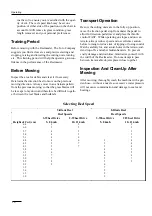
Speed Selector (Fig. 8)—The cam lever at the side of
the traction pedal can be rotated to maintain the
desired speed.
The reverse pedal stop (under the pedal) is set at the
factory to provide 4.8 kmh (3 mph) maximum speed in
reverse.
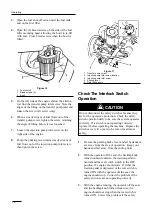
Ignition Switch—The ignition switch, which is used
to start, stop and preheat the engine, has four posi-
tions: OFF, ON, START and GLOW PLUGS (PRE-
HEAT).
To start the engine, turn the key counterclockwise—
GLOW PLUG position—and hold it there for 20 to 30
seconds, then, turn the key clockwise to the START
position to engage the starter motor. Release the key
when the engine starts. The key will move automati-
cally to ON. To shut off the engine, turn the key coun-
terclockwise to OFF. Remove the key from the switch
and install the switch cover to prevent accidental start-
ing.
Figure 9
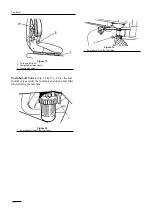
Throttle (Figure 11)—Moving the throttle upward
increases engine speed; downward decreases engine
speed.
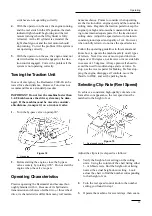
Cutting Unit Lift Lever (Figures 11)—The lift lever
has three positions: LOWER, RAISE, and NEUTRAL.
To lower the cutting units to the ground, move the lift
lever forward.
When lowering the cutting units, make sure the
hydraulic cylinder is completely retracted before
releasing the lift lever. The cutting units won’t operate
unless the cylinder is retracted.
To raise the cutting units, pull the lift lever rearward to
the RAISE position.
Cutting Unit Drive Switch (Figures 11) —The switch
has two positions: ENGAGE and DISENGAGE. An
amber light on the dash indicates when the reels are
turning. Pull the switch lever out to move from disen-
gage to engage.
Hour Meter (Figures 11)—Indicates the total hours of
machine operation. The hour meter starts whenever
the key switch is turned to “ON.”
Temperature Gauge (Fig. 10)—Registers coolant
temperature in the system.
Oil
Pressure Light (Fig. 10)—Glows if the engine oil
pressure drops below a safe level.
Water Temperature Light (Figure 10)—This light
glows and the engine automatically shuts-down if the
Controls
Содержание REELMASTER 2300-D
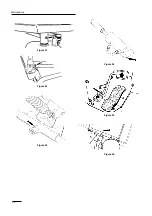
Страница 24: ...Figure 21 Figure 22 Figure 23 Figure 24 Figure 25 Figure 26 24 Maintenance ...
Страница 29: ......


