


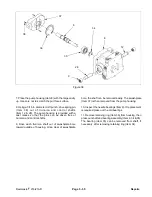


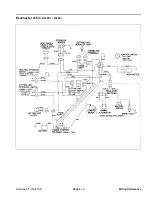

8
39
5
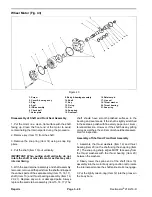
Figure 37
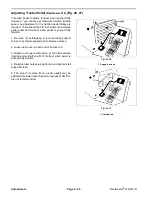
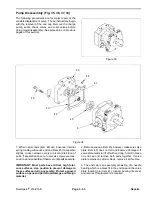
4. Lift out the cylinder block assembly (Item 5). The
5. Visually inspect wear surfaces of valve plate, cylinder
pistons may come out of the cylinder block. There is no
block and slippers for damage. Check to be sure pistons
special orientation of piston to bore that needs to be
are free in bores.
maintained. Do not attempt to disassemble the spring
and other parts from the center bore of the cylinder
6. Remove thrust plate (Item 39) from counterbore in
block. The entire cylinder block assembly (Item 5)
face of swashplate (Item 37). Visually inspect both sides
should be replaced if any of its components are dam-
for damage and flatness.
aged.
Repairs
Page 5 - 34
Reelmaster
®
216/216-D
Содержание reelmaster 216
Страница 2: ...This page is blank ...
Страница 4: ...This page is blank ...
Страница 8: ...Safety Instructions Page 1 4 Reelmaster 216 216 D ...
Страница 12: ...Torque Specifications Page 2 4 Rev B Reelmaster 216 216 D ...
Страница 26: ...Adjustments Page 4 4 Reelmaster 216 216 D ...
Страница 40: ...Troubleshooting Page 5 14 Reelmaster 216 216 D ...
Страница 42: ...Troubleshooting Page 5 16 Reelmaster 216 216 D ...
Страница 72: ...Repairs Page 5 46 Reelmaster 216 216 D ...
Страница 74: ...Wiring Schematics Reelmaster 216 S N 99999 Below Wiring Schematics Page 6 2 Reelmaster 216 216 D ...
Страница 75: ...Reelmaster 216 S N 10001 19999 Reelmaster 216 216 D Page 6 3 Wiring Schematics ...
Страница 76: ...Reelmaster 216 S N 20001 Up Wiring Schematics Page 6 4 Reelmaster 216 216 D ...
Страница 77: ...Reelmaster 216 D Reelmaster 216 216 D Page 6 5 Wiring Schematics ...
Страница 114: ...Repairs Page 7 8 Reelmaster 216 216 D ...
Страница 124: ...Repairs Page 8 10 Reelmaster 216 216 D ...
Страница 143: ...This page is blank ...
Страница 144: ...Commercial Products The Toro Company ...


