Adjustments
Cutting Unit Belt Adjustment
Cutting unit drive belts should have a maximum deflec
tion of 1/2 in. with 10 lb. load applied to middle of belt
span.
NOTE: When new belts have been installed, check
tension again after the first 8 hours of operation.
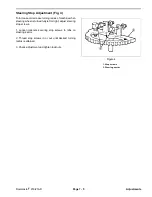
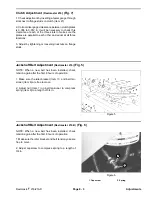
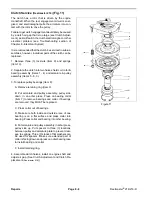
Old Style Belt Tensioner Assembly (Fig. 3)
Loosen jam nut on front end of belt tension rod. Rotate
rod to lengthen or shorten rod to desired length. Tighten
jam nut.
To release belt tension to cutting units:
Figure 3
A. Remove hair pin cotter and pivot belt tension rod
(Old Style Belt Tensioner)
handle outward (away from cutting unit).
1. Belt tension rod handle
3. Jam nut
B. Turn handle 1/2 turn (180
°
) so the angle cut
2. Belt tension rod
4. Angle cut
(beveled edges) of tension rods are parallel. Belt
tension is now released.
C. To tighten the belt, turn belt tension rod handle
1/2 turn (180
°
) back to its previous position and
install hair pin cotter. Angle cuts (beveled edges)
must be oriented toward cutting unit and ends must
make contact when belt is tensioned.
NOTE: For smooth operation, occasionally clean sliding
pin at center of tension rod and coat with anti-seize
compound.
NOTE: Old style belt tension rods can be replaced with
the new style assemblies.
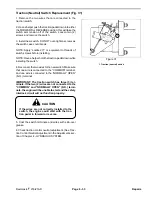
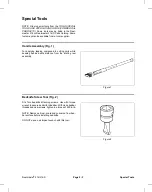
New Style Belt Tensioner Assembly (Fig. 4)
Loosen jam nut on front end of belt tension rod. Rotate
rod to lengthen or shorten rod to desired length. Tighten
jam nut.
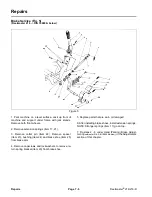
To release belt tension to cutting units push retaining
cup rearward and pivot yoke downward.
Figure 4
(New Style Belt Tensioner)
1. Belt tension rod cup retainer
2. Belt tension rod
3. Jam nut
Adjustments
Page 8 - 2
Reelmaster
®
216/216-D
Содержание reelmaster 216
Страница 2: ...This page is blank ...
Страница 4: ...This page is blank ...
Страница 8: ...Safety Instructions Page 1 4 Reelmaster 216 216 D ...
Страница 12: ...Torque Specifications Page 2 4 Rev B Reelmaster 216 216 D ...
Страница 26: ...Adjustments Page 4 4 Reelmaster 216 216 D ...
Страница 40: ...Troubleshooting Page 5 14 Reelmaster 216 216 D ...
Страница 42: ...Troubleshooting Page 5 16 Reelmaster 216 216 D ...
Страница 72: ...Repairs Page 5 46 Reelmaster 216 216 D ...
Страница 74: ...Wiring Schematics Reelmaster 216 S N 99999 Below Wiring Schematics Page 6 2 Reelmaster 216 216 D ...
Страница 75: ...Reelmaster 216 S N 10001 19999 Reelmaster 216 216 D Page 6 3 Wiring Schematics ...
Страница 76: ...Reelmaster 216 S N 20001 Up Wiring Schematics Page 6 4 Reelmaster 216 216 D ...
Страница 77: ...Reelmaster 216 D Reelmaster 216 216 D Page 6 5 Wiring Schematics ...
Страница 114: ...Repairs Page 7 8 Reelmaster 216 216 D ...
Страница 124: ...Repairs Page 8 10 Reelmaster 216 216 D ...
Страница 143: ...This page is blank ...
Страница 144: ...Commercial Products The Toro Company ...

