


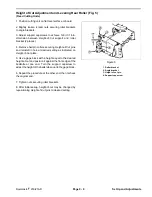


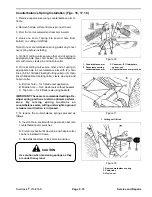


When assembling reel (Fig. 19):
Tighten large jam nut (Item 56) on reel shaft against
washer (Item 57) and bearing (Item 30) so that when
capscrew (Item 34) on end of reel shaft is tightened,
there will be a 0.060 in. gap between end of bedbar and
reel blades. Tighten capscrew (Item 34) on end of reel
shaft to 35 ft-lb.
To get proper bearing alignment, leave nuts (Item 41)
on bearing flanges (Item 29, 31) loose and adjust reel
parallel to bedknife. Rotate reel by hand and tap each
bearing with a soft-faced hammer so it will self-align in
flanges. Tighten nuts to clamp and retain bearings.
When assembling S.P.A. handle (Fig. 19):
Tighten locknut (Item 10) so compression spring
(Item 11) is 0.86 in. long.
Pivot (Item 13) must be centered in bedbar arm yoke so
a gap exists on both sides of yoke. S.P.A. pin (Item 22)
can be moved left or right so handle assembly is straight
with no side load. Tighten hex socket set screws
(Item 49) until firmly seated (slight pre-load) in tapered
seats, then tighten jam nuts.
Position spring arm (Item 17) and fasten so good solid
clicking sound is achieved when turning handle.
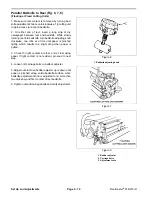
compound
Anti-seize
compound
Anti-seize
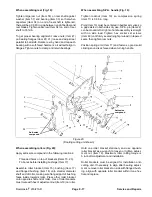
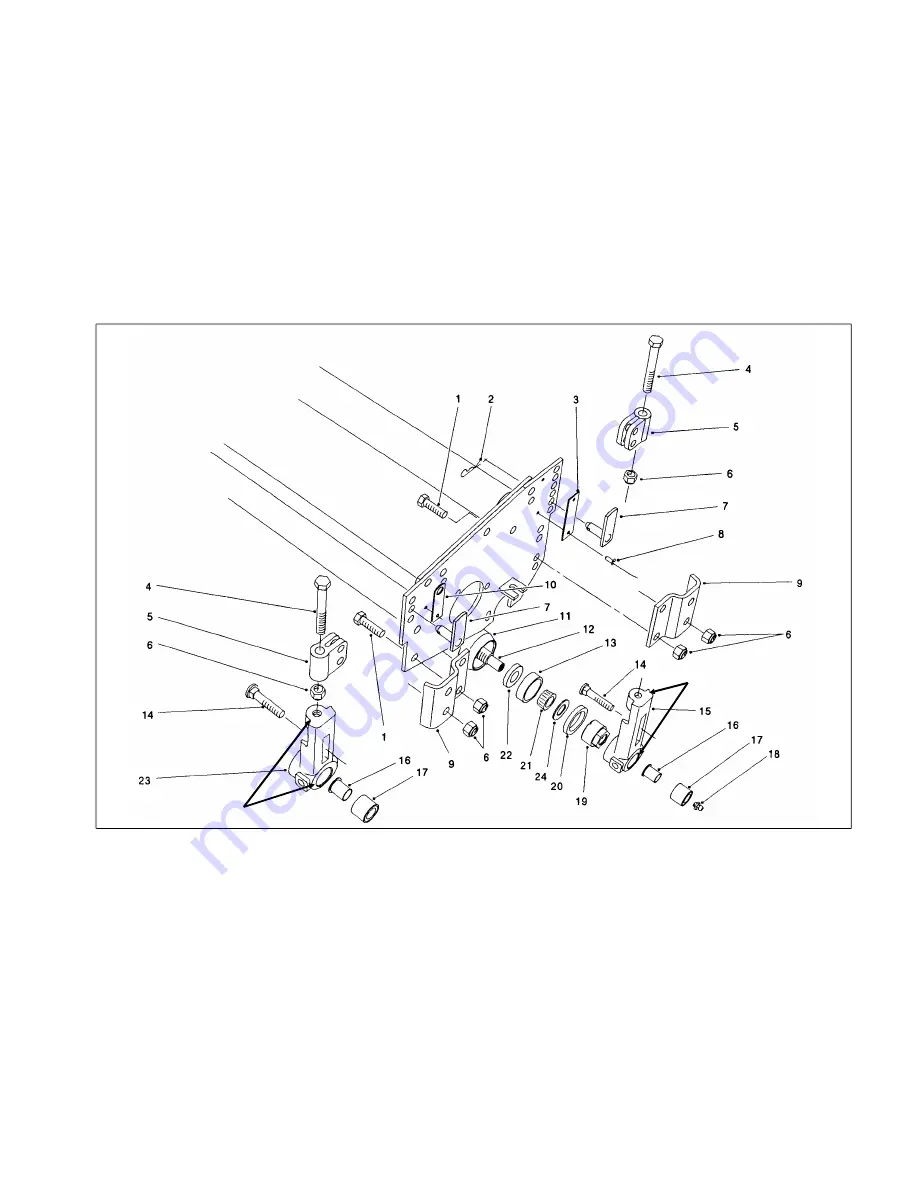
Figure 20
(Floating cutting unit shown)
When assembling rollers (Fig. 20):
Apply anti-seize compound in the following locations:
Threaded holes on top of brackets (Items 15, 23).
To bores before installing bushings (Item 17).
Assemble roller bracket (Item 15), bushing (Item 17)
and flanged bushing (Item 16) onto smaller diameter
shaft end of roller, making sure flanged part of bushing
faces inside towards roller. Press other roller bracket
onto opposite shaft end of roller. Hex of roller brackets
must mate with hex of adjustment nut (Item 19) on roller.
Hold one roller bracket stationary and use opposite
roller bracket as a wrench to loosen or tighten adjust
ment nut (Item 19). Maximum roller rolling torque is
5 in-lb after adjustment and installation.
Roller brackets must be aligned for installation onto
cutting unit. If necessary to align after bearing adjust
ment, remove roller bracket on side with flanged bush
ing, align with opposite roller bracket within
±
one hex
flat and replace.
Reelmaster
®
216/216-D
Page 9 - 17
Service and Repairs
Содержание reelmaster 216
Страница 2: ...This page is blank ...
Страница 4: ...This page is blank ...
Страница 8: ...Safety Instructions Page 1 4 Reelmaster 216 216 D ...
Страница 12: ...Torque Specifications Page 2 4 Rev B Reelmaster 216 216 D ...
Страница 26: ...Adjustments Page 4 4 Reelmaster 216 216 D ...
Страница 40: ...Troubleshooting Page 5 14 Reelmaster 216 216 D ...
Страница 42: ...Troubleshooting Page 5 16 Reelmaster 216 216 D ...
Страница 72: ...Repairs Page 5 46 Reelmaster 216 216 D ...
Страница 74: ...Wiring Schematics Reelmaster 216 S N 99999 Below Wiring Schematics Page 6 2 Reelmaster 216 216 D ...
Страница 75: ...Reelmaster 216 S N 10001 19999 Reelmaster 216 216 D Page 6 3 Wiring Schematics ...
Страница 76: ...Reelmaster 216 S N 20001 Up Wiring Schematics Page 6 4 Reelmaster 216 216 D ...
Страница 77: ...Reelmaster 216 D Reelmaster 216 216 D Page 6 5 Wiring Schematics ...
Страница 114: ...Repairs Page 7 8 Reelmaster 216 216 D ...
Страница 124: ...Repairs Page 8 10 Reelmaster 216 216 D ...
Страница 143: ...This page is blank ...
Страница 144: ...Commercial Products The Toro Company ...


