


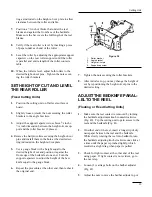


down until the paper is pinched along the entire
bedknife surface when the bedknife adjustment
knob is adjusted to no more than two clicks beyond
first contact of the reel bedknife (Fig 41).
6.
Tighten the nuts and carriage bolts and verify
adjustment
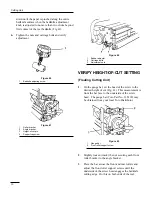
VERIFY HEIGHT-OF-CUT SETTING
(Floating Cutting Unit)
1.
On the gauge bar, set the head of the screw to the
desired height of cut (Fig. 43) This measurement is
from the bar face to the underside of the screw
head. The gauge bar (Toro Part No. 138199) may
be obtained from your local Toro Distributor
2.
Slightly loosen (crack) the nut securing each front
roller bracket to the angle bracket.
3.
Place the bar across the front and rear rollers and
adjust the front roller support screws until the
underside of the screw head engages the bedknife
cutting edge. Do this on both ends of the reel.
30
Cutting Unit
Figure 40
1.
Bedknife adjusting screw
Figure 41
1.
Roller bracket
2.
Angle bracket
3.
Height-of-cut pin
4.
Support capscrew
Figure 42
1. Bedbar
adjuster
2. Carriage
bolts
3. Adjustment
nuts
Figure 43
1. Gauge
bar
2. Front roller support screw
Содержание reelmaster 216
Страница 24: ...Figure 28 Figure 29 Figure 30 Figure 31 24 Maintenance ...
Страница 34: ......
Страница 35: ......
Страница 36: ......