background image

16

MAINTENANCE

Squeegee Blades

Whenever the squeegee leaves streaks or

water trails, debris at the blade edges is the

primary cause. Clean the blade edges with a

damp cloth.

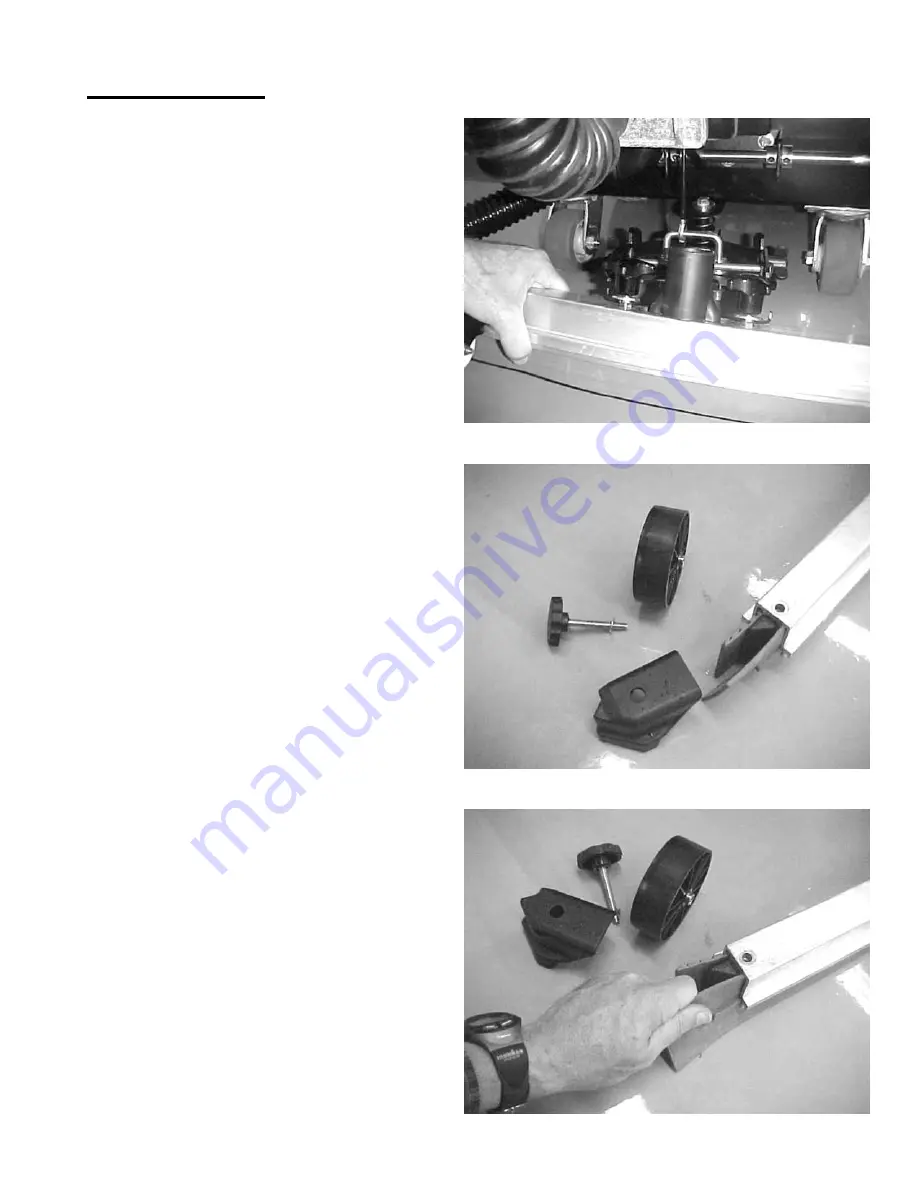
If a squeegee blade is worn or nicked, raise

the squeegee assembly and remove the

entire assembly: disconnect the vacuum

hose, loosen both star handles, and slide the

squeegee assembly out.

Remove both guide wheels and end caps.

Pull each blade out from one end, and slide

its replacement into place.

Replace the end caps and guide wheels.

Slide the squeegee assembly back onto its

mount, and tighten both star handles.

https://harrissupplyind.com - To Order Parts Call 608-268-8080

Содержание Floorkeeper 99328

Страница 1: ...For Parts List see L9332EDP Effective 11 7 2005 Form No L9332ED Revised 11 05 2006 Tornado Industries All rights reserved TORNADO INDUSTRIES 7401 W LAWRENCE AVENUE CHICAGO IL 60706 708 867 5100 FAX 7...

Страница 2: ...2 NOTES h t t p s h a r r i s s u p p l y i n d c o m T o O r d e r P a r t s C a l l 6 0 8 2 6 8 8 0 8 0...

Страница 3: ...INTRODUCTION 13 BATTERY CARE 13 BATTERY CHARGING 15 SQUEEGEE BLADES 16 SQUEEGEE ADJUSTMENT 17 VACUUM AND WATER RECOVERY SYSTEM 18 SOLUTION AND RECOVERY Vacuum TANKS 18 VACUUM MOTOR 19 WHEELS 19 LUBRI...

Страница 4: ...hs labor OR 1000 hours of operation whichever comes first Warranties on the 75 140 90 140 are 24 months parts 12 months labor OR 1 000 hours of operation whichever comes first 3 All non wear item part...

Страница 5: ...ge Floorkeeper Automatic Scrubber was designed and built to exceed your needs for durability and serviceability in demanding commercial environments This manual is designed to instruct your personnel...

Страница 6: ...Button 5 Brush Position Switch Rear Controls 6 Adjustable Solution Control 7 Dual Drive Levers 8 Dual Reverse Buttons 9 Emergency Stop Switch 10 Key Lock 11 Circuit Breaker 12 Squeegee Control Lever...

Страница 7: ...ique screens Each screen displays a different set of icons and numerical readouts to give you useful information about your Long Range Floorkeeper s operating status For particulars on diagnostic faul...

Страница 8: ...y as shown in bottom photo or refer to chart located under the hood Ensure that positive and negative terminals are positioned and connected correctly CAUTION Observe polarity Place battery terminal p...

Страница 9: ...queegee assembly Make sure the black metal bracket on the squeegee assembly is aimed forward toward the concave side of the squeegee Lift the squeegee bracket and washers if present and slide the sque...

Страница 10: ...htly Refer to the Maintenance section to properly adjust the squeegee position for best wiping performance Never store machine with squeegee in down position This can damage the flexible blades Always...

Страница 11: ...e brush heads using the switch on the control panel 2 Place the brushes or pad holders under the brush cover Center the brushes on the brush couplers Pull up to lock in place 3 Check to see that the t...

Страница 12: ...recovery tank before filling solution tank This will eliminate overfilling of recovery tank Lift solution tank cover and fill 3 Close top covers by pushing covers down You are now ready to operate yo...

Страница 13: ...quantities of running water for 15 minutes SKIN Flush area with plentiful amounts of running water INGESTION Give milk to drink DO NOT induce vomiting call a physician SPILLS Wash with water or neutr...

Страница 14: ...y caps Using baking soda or ammonia and water solution saturate a cloth and wring until drip dry Use this cloth to wipe the battery tops 1 The battery terminals and connections need to be coated with...

Страница 15: ...AS DO NOT DISCONNECT CHARGER DC OUTPUT TERMINALS FROM BATTERY WHEN CHARGER IS ON THE RESULTING ARCING AND BURNING COULD CAUSE THE BATTERY TO EXPLODE KEEP SPARKS FLAME AND SMOKING MATERIALS AWAY FROM B...

Страница 16: ...d remove the entire assembly disconnect the vacuum hose loosen both star handles and slide the squeegee assembly out Remove both guide wheels and end caps Pull each blade out from one end and slide it...

Страница 17: ...appear evenly loaded readjust the squeegee assembly using the directions below Loosen the two rocker thumbscrews Hold the squeegee and rotate it forward or rearward until the squeegee blades contact...

Страница 18: ...o dry when not in use A liquid shutoff is built into the filter system to prevent overfilling tank Do not disassemble or modify the white plastic float or vacuum motor damage may result Solution and R...

Страница 19: ...rrosion of vacuum motor Vacuum Motor To service vacuum motor which is located above re covery tank 1 Disconnect vacuum hose clamp 2 Remove four screws 3 Disconnect wires and remove cover 4 Remove vacu...

Страница 20: ...eplacement brushes need to be inspected and changed more often due to commutator wear Always permanently record any brush inspections and replacements you make Don t attempt to use the Motor Fault Err...

Страница 21: ...shutoff closes to prevent water from entering vacuum motor 2 Loose hose on float filter creating an air leak 3 Clogged filter 4 Clogged stand pipe near filter Remove cap to inspect and clean with hose...

Страница 22: ...ocedures will avoid problems with the recovery system requiring outside repair service Always be very sure the vacuum system is clear of any blockage before calling for service Poor Solution Flow If a...

Страница 23: ...ries Check the lights on the battery charger after charger shuts off A Green light Batteries are fully charged and are in good condition B Amber light All cells are OK but the total battery capacity i...

Страница 24: ...etal and excessive heat away from batteries 7 Use TORNADO charger with correct voltage and current rating TROUBLESHOOTING PERFORMANCE SYMPTOMS Poor Solution Pickup Vac motor not running Vac filter is...

Страница 25: ...0811 0812 0813 0814 0815 0816 0817 0818 0A01 Possible Controller fault Replace Controller if not cleared by disconnecting batteries for 1 min 0B0B Possible Controller fault Replace Controller if not c...

Страница 26: ...nnecting batteries for 1 min 3210 3211 3212 3213 3214 3601 Possible Controller fault Replace Controller if not cleared by disconnecting batteries for 1 min 3602 3603 3608 3609 360A 360B 360C 360D 360E...

Страница 27: ...Trio and check the wiring from this connector down to the Traction motor and checking connections all the way Otherwise possible Traction motor fault 7801 Possible short circuit on Traction motor or...

Страница 28: ...grease gun supplied with Floorkeeper 2 Check the specific gravity of fully charged battery cells allow a 30 minute cool down after charging specific gravity should be 1 270 to 1 280 MONTHLY MAINTENAN...

Отзывы: