


16
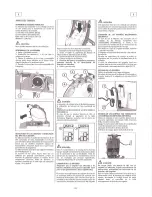
6 Reassemble all parts and close, if pres-
ent, the solution valve of the drainage
device.
7. The machines equipped with the 3S
system (see under “3S SYSTEM SOLU-
TION SAVING SYSTEM”) (optional), it
is necessary to clean in the same way also
the filter of the auxiliary hydraulic circuit.
ATTENTION
:
This operation must be carried out using
gloves to protect from contact with dan-
gerous solutions.
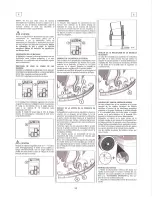
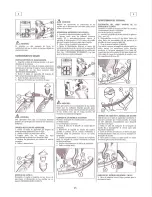
TWO-MONTHLY MAINTENANCE
FRONT SQUEEGEE RUBBER RE-
PLACEMENT
Check the wear of the squeegee rubber
and eventually replace it.
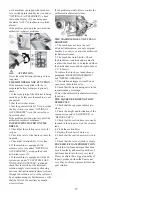
For the replacement it is necessary to:
1. Take off the squeegee hose (3) from its
coupling.
2. Disassemble the squeegee from the sup-
port rotating the lever (2) counterclock-
wise and sliding the stud bolts (1) in their
slots.
3. Uncouple the hook (1) of the rubber
holder blade, release the extremities (2)
from the squeegee body and take off the
rubber (4).
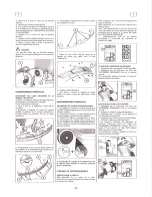
4. Unscrew the wing nuts (5) in the upper
part of the squeegee.
5. Slip off the lower part (6) of the squee-
gee body, so to take off the front rubber
(7).
6. Replace the front rubber.
7. To reassemble the squeegee reverse the
operations above.
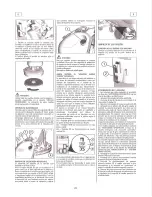
SIX-MONTHLY MAINTENANCE
SPLASH GUARD REPLACEMENT
1. Release the spring in the rear part of the
brushes base group from the slot placed at
the extremity of the metal strip.
2. Unscrew the nut on the front part of the
brushes base group and take off the metal
strips.
3. Replace the splash guard rubbers
and follow assembling instructions at
“SPLASH GUARD ASSEMBLY” para-
graph.
With brushes assembled, the splash guard
must slightly touch the floor.
The checking of all the other foreseen ma-
chine operations is left to the authorized
technical assistance.
TROUBLESHOOTING GUIDE
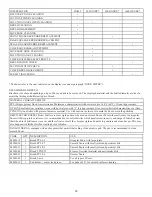
SIGNALS ON THE DISPLAY
A001: Indication of the version of the
electronic check card (the last number
indicates the revision of the check card).
Pb24: Indication battery check card set for
lead batteries.
GE24: Indication battery check card set
for gel batteries.
AL01: Signal indicating an absorption of
excessive current of the brush motor, only
on machines equipped with the overload
protection device for the brush pressure
adjustment (see under "OPTIONAL AC-
CESSORIES”).
---- (blinking): signal indicating the dis-
charged batteries and intervention of the
brush stop device.
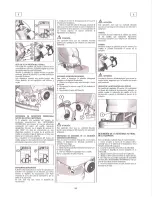
THE SUCTION MOTOR DOES NOT
WORK
1. Verify that the general switch (12)
is on or that the key switch (see under
"OPTIONAL ACCESSORIES”) is in the
correct position (clockwise).
2. Check the charge level of the batteries.
3. Check that the battery connector is cor-
rectly plugged in.
4. Verify that the switch (3) is on.
If the problem persists, please contact the
authorized technical assistance.
THE BRUSH MOTOR DOES NOT
WORK
1. Verify that the general switch (12)
is on or that the key switch (see under
"OPTIONAL ACCESSORIES”) is in the
correct position (clockwise).
2. Check the charge level of the batteries.
3. Check that the battery connector (1) is
correctly plugged in.
4. Verify that the switch (5) is on.
5. Activate the brush activation levers.


