


11
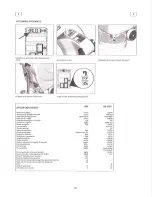
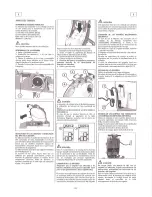
Bring the machine on a levelled surface
near to a single-phase socket with tension
120V, frequency 60Hz, nominal current
10A.
Switch off the switches of the brushes
motor, suction motor and of the solenoid
valve.
Insert the plug into the mains socket.
At the end of the recharging, take off the
plug from the mains socket.
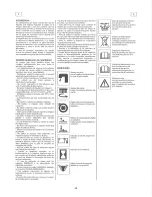
ATTENTION
:
Never charge a GEL battery with a non
suitable recharger. Strictly follow the
instructions sup-plied by the batteries and
recharger manufacturer.
In order not to cause permanent damages
to the batteries, it is necessary to avoid
their complete discharge, providing for the
recharging within a few minutes after bat-
teries discharge signal starts blinking.
BATTERIES RECHARGING WITH
INCORPORATED BATTERY RE-
CHARGER (OPTIONAL)
NOTE: Never leave batteries completely
discharged even if the machine is not
used. In case of traditional batteries,
please check the electrolyte level every 20
recharging cycles and eventually fill them
up with distilled water.
ATTENTION
:
For the daily recharge of the batteries it is
necessary to follow strictly all the indica-
tions given by the manufacturer/distribu-
tor. All the installation and maintenance
operations must be carried out by qualified
staff. Danger of gas exhalations and emis-
sion of corrosive liquids. Fire danger: do
not approach with free flames
BATTERIES DISPOSAL
It is compulsory to hand over exhaust
batteries, classified as dangerous waste, to
an authorized institution according to the
current laws.
BATTERIES CHARGE LEVEL INDI-
CATOR
WHEN THE MACHINE IS SWITCHED
ON, ON THE DIS-PLAY (1) APPEARS
THE SETTING OF THE BATTERY
CHECK CARD:
GE 24: check card set for GEL batteries.
Pb 24: check card set for lead batteries.
On the display (1) the following indica-
tion of the battery charge level is digital
and indicates the percentage of the battery
charge. 90 is the maximum charge, down
to a minimum of 10, indicating every 10%
decrease.
When the charge level reaches 10%, the
display starts blinking indicating the end
of the battery charge.
ATTENTION
:
After a few seconds from the four blink-
ing ‘’----’’ dashes, the brushes motor stops
automatically. With the remaining charge
it is anyhow possible to finish the dry
-
ing operation before proceeding to the
recharge.
HOUR METER
The machine is equipped with an hour
meter located on the same display of the
battery charge level indicator (1). Keeping
the button (2) pressed for more than 3 sec-
onds, the first data indicates the working
hours and after a few seconds the working
minutes are shown.
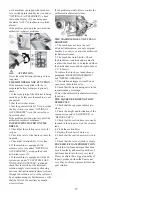
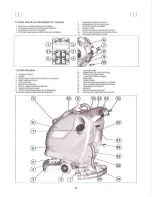
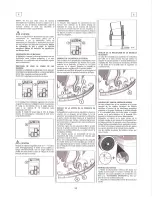
SQUEEGEE ASSEMBLY
With the squeegee support lowered, slide
the two stud bolts (1) placed on the upper
part of the squeegee inside the slots on the
support. Block the squeegee by rotating
the lever (2) clockwise.
Insert the squeegee hose (3) into its cou-
pling, respecting its position as indicated
in the figure.
ADJUSTMENT OF THE SQUEEGEE
HEIGHT
The squeegee must be adjusted in height
depending on the rubber wear. In order
to guarantee a perfect drying during the
operation, the lower blade of the rear
squeegee rubber (4) must work slightly
bent backwards (operator side) in uni-
formed way in all its length.
Acting clockwise upon the two registers
(5) it is possible to increase the bending of
the rubber. Acting counterclockwise it is
possible to decrease the rubber bending.
A label placed near the two registers (5)
indicates rotation sense to increase or
reduce the height.


