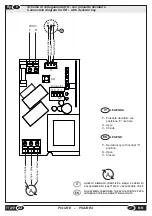
To program and enable a radio control device for use,
proceed as follows:
% make sure the control unit is powered;
% press and hold key SP1 until the red led L1 lights with
fixed light;
% release key SP1;
F
the motor connected to the control unit first performs an
opening maneuver (about 4 seconds) following by
another rapid closure maneuver.
% press the smooth key of the pair of keys on the radio
control device that you wish to enable (e.g. key No. 1);
F
the red LED turns off and the control unit makes the
actuator perform 5 short closing maneuvers to confirm
the received signal.
% release the button on the remote;
% the red LED on the control unit flashes 4 times.
% the radio control device is enabled to control opening of
the motor connected to the unit using the first pair of keys
(keys 1 and 2).
@
Repeat the steps described above for every radio
control device you want to enable (Each receiver can
memorize up to 6 radio control devices).
@
The programming stage is complete when the receiver
does not receive a valid code within about 30 seconds.
@
Each radio control device can be programmed and
used for more than one RR control unit.
If it is not possible to see the actuator movements during
programming, proceed as follows:
%
press and hold key SP1 as long as the red LED L1 lights
with fixed light;
%
after approx. 5 seconds press the smooth key of the
button pair on the remote that you wish to enable;
%
after a few seconds the red LED flashes 4 times and then
turns off.
%
release the button on the remote control;
%
the radio control device is enabled to control opening of
the motor connected to the unit using the first pair of keys
(keys 1 and 2).
16
EN
RR
key or radio control functions in “step-step” mode (Open,
Stop, Close, Stop, etc).
Ÿ
DIP-SWITCH No.3: Working time management TL
%
With dip-switch No.3
OFF
the time in which the relay
remains active to permit movement of the motor is 120s
%
With dip-switch No.3
ON
, however, the time in which the
relay remains active to permit movement of the motor is
70s (recommended for C20 actuators).
Ÿ
DIP-SWITCH N.4
%
Dip-switch No.1 does not serve any function and must
necessarily be set to
OFF
.
6.3
LED
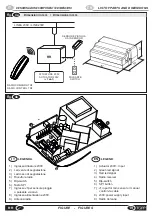
The RR mini control unit is equipped with a red led L1 and a
green led L2 that indicate the status of the control unit.
%
When the control unit is on stand-by, awaiting a manual or
automatic command, the green led is on with fixed light and
the red led is off.
%
When the unit receives a radio signal from a programmed
radio control device, it converts it into an open or closure
command, the green led blinks and the red led is off.
@
The green led L2 blinks for the duration of the radio
signal. If the key is released on the transmitter the green
led returns to fixed light and the control unit returns to the
stand-by condition.
%
When the control unit receives the automatic closure
command from the rain sensor and sends the closure
command to the actuator connected to it, the green led
stays on fixed while the red led blinks for 5 seconds, then
goes off.
6.4
RADIOCONTROL DEVICE TR8
The radio control device TR8 (
Fig.7
) controls the motor
connected to the RR manually via radio transmission. To
enable the radio control for use the central receiver must be
able to receive it; recognition is made through a simple
programming operation.
@
The TR8 radio control device is equipped with 4 pairs of
keys, each of which consists of a smooth key and a
knurled key. During programming, decide which pair of
keys to use to control the actuator connected to the
control unit.
@
Before programming the radio control device, reset the
control unit as described in section
6.5
.
To reset the RR and disable the programmed radio control
devices, proceed as follows:
% make su
re the control unit is powered and on stand by
(green led ON);
%
press and hold k
ey SP1;
F
The red led L1 lights with fixed light and the motor connected
to the unit performs an open maneuver (about 4 seconds)
following by a rapid closure maneuver. After about 7
seconds, the motor performs 4 more closure maneuvers of
very brief duration while the red led blinks 3 times and goes
6.5
RESETTING THE CONTROL UNIT
off.
%
release key SP1;
%
the memory has been erased.
@
Perform this procedure before programming the radio control
device.
If it is not possible to see the actuator movements during the
operation, proceed as follows:
%
press and hold key Sp1;
%
the red led L1 lights up with fixed light. After about 7 seconds
the red led blinks three times and goes off.
%
release key SP1.
6.6
PROGRAMMING THE RADIOCONTROL DEVICE
The RR control unit drives the motors in step-step or
deadman mode. For example, to drive the actuator in step-
step mode with the first pair of keys (smooth key 1 – knurled
6.7
USE OF THE RADIOCONTROL DEVICE
INSTALLATION AND USE INSTRUCTIONS
Содержание RR
Страница 23: ......

