

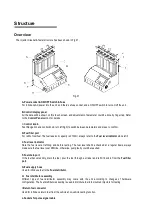


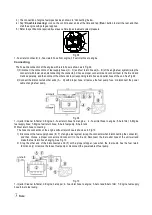


1-Plate bolt; 2-Crescent plate; 3-Fuel distributor stopper; 4-Reverse adaptor; 5-Injector; 6-Knurled nut; 7-Adjustable screw;
8-Riffle screw; 9,10,11-O-ring; 12-Fuel distributor; 13-O-ring; 14-Couplers.
Leakage Test
Leakage test is to inspect the sealing conditions of the injector needle valve under system pressure and to find out if the
injector is dribbling.
Procedures (For installation refer to
Uniformity/Sprayability Test
):
1) Before doing leakage test, please press [Drain] button to drain the rudimental residual test liquid from the measuring
cup.
2) Select <
Leakage test
> icon on the main screen. tap <
Run
> key, the machine will work. At this time the system
pressure can be adjusted to observe dribbling from the injector, the pressure is adjusted preferably 10% higher than
manufacturer’s specifications.
3) When the test is over, the equipment will automatically stop.
Note:
In general the drip of the injector should be less than 1 drop within 1 minute (or in accordance with the
specifications). The default time of the system is 1 minute.
Injecting Flow Test
Injecting flow test is to check if the injecting flow in 15 seconds meets the specifications for injecting amount. The deviation
reflects the wear or clogging in the injector, instead of electrical parameter variation.
Procedures
(For installation refer to
Uniformity/Sprayability Test
):
1) Before this test, tap <
Drain
> button to drain the test liquid from the measuring tube if there is any.
2) Tap <
Injecting flow test
> icon on the main screen, and tap <
Run
> button to start the test. Adjust the fuel pressure
according to the injector specification.
3) When the test is over, Injector Cleaner & Tester will stop.
Automatic Test
Automatic Test contains all above-mentioned tests (15-second injecting test, idle speed, middle speed, high speed, varying
acceleration, varying deceleration, changing pulse width test). This function can test more comprehensive performance of
injectors by simulating the various engine working conditions.
Procedures
(For installation refer to
Uniformity/Sprayability Test
):
1) Before the test, tap <
Drain
> button to drain all the test liquid in the measuring cups if there is any.
2) Tap <
Automatic Test
> mode on the Main Screen and set up the pressure value according to the injector
specifications, select the test mode (mode 1, 2, or 3 are all available), and then tap <
Run
> button to start the test.
3) Adjust the fuel pressure when testin.
4) When the test is over, Injector Cleaner & Tester will stop.
Note: Please refer to the Control Panel section for Mode explanation.
On-Vehicle Cleaning
1) Please check if there is test liquid or detergent inside the fuel tank before on-vehicle cleaning. If test liquid is in the tank,
replace it with detergent. The detailed procedure to be followed: remove the level indicator on the left of the main unit,
and drain the test liquid inside fuel tank into a container. If the drained test liquid contains lots of impurities and can not
be reused, please dispose it in the proper way and fill with new test liquid. If the drained test liquid is clean, please store
it for later using.
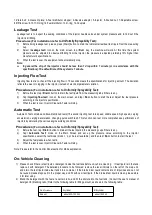
2) Blend the detergent with the fuel at a certain ratio, and fill the mixture into the fuel tank. (Consult the user’s manual of
detergent for blending ratio.) Refer to the following table for filling amount, as shown in the following table:
No. of
cylinders
4 cylinder
6/8 cylinder
Amount
about 800~1000ml
about 1500ml
Содержание GDI
Страница 1: ...Automotive Fuel Injector Tester PFI GDI GS6...
Страница 16: ......