TOOL WAREHOUSE GDI Скачать руководство пользователя страница 11

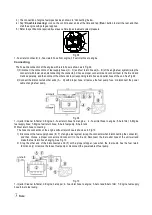
2) Mount the injectors on the couplers and install them onto the side-supply fuel distributor.

3) Mount the cross plate (1) and tighten it with bolts.

4) Mount the fuel distributor and injectors onto the fuel distributor supporter, and tighten them with two riffle screws (black).

See Fig. 06.

5) Connect the injector pulse signal wire.

6) Before doing this test, tap <

Drain

> button to drain the test liquid from the measuring cup if there is any.

7) Tap <

Uniformity/Sprayability test

> on the control panel, set the corresponding parameters and tap <

Run

> button to

start the testing.

8) When the testing is finished, Injector Cleaner & Tester will stop.

CNC3

Fig. 06

1-

Cross plate; 2-Fuel side-supply injector; 3- Coupler for fuel side-supply injector; 4,5-O-ring; 6-Side-supply fuel distributor

Note:

While testing, Injector Cleaner & Tester can drain fuel by tap <Drain> key at anytime. At default, solenoid valve

is set at the closed state. Uniformity test can be done at this state. When <drain> key is pressed, solenoid

valve will drain oil for 60 seconds.

The default cylinder number of the system is 0, which means that all injectors are working when Injector

Cleaner & Tester is running. A specific cylinder can be selected by setting the number of the cylinder.

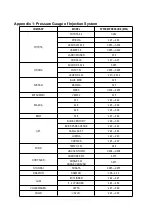
The System Pressure, RPM, Pulse can be adjusted during testing.

Keep the fuel level to at least 30 ml while testing. Foam will be produced in the liquid during injection. In order

to prevent spillover, set the related parameter with reference to the following formula :Pulse width(ms)

×

time(s)

×

speed(rpm) / 120

18000

This function is for checking the uniformity of each cylinder. Injecting difference of all injectors on one

vehicle should be kept within 2% during uniformity testing.

Reverse flush

Injector Cleaner & Tester can also perform reverse flush by connecting with flush-back adaptor at [Uniformity/Spray-ability

test] mode. Reverse flush is a way to clean the injectors with the test liquid flowing from the outlet to the inlet of the injector.

Reverse flush may remove the dirt inside the injector or the injector Strainer (Only for the top fuel supply injector).

Procedures:

1) Choose a reverse flush coupler and proper O-ring, and mount them under the fuel distributor.

2) Install the injectors in reverse direction (outlet upward, and inlet downward).

3) Choose a proper coupler according to the shape of the injector and put it under the injector.

4) Install the fuel distributor and the injector on the fuel distributor supporter with a proper adjustable screw and knurled

nuts, and tighten two riffle screws (black). See Fig. 07.

5) Connect the injector pulse signal wire.

6) Tap <

Injecting Flow Test

> icon, and tap [Run] button to start cleaning.

7) When the cleaning is over, Injector Cleaner & Tester will automatically stop.

Note:

The system pressure can be adjusted when performing reverse flush.

It is advised to tap <Drain> key to avoid spillover of test liquid during reverse flush.

Fig. 07

Содержание GDI

Страница 1: ...Automotive Fuel Injector Tester PFI GDI GS6...

Страница 2: ...quipment when storing To protect against risk of fire do not operate the equipment in the vicinity of open container containing flammable liquid gasoline Make sure that the unit is in the well ventila...

Страница 3: ...ch is suitable for all EGI vehicles and can help to achieve automatic cleaning and testing of injectors With the help of microcomputer control and digital display the equipment makes possible automati...

Страница 4: ...uel level indicator while refill E Fuel level indicator Note the fuel level at refilling and before testing The fuel level shall be checked at a regular basis always make sure the fuel level over MIN...

Страница 5: ...elect and press to confirm All explanation with a means its a menu item All explanation with a mark means its editable and a window as below would pop up while tap the entry A Decrease B Increase C Dr...

Страница 6: ...on C RPM D Pulse E Duration of the Test F Injector Index 0 means all injectors while 1 6 refer to signal socket 1 to 6 G Pressure Level H Drain Fuel Button I Start Stop button J Return to Main Screen...

Страница 7: ...ain Fuel Button I Start Stop Button J Return to Main Screen Mode Mode 1 Injecting for 8 seconds Halt for 30 seconds Drain 60 seconds Injecting for 1500 times at 650rpm 2 8ms Halt for 30 seconds Drain...

Страница 8: ...creen Setting The setting page is used to setup the default value while the unit every time start up A Status Icon B Default RPM C Default Pulse D Default Spray test Duration E Default Leakage Duratio...

Страница 9: ...e fuel level viewer Do NOT exceeding the Max line 3 Turn on the power switch on the left side of the Cabinet 4 Fill ultrasonic detergent into the ultrasonic cleaning launder so that the needle valve o...

Страница 10: ...nspect the spraying performance by observing the injectors Installing and testing procedures for top supply injectors 1 Choose the fuel distributor stopper 4 from the coupler box and mount a proper O...

Страница 11: ...ll be produced in the liquid during injection In order to prevent spillover set the related parameter with reference to the following formula Pulse width ms time s speed rpm 120 18000 This function is...

Страница 12: ...ion 3 When the test is over Injector Cleaner Tester will stop Automatic Test Automatic Test contains all above mentioned tests 15 second injecting test idle speed middle speed high speed varying accel...

Страница 13: ...onnected other ends A D with proper hose or remove the fuel pump fuse or disconnect the power cable of engine fuel pump Fig 09 1 Injector Cleaner Tester 2 Engine 3 Fuel return hose from engine 4 Fuel...

Страница 14: ...unit with the matter similar with plastic strip and add the filling material such as foam or sponge etc between the unit and packing case to avoid scratching the surface when the unit shakes E Make su...

Страница 15: ...D 0 25 MAXIMA 0 25 300EX 0 206 0 255 MITSUBISHI V63000 0 35 MAZDA 323 0 20 0 22 626 0 25 0 29 929 0 25 0 29 BMW 528 0 27 0 29 GM BUICK CENTURY 0 29 0 33 BUICK PARK AVENUE 0 29 0 33 CADILLAC 5 7 0 29 0...

Страница 16: ......

Отзывы: