TMEZON MZ-IP-V739W Скачать руководство пользователя страница 20

A. LAN Settings

[

IP Type

]: There are two options: “Fixed IP Address” and “dynamic IP Address”.

After selecting an Internet connection setting - such as fixed IP address (static) or dynamic IP 
address (DHCP) – and allocating a port, users can access the indoor unit remotely via the
Internet. 
1) If fixed IP address has been selected, it is necessary to set up an IP address, a subnet mask 
and a gateway. 
[

IP Address

]: Enter the IP address in this field.

[

Subnet Mask

]: Input numbers for the subnet mask.

[

Gateway

]: Enter numbers for the default gateway.

[

DNS Type

]: Options include “Manual DNS” and “From DHCP Server”. If users select “Manual 

DNS”, they have to input numbers for primary DNS and second DNS manually.  
2) If DHCP is selected, the server will allocate a IPC IP address automatically.

 Save the IP address when selecting DHCP and the IPC will automatically connect with

NOTE:

 the server. It will allocate an IP address when the connection is stable, and this address will
be displayed on the interface.

B. HTTP

[HTTP Port

]: The IP address identity one indoor unit  in the network, you can run several 

programs on this equipment, and every program will transfer the data through some port, in fact
data is transferred from one port to another. The port setting of this page is asking user choose
which port to transfer the data for the web server. Doing port mapping, need to maintain
consistent with the port (equipment factory default port is 80).Sets up a Web browser port via 
HTTP. The default port number is “80”. The port range can be set up from 1024 to 32767.

[Mobile port]

: Mobile monitoring port. And default value is 20510.

C. Network Test

[

Wan Test

]: In this field, users can fill in the IP address or DDNS address which they set up, 

and click “            ” to test the network traffic is normal or not. If all the network parameters are 
set correctly, click “            ” and “Test Success!” will be shown. Otherwise “Test Failure!” will 
be shown. 

5.3.2 Network--DDNS

Click “Parameters-Network-DDNS”to enter the DDNS setting interface. DDNS setup as follows.
User can use third part DDNS, first user must have a domain name; 

 or 

www.dyndns.org

 is recommended. Please remember the username, password and domain name.

www.3322.org

Then enable DDNS, for example, select the DDNS Provider as “3322.org”. If your domain name 
is “test.f3322.org”, please enter “test.f3322.org” in the option “Your Domain”, the “Username” and
“Password” is the username and password that applied in the 

. Click “              ” to

www.3322.org

save. Then you can access the device by domain name.

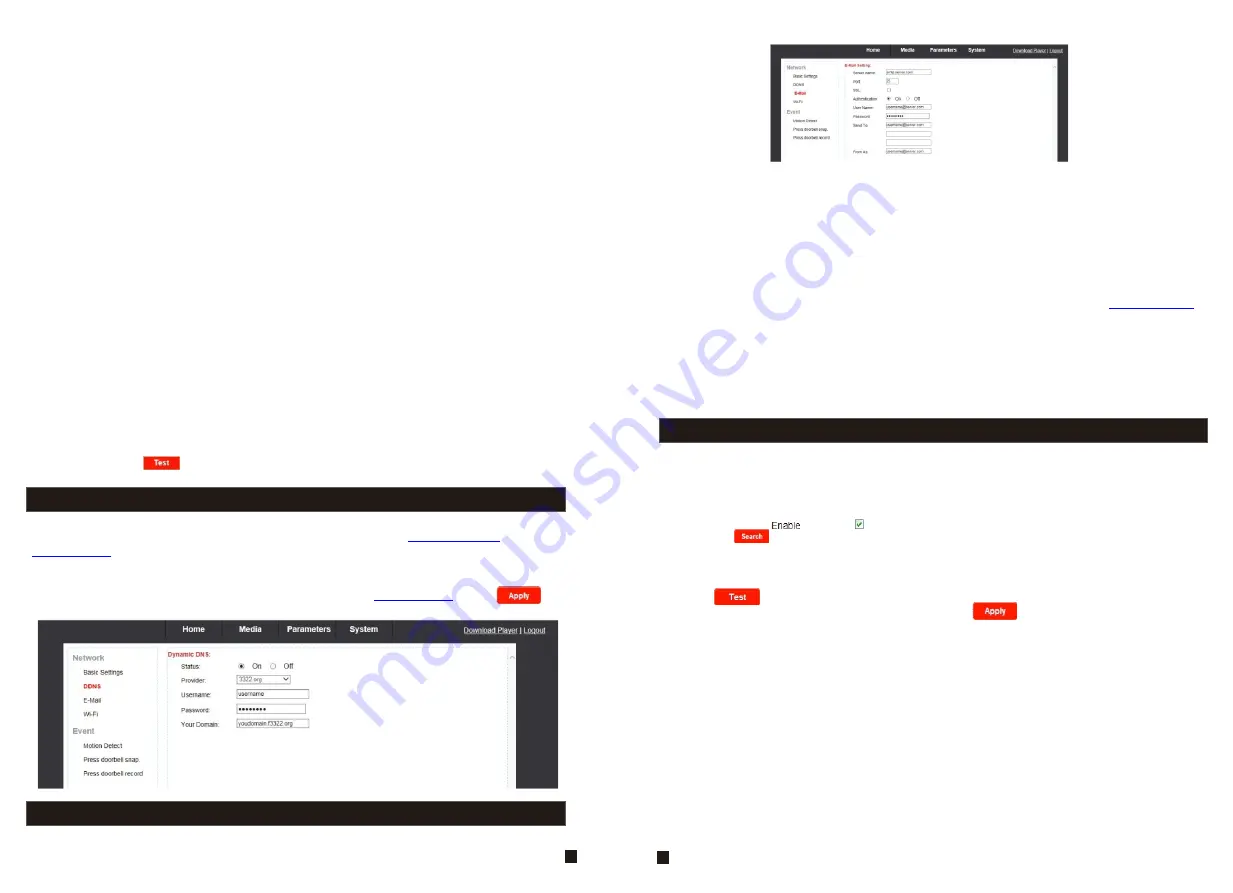
5.3.3 Network--E-mail

Click “Parameters—Network—E-Mail” to enter the E-Mail Setting interface, and SMTP setup 
as follows.

5.3.4 Network--Wifi

For the indoor unit  with WIFI function, users can visit the device remotely by the following 
methods: through network cable connection or through wireless connection.  If through wireless 
connection, please use the network cable to connect the device into LAN before doing settings 
of wireless connection. Then click “Parameters—Network—WiFi” to enter the Wifi Setting 
interface, and according to the below 1-6 steps to do the settings.
1)  Open wireless, “                             ” indicates WIFI status to be enabled.
2) Click the “           ” button to search the current wireless routers, and all the wireless routers 
will appear on the Current Hot Point list.
3)  Choose one effective router, click it to choose router SSID.
4)  Input correct password of the wireless router in wireless security mode.
5) Click “               ” to check the wireless network is connected successfully or not.
6)When the wireless is connected successfully, click “              ” to save the settings, the device
will be reboot automatically, take away the Ethernet cable, then the wireless network will work
perfectly.

Note: 
1. When adjust WIFI status, the device will reboot after saving the setting. 
2. When enable WIFI status, the device will reboot automatically if plug or unplug the keystone jack
    of network cable to the RJ45 ethernet interface of the indoor unit. 
3. Through Wifi connection, the “Network Type” on the Network Basic Setting suggested to be set as
    “DHCP”. When configure the parameters about WIFI, user can view the indoor unit can be 
     allocated

 IP address whether or not through the search tool “HiCamSearcher”. If not, 

    user must set up parameters about Wifi again.
4. When the equipment connected to the Internet, and also enable the WIFI, when 
    activated, the equipment will be the first to choose Ethernet cable connection mode, 
    if can't connect, then choose WIFI connection. WIFI connection of the ports to use are 
    consistent with cable connection of the ports to use.
5. No space between characters of the SSID, no space between characters of the Wifi
    password, otherwise the wireless router can’t be connected successfully.


36

This function not only support internal mail transfer but also internet.
1) 

Sever name

: Input SMTP sever address in this field, and SMTP Server Address is refers the 

IP address of mail server, such as QQ is smtp.qq.com, Gmail is smtp.Gmail.com.
2) 

Port

: This refers to the port of the SMTP server. Generally, the SMTP port number is “25”, but 

there are exceptions; for example, the SMTP port number of Gmail's server is “465”.
3) 

SSL

: SSL is a security link transport protocol that can be used to encrypt information 

communicated over the Internet (including email) to prevent hackers from accessing the email 
communication or other information of users on a network, such as passwords.

4) 

User Name

: In this field, enter the sender's email address. The email address should be 

consistent with the server being used. That is, if the sender's email address is 

.

[email protected]

5) 

Password

: In this field, enter the password of the sender's email address.

6) 

Sender to

: In this field, enter the receiver's email address (the email address being used to 

receive images transmitted from the IP doorbell-vistor call on the outdoor bell). Clear the images 
received as soon as possible to avoid exceeding the email account's storage capacity.

7) 

From as

: In this field, enter the sender's email address. The email address should be 

consistent with the server being used. That is, if the sender's email address is 

[email protected]

the corresponding server should be “

”.

smtp.126.com

35

Содержание MZ-IP-V739W

Страница 1: ...company for clarification There maybe some differences between the descriptions provided here and the actual devices as our products are constantly developing and upgrading We apologize if this manual does not contain all of the latest updates Thanks 4 Wire IP Video Door Phone User Maunal MC 1482 A 4 ...

Страница 2: ...e video to show how to connect the indoor monitor and uCareHome APP https youtu be bpsnpDI8BkQ As for the installation of the products it needs some DIY experiences maybe you will get trouble during installation Don t worry any questions please feel free to contact us directly we are always ready to help rather than return the products We provide all day mail service Please send email to support t...

Страница 3: ...ecurely install the devices on vertical surfaces solid walls doors not prone to vibration or impact Install the devices away from heat sources such as radiators heat registers and stoves Installation of the terminal near consumer electronics devices e g stereo receiver amplifiers and televisions is permitted as long as the air surrounding the terminal does not exceed the above mentioned temperatur...

Страница 4: ... 27 3 2 Quick Setting 27 3 3 System Login 29 4 Port Forwarding 31 5 Function Settings 32 5 1 Home 32 5 2 Media 33 5 2 1 Media Video 33 5 2 2 Media OSD 34 5 3 Parameters 34 5 3 2 Network DDNS 35 5 3 3 Network E mail 35 5 3 4 Network Wifi 36 5 3 5 Network Motion Detect 37 5 3 6 Event Press doorbell capture 39 5 3 7 Event Record 39 5 4 System 39 5 4 1 System User 40 5 4 2 System Time Setting 40 5 4 3...

Страница 5: ...pin interface to it shown as below for example Note The indoor monitor uses an external switching power supply 1 2 Wiring diagram Avoid installation of the device near strong radiation e g TV set and PC etc Maintenance should be complied with a qualified technician Avoid hard shake beating and collision otherwise the internal exact components maybe be damaged Select the most suitable position wher...

Страница 6: ...extension cables There are 8 wires 4 pairs in the cat5 cat6 we let two wires twisted into one cable to use Green green white Orange orange white Blue blue white Brown brown white Cat5 cat6 network cable Cut the RJ45 port Connect with the 4 pin connector we provided in the box please make sure the 4 wires connections at both ends are consistent 4 Pin connector provided in the box White terminal Ple...

Страница 7: ...o other indoor monitors Unlock Talk Monitoring 7 1 End conversation mode by pressing this button and the indoor monitor will go into standby mode 2 In standby mode press and hold this button for about five seconds until hearing a beep sound it will automatically reboot and restore all the parameters to the default settings except IP address Observe the image of camera view at entrance in real time...

Страница 8: ...standby mode if you are not at home or have not reached the indoor monitor in 60s The conversation duration is 120s at a time Stop ringing NOTICE Please be aware of Connection of 2 outdoor cameras is required Talk For the models with SD card if the SD card has been inserted into the indoor monitor when visitor press the Call button on outdoor camera the device will start recording and the recordin...

Страница 9: ...ivate conversation with the visitor for more detailed operations please refer to VISITOR CALL on page 11 At least 2 indoor units is required At least 2 indoor units is required Talk Hang up Talk Talk If the indoor monitor is underway in monitoring mode during this time a visitor press the call button on either of outdoor unit the monitoring mode will be switched off The just visitor s image will a...

Страница 10: ... more information network connection 4 5 3 4 Network WIFI diagram please refer to Figure 1 on the above 2 If user doesn t want to connect a wired cable to the indoor monitor and user needs to prepare a wireless router and a smart phone or a pad with IOS or Android system The parameters for WIFI can be set up via a smart phone or a pad with IOS or Android system please see section for more informat...

Страница 11: ...uCareHome around your entire property Now you ll always be connected to your home so you can watch over your property and answer it from anywhere Contents 1 Download uCareHome app 19 2 WiFi setting 19 3 Set up New Indoor Monitor 20 23 4 Set up Existing Indoor Monitor 24 5 Others 25 26 ...

Страница 12: ...into AP mode by manual Press and hold Talk for 5 10 seconds until you hear a BEEP sound it will reboot automatically and wait for power LED flashing then AP mode ready Then you can setup WIFI for it For some models please refer to the actual user manual to enter into AP mode Note 1 Router Band This IP indoor monitor will only connect to the 2 4GHZ band If you have a dual band router you must creat...

Страница 13: ...ot automatically b For IOS you need connect manually Step 5 Connect to WiFi router Step 6 Add the indoor monitor Name is the device name for your IP indoor monitor Cloud is for cloud storage service System setting more advance setting Delete remove device Gray Offline Green Online 21 22 Password is the device password for login your IP indoor monitor The default password is 888888 ...

Страница 14: ...tdoor bell 3 1 The icons on live view Share device account One device have one master the account that added the device first will be the master and can share the device to other users 3 2 Add Existing Device Name is the device name for your IP indoor monitor QR Code Scan for your indoor monitor QR code LAN Search to search online devices in the same WIFI network 23 24 Password is the device passw...

Страница 15: ...ng and values can be set from 1 to 10s One Key Unlock After turn on this switch no need enter unlock password every time by visitor press CALL Unlock Key is the password for unlock Modify Device Password 3 4 Advance setting For 7 Inch Indoor Monitor 25 26 Reset Please press Hang up button for 5 seconds the device will be reset Modify Unlock Key Motion Detection only one channel can enable motion d...

Страница 16: ... Note 1 Suggested that to run Internet Explorer browser as Administrator on operation system such as Windows 7 Windows 8 Windows 8 1 except Window XP 2 Before setting up remote access turn Disable the firewall and any anti virus software currently running on the computer 3 1 Running Environment 3 2 Quick Setting 2 1 Through the indoor unit connection to network or PC and then to the indoor unit el...

Страница 17: ... the following method Click and download the file IPDoor zip to the PC Open the zip file to run the file IPDoorSetup exe and it will install indoor unit s OCX on the PC according to the method as following figures 3 After installing player on the PC input the authorized user name and password the default user name is Admin and the default password is 888888 Select language choose network stream Ma...

Страница 18: ...tact your Internet Service Provider for this information Take Netgear router for example Operation Steps 1 After login the interface of the router choose Port Forwarding 2 Choose Add custom Service 3 Input indoor unit ports including http port default as 80 and mobile port default as 20510 4 Input IP address of the indoor unit click Apply the HTTP port the mobile port and IP address should be the ...

Страница 19: ...esponding frequency If the two frequencies are different the image will flick There are two frequencies on the world one is 50HZ and the other is 60HZ In China adopt 50HZ Click to refresh the settings of the Image and click to restore the parameters of the image to the default settings 34 Click Media OSD to access the interface as follows OSD options include Time Stamp Device Name and Name 1 Time ...

Страница 20: ... WiFi to enter the Wifi Setting interface and according to the below 1 6 steps to do the settings 1 Open wireless indicates WIFI status to be enabled 2 Click the button to search the current wireless routers and all the wireless routers will appear on the Current Hot Point list 3 Choose one effective router click it to choose router SSID 4 Input correct password of the wireless router in wireless ...

Страница 21: ...coverage area enabled with the motion detection feature while other regions in the same coverage area do not require this functionality This may be handy when for example the camera covers the road and an adjoining area While it would be useful to have the motion detection enabled on the area near the entrance to a building it would most likely not be helpful to see it triggered every time a car o...

Страница 22: ...vent Record Click parameters Event Record to access the setting menu to set up record mode when calling on the doorbell as follows Modes include record and snapshot For the record mode the whole process will be recording from the start of a call For the snapshot mode if a visitor calls on the outdoor camera the first picture will be captured 39 5 4 1 System User Click System user to access user se...

Страница 23: ...or example the firmware file such as Mobile IPDoor 6100 LB96319BW 20180412 ov is on the desktop First choose the firmware file click and it will be shown as then click to upgrade the equipment whether or not After the upgrading the equipment will restart Note During upgrading please don t power off the indoor unit 41 42 5 4 4 System Device Info Click System Device Info to enter the Device Informat...

Страница 24: ...pports up to 64GB card for recording and snapshots The file system of the card must be FAT32 to storage And suggest that it s better to use a TF card more than class 10 onto the device 46 Appendix 2 Accessing the indoor monitor via Google Chrome 1 First installing Google Chrome Browser on Windows this manual will use Chrome version 34 0 1847 116 m as an example 2 After installing Google Chrome sea...

Страница 25: ...iew button in the Address bar You can only turn on Compatibility View in Internet Explorer for the desktop A To turn on Compatibility View 1 See if the Compatibility View button appears in the Address bar If you don t see the button there s no need to turn on Compatibility View 2 Tap or click the Compatibility View button to display the site in Compatibility View Once you turn on Compatibility Vie...

Страница 26: ...47 48 ...

Страница 27: ...9 VI Y G B AI W 12V R A B B 49 50 ...

Страница 28: ... 12V R Electric mortise lock Magnetic lock Power supply control NO NC COM 12v GND PUSH1 PUSH2 PUSH2 CONTROL CONTROL L NC 4 pin cable Power supply Monitor L COM L L NO Lock connection NC Lock connection Need add power supply control Confirm the type of the door lock before connection NO lock or NC lock The case of NO lock and NC lock may be the same it cannot judge whether it is NO lock or NC lock ...

Страница 29: ...hina Official Website http www tmezon com Technical Support support tmezon com No matter how you connect the lock the door lock has to be independently powered VI Y G B AI W 12V R VI Y G B AI W 12V R RF ID Audio Video GND DC Power supply control 4 pin cable Power supply Monitor NO NC COM 12v GND PUSH1 PUSH2 PUSH2 CONTROL CONTROL 4 pin electronic lock L L 12VGND ...

Отзывы: