background image

56

WFS150 / WFS150C Manual

© <2007> ... Thorlabs GmbH

'

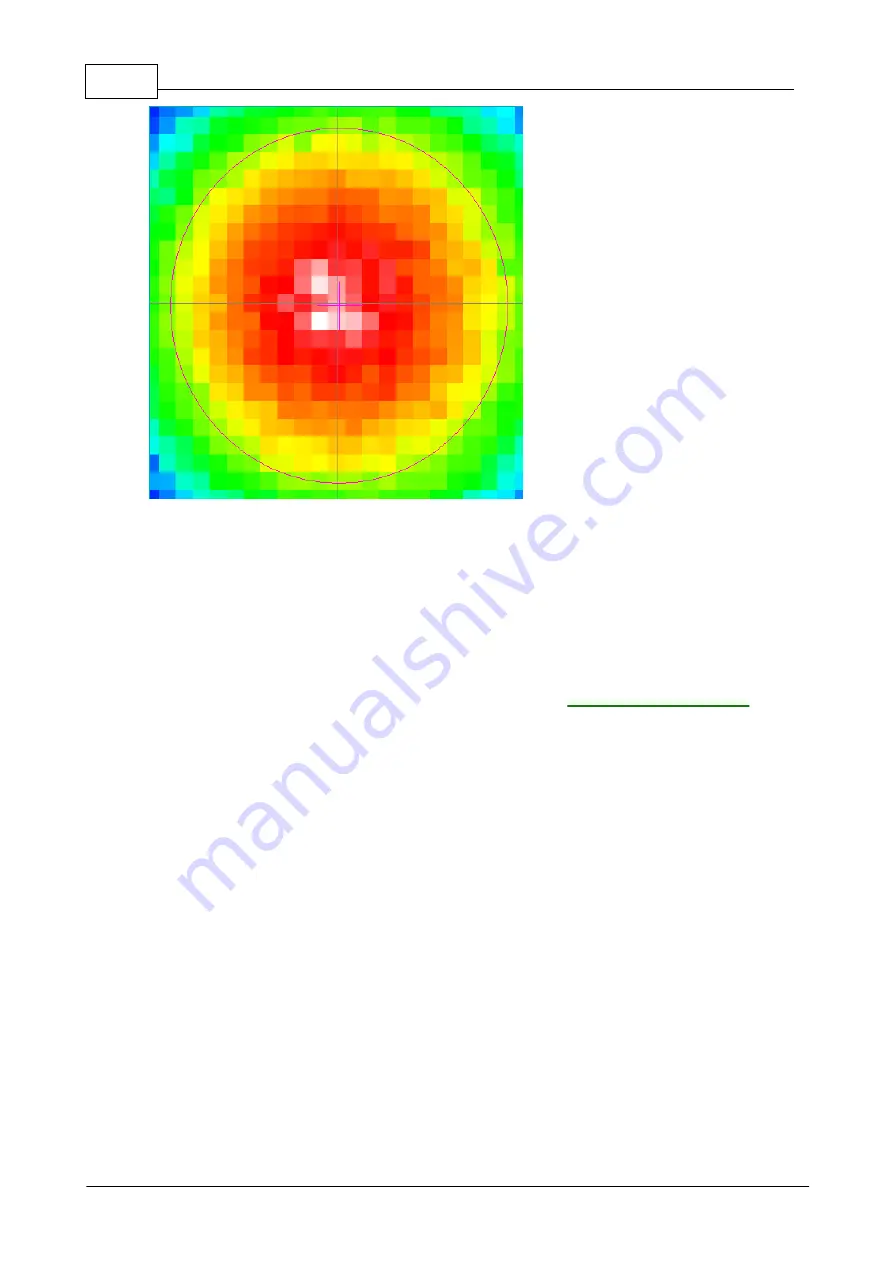
Show Image Axes

' displays the center axis in horizontal and vertical direction.

'

Show Beam Diameter

' displays a circle or an ellipse (light gray) that illustrates

the actual beam diameter and position.
'

Show Pupil

' displays a circle or an ellipse (magenta) that illustrates the actual

pupil size and position.

Note:

 Usually, there is a difference between the actual beam size and position

and the actual pupil size and position. Only in case you marked '

Use Beam

Width

' and '

Use Beam Centroid

' options within the 

Pupil Definitions Setup

 panel

both parameters coincide.

4.3.2.5

Wavefront Panel

The Wavefront panel contains a 3D diagram that displays the measured
wavefront. The wavefront data array is retrieved from the spot shifts which are
directly proportional to the local derivatives of the wavefront. A two-dimensional
integration process, starting at the center spot, leads to the wavefront data.

Содержание WFS150

Страница 1: ...2007 Operation Manual Thorlabs Instrumentation Optical Wavefront Sensor WFS150 WFS150C...

Страница 2: ...Version Date 1 2 December 2007 2007 Thorlabs GmbH 2007 Thorlabs GmbH...

Страница 3: ...t with the Wavefront Sensor 39 Coordinate Definitions 41 3 The Graphics User Interface GUI 41 Start the GUI 43 Operating the Wavefront Sensor Software 43 Menu and Toolbar 49 Lineview Panel 52 Spotfiel...

Страница 4: ...Troubleshooting Part VI Listings 106 106 1 List of Acronyms 107 2 Addresses Part VII Appendix 109 109 1 Zernike Fit and Zernike Modes 111 2 Microlens Data 113 3 Typical Wavelength Curves 115 4 Wavefro...

Страница 5: ...deas We and our international partners are looking forward to hearing from you Thorlabs GmbH This part of the instruction manual contains every specific information on how to handle and use the WFS150...

Страница 6: ...General WFS150 WFS150C Manual Part I...

Страница 7: ...ision device is only transportable if duly packed into the complete original packaging including the plastic form parts If necessary ask for a replacement package Do not stick something into the apert...

Страница 8: ...rlabs reserves the right to change this instruction manual or the technical data of the described unit at any time 1 3 WEEE As required by the WEEE Waste Electrical and Electronic Equipment Directive...

Страница 9: ...sal site 1 3 2 Ecological Background It is well known that WEEE pollutes the environment by releasing toxic products during decomposition The aim of the European RoHS directive is to reduce the conten...

Страница 10: ...Getting Started WFS150 WFS150C Manual Part II...

Страница 11: ...rating system Microsoft Windows 2000 Windows XP or higher USB 2 0 high speed port A USB 1 1 full speed port is not usable There is only one software component that must be properly installed and activ...

Страница 12: ...ensor application and USB drivers onto your computer Note It is recommended to close all other programs on your computer prior to start the installation process Do install both components in the order...

Страница 13: ...mbH Click Next to proceed It is sufficient to choose Drivers in order to install the required camera drivers only A complete installation of the camera application software and its documentation is no...

Страница 14: ...12 WFS150 WFS150C Manual 2007 Thorlabs GmbH Click Next to proceed or select an alternative folder where to install the driver Let the destination folder name unchanged and click Next...

Страница 15: ...rted 2007 Thorlabs GmbH Click Next and the installation process starts The following panel will appear Let the options enabled to generate shortcuts to the uc480Viewer software and click Next Click Ne...

Страница 16: ...s GmbH The WhatsNew txt file will inform you about latest changes of the camera software it can be disabled Click Next to proceed If it is required to restart your computer leave option Yes enabled an...

Страница 17: ...pplication software Click on Install Wavefront Sensor Application Software to start the installation procedure The following opening screen will appear Click Next to proceed Read the License Agreement...

Страница 18: ...FS150C Manual 2007 Thorlabs GmbH You will be informed about items that are going to be installed Click Next to proceed The installation process will take a minute If no error occurs the following mess...

Страница 19: ...7 Getting Started 2007 Thorlabs GmbH Click Finish to complete the installation process Depending on your operating system it may be required to restart your computer Click Restart to reboot your syste...

Страница 20: ...he same for both instruments GAttentionG Don t worry about that a Thorlabs DCU camera is displayed in the device manager This is because the Thorlabs Wavefront Sensor consists basically of a Thorlabs...

Страница 21: ...Getting Started 2007 Thorlabs GmbH Mark Install the software automatically Recommended option and click Next Please ignore this warning has not passed Windows Logo testing and click on Continue Anywa...

Страница 22: ...Finish to finalize the first phase The camera hardware is now booting and the Found New Hardware Wizard will appear again to assign installed drivers for the Thorlabs DCU camera Mark Install the soft...

Страница 23: ...or is now properly installed Click Finish to complete this process For verification purposes you might check the existence of this instrument in the device manager of your computer From the Start butt...

Страница 24: ...also indicated by the LED at the back side of the wavefront sensor It lights up red immediately after connection to the USB bus and goes to green as soon as the driver software has completed the initi...

Страница 25: ...Description WFS150 WFS150C Manual Part III...

Страница 26: ...shape and intensity distribution of beams This is done by analyzing the location and intensity of spots spotfield formed by imaging a beam of light onto a CCD array with a microlens array as shown in...

Страница 27: ...order The camera image is transferred via USB 2 0 interface to a computer or laptop that is running the Thorlabs Wavefront Sensor application software Special algorithms within the software calculate...

Страница 28: ...loop to ensure an optimal saturation level Diameter and position of the beam is detected and these data are used optionally for defining the instruments pupil area Otherwise pupil data can be defined...

Страница 29: ...ly of a CCD camera with a microlens array mounted in a defined distance in front of its sensor chip Each microlens generates a spot onto the sensor whereas the spot centroid position depends on the wa...

Страница 30: ...o x and y are determined by the spot shift dx and dy respectively as well as by the distance between microlens end detector which is usually the focal length of the microlens fML Spot deviations dx an...

Страница 31: ...suited for applications that do not tolerate back reflections back into the measurement setup for instance because it contains a laser without an isolator but parallel beam and long coherence length U...

Страница 32: ...x6 if you want to use one of the mounting threads M4 or UNC8 32 Otherwise this adapter can be omitted See Appendix WFS Mounting Adapter for a drawing of this adapter plate Optional C Mount Adapter The...

Страница 33: ...nm Aperture Size 5 95 x 4 76 mm max Camera Resolution 1280 x 1024px max selectable Pixel Size 4 65 x 4 65 m Shutter Global Lenslet Pitch 150 m Lens Diameter 146 m Number of Lenslets 39 x 31 max selec...

Страница 34: ...unity complies with immunity test requirements for equipment intended for use in industrial locations 1 Emission complies with EN 55011 Class B Limits 1 IEC 61000 4 2 Electrostatic Discharge Immunity...

Страница 35: ...Operating Instruction WFS150 WFS150C Manual Part IV...

Страница 36: ...crolens array because there is no covering glass in front of it Be very careful in handling high power optical beams especially if they are focussed Avoid skin irradiation and use laser protection gla...

Страница 37: ...the available aperture 5 95 x 4 76 mm of the WFS150 WFS150C Wavefront Sensor can be adapted using beam expanders Thorlabs BE01 BE20 series Beam Alignment Align the Wavefront Sensor so that the beam to...

Страница 38: ...beam position also using the Spotfield Panel Enable the diagram options Show Image Axes and Show Pupil Be sure you have enabled the Use Beam Centroid option within the Pupil Definitions Setup panel in...

Страница 39: ...n get saturated for small beams at the lower mW levels Use an external attenuator in that case During operation keep in view the on the error window at the bottom Care about the Power too low Power to...

Страница 40: ...beam decreasing its diameter on the way to the Wavefront Sensor When the Wavefront Sensor would be replaced by a canvas a focal point would be seen somewhere behind the sensor position This makes cle...

Страница 41: ...e Wavefront Sensor and are looking towards the light source Then the x direction points towards right and the y direction points up whereas the optical beam to be analyzed is propagating in z directio...

Страница 42: ...avefront graph the beam s cross section lies within the x y plane that is perspectively drawn at the bottom whereas the z axis points upwards Imagine the beam is coming from beneath so the displayed 3...

Страница 43: ...l will open the Wavefront Sensor Operating manual using the Adobe Acrobat Reader Thorlabs Wavefront Sensor is the application program click on this entry and the Wavefront Sensor software will start w...

Страница 44: ...ical User Interface GUI displays the measured data The GUI looks like this The Wavefront Sensor model is displayed in the title bar of the panel The software starts displaying the actual camera image...

Страница 45: ...nsor GUI You can either use the menu or just click a symbol on the tool bar to operate the Wavefront Sensor application software 4 3 2 1 Menu and Toolbar The toolbar allows access to the most common m...

Страница 46: ...ront Graph Configure Zernike Bar Graph DataSocket Measurement Start Measurement F2 Stop Measurement F3 Calibration Plane Wavefront Spherical Wavefront Save Spotfield Reference Load Spotfield Reference...

Страница 47: ...er that separates two successive data values within a text line out of the following For Decimal character which is whether decimal point or comma you have the choice between the following With Save O...

Страница 48: ...P Print Graph Only The Wavefront Sensor software enables the user to print out a screen shot of whether the entire panel or the graph only the right hand panel with changing content on a printer insta...

Страница 49: ...a detailed description of all setup controls Configure Graph Lineview Spotfield Beamview Wavefront Zernike Opens a configuration panel to the appropriate graphical display A more direct way to open th...

Страница 50: ...l be asked to change settings and to re start the continuous measurement again 4 Calibration The following pull down menu occurs There are two different ways to perform a User Calibration of the Wavef...

Страница 51: ...software release versions the Instrument Name and Serial Number of the used device 4 3 2 2 Lineview Panel This graph displays the horizontal intensity distribution of the CCD camera Each point on the...

Страница 52: ...n offset brightness level for all illuminated pixels and should be adjusted so that the minimum line visible within this panel is to be seen above zero See chapter Camera Settings for a detailed descr...

Страница 53: ...es Each point of the upper curve white displays the maximum and each point of the lower curve gray displays the minimum intensity of the appropriate CCD column Switch to Show Single Line in order to e...

Страница 54: ...erewith the number of spots in horizontal and vertical direction using the Camera Settings panel It is recommended to select the camera resolution and therewith the active sensor area to be a bit larg...

Страница 55: ...zontal and vertical direction Mark Center Spot marks the spot at the image center from that acts as a starting point for the centroid determination algorithm Show Spot Shifts displays a short gray lin...

Страница 56: ...beam so that the center cross of the pupil coincides with the center image axis 4 3 2 4 Beam View Panel The Beam View panel gives you an overview about the intensity distribution within the active ca...

Страница 57: ...bs GmbH Double click on the graph to see the Beamview Configuration panel Interpolate Spot Areas will do an interpolation between the coarse array of measured intensity points If switched off the real...

Страница 58: ...is a difference between the actual beam size and position and the actual pupil size and position Only in case you marked Use Beam Width and Use Beam Centroid options within the Pupil Definitions Setup...

Страница 59: ...layed in a color spectrum whereas the assignment between color and curve height is always the same black magenta lowest wavefront parts green medium red white highest wavefront parts When the option L...

Страница 60: ...e Zernike Fit Setup panel can be displayed and analyzed separately Difference displays the difference between the measured and reconstructed wavefront and is therefore an indicator of the fit error No...

Страница 61: ...are to be seen and the wavefront can be viewed as a 3D curve Default top view sets the Latitude view angle to zero and allows a view parallel to the z axis towards the x y plane The x y plane becomes...

Страница 62: ...w rotated the graph to achieve a top view of the profile The default top view zoom level of 2 is to visualize the entire active sensor area without its caption Autoscale By default the graph s z axis...

Страница 63: ...ndicate the Zernike coefficients which are the results of the Zernike fit The Zernike coefficients can be positive or negative and indicate that the measured wavefront does contain particular Zernike...

Страница 64: ...and Max values manually Omit Piston Tip Tilt is normally switched off and all calculated Zernike Modes are displayed But generally the lowest order modes Piston and the wavefront s Tip and Tilt are o...

Страница 65: ...Sensor GUI automatically starts measuring the applied wavefront using favorable default parameters Using these default settings the instrument is able to do first measurements Nevertheless it is high...

Страница 66: ...trument will go back to the state before opening the panel by restoring the previous settings The Setup Panel is divided into five sub panels accessible by clicking on the corresponding tabs Camera Se...

Страница 67: ...he spotfield images The following area sizes can be selected The camera offers a maximum of 1280 x 1024 pixel 1 3 MegaPixel on a rectangular area 5 95 x 4 76 mm For beams that have a larger diameter t...

Страница 68: ...y The number of microlens spots in x and y direction is as follows Camera resolution in pixel Wavefront resolution No of wavefront points 320 x 320 9 x 9 81 512 x 512 15 x 15 225 768 x 768 23 x 23 529...

Страница 69: ...every time a new image is retrieved A new image is added to a buffer that already contains the averaged image and the summarized image is divided by the number of averages This way a pseudo rolling a...

Страница 70: ...eeds to be exceeded by the spots Ambient light and noise terms below this limit will be set to zero intensity See the result in the Lineview panel Since defining such a fix level is problematic for ch...

Страница 71: ...heck the correct setting Set Default Click on Set Default to activate the factory default values Cam Noise Level Auto Exposure time and Master Gain Auto Black Level 100 Settings for Camera Image Size...

Страница 72: ...idth The beam width is measured using the second moment method and corresponds to the 1 e2 diameter in case of a Gaussian beam shape Note The second moment method will calculate accurate beam widths o...

Страница 73: ...front Sensor will automatically follow the wandered spot If you switch to manual input you can use the 0 0 button to set the pupil centroid to the center of the Wavefront Sensor Note Manual definition...

Страница 74: ...entry or simply click right on one of the graphs on the right hand side of the main panel Select the tab Wavefront Wavefront Reference The Thorlabs Wavefront Sensors WFS150 WFS150C are factory calibr...

Страница 75: ...ternal reference Perform a User Calibration using a plane or spherical wavefront to fill the default file with reference data measured by the user There is one user reference file designated for each...

Страница 76: ...The average wavefront tip and tilt will not be removed completely Small relicts are still visible in terms of Zernike coefficients Z1 and Z2 Also note that Zernike terms Z1 and Z2 are not related to...

Страница 77: ...this or lower potencies n of the pupil radius r By default the highest Zernike order is set to n 4 which implies a total number of 15 Zernike modes The resulting coefficients are displayed in bar grap...

Страница 78: ...truction This table provides a list of all calculated Zernike coefficients each listed in a row The number of rows is determined by the Fit up to Zernike Order control The check box at the left side d...

Страница 79: ...rst program start the following default settings become active Fit up to Zernike Order 4 manual setting Highest order in Fourier and Optometric calculations 2 All Zernike modes selected for wavefront...

Страница 80: ...f the Wavefront Sensor GUI become redundant and its updating and can be disabled Note Selecting a lower camera resolution on panel Camera Settings will result in less spots to be calculated and will i...

Страница 81: ...brightness pixels must be below 255 digits to prevent sensor saturation Sat indicates the percentage of saturated pixels The calculated values for all spot diameters and also the tilt angle of the le...

Страница 82: ...take into account that this data cannot give an exact measure of the beam because the lenslet array in front of the camera and wavefront distortions have changed the intensity distribution between the...

Страница 83: ...constants Radius of Curvature RoC This parameter is based on the 5th Zernike term Defocus and describes the degree of curvature of the measured wavefront All other Zernike terms and corresponding wave...

Страница 84: ...ermine the number of output appropriate RMS variation results Zernike Modes The coefficients of the Zernike modes which are determined by a least square fit to the measured wavefont are either display...

Страница 85: ...reduce the number of Zernike orders in the Zernike Fit Setup panel Power too low The detected spot intensity is too low so that the analysis of its centroid positions becomes incorrect Check if Exposu...

Страница 86: ...warning is a reminder that all graphics and also the numerical parameter box are disabled in order to speed up the sampling rate Switch off the option Disable Graphics within the panel Menu Setup Wave...

Страница 87: ...libration User Calibration using a Plane Wavefront In order to perform this user calibration you need to apply a high quality beam with having a perfect plane wavefront Be sure the beam is properly al...

Страница 88: ...any collimators or lenses is ideally suited for that purpose Be sure the beam is properly aligned to the Wavefront Sensor and fills the selected active camera area completely Note The calibration fail...

Страница 89: ...ng with an user reference you will reminded to switch to the internal reference In case the distance to the point source is measured too short or too far the following error occurs Change the setup ac...

Страница 90: ...whereas for each selectable camera resolution exists a separate file wfs_ref_0 ref wfs_ref_1 ref wfs_ref_2 ref wfs_ref_3 ref wfs_ref_4 ref Note Do not edit the content of these reference files they wo...

Страница 91: ...data array is saved This wavefront data array is surrounded by x and y scale information whereas the first column indicates the x coordinates and the last row indicates the x coordinates of the wavef...

Страница 92: ...3 0 000 8 3 1 0 000 9 3 1 0 000 10 3 3 0 001 11 4 4 0 001 12 4 2 0 001 13 4 0 0 001 14 4 2 0 001 15 4 4 0 001 Fit Error Mean arcmin 9 500e 13 Fit Error StdDev arcmin 7 437e 05 RMS WAVEFRONT VARIATION...

Страница 93: ...304 0 249 0 277 0 382 0 564 In case the option Save Only Wavefront Data was enabled the file content is limited to the following lines Spots X 9 Spots Y 9 y x mm 0 600 0 450 0 300 0 150 0 000 0 150 0...

Страница 94: ...data transfer DataSocket is a program interface designed for live data exchange between different applications on one system or even on separated computers connected by a TCP IP network The Wavefront...

Страница 95: ...n application on a third PC C retrieves the data All PCs A B and C are connected via a TCP IP network The following explanations are related to the National Instruments DataSocket server It comes with...

Страница 96: ...lt Readers and Default Writers Save the changed settings Ctrl S and close the panel In order to update the DataSocket server using these settings it is required to shutdown the DataSocket server by us...

Страница 97: ...t server If you want to use a DataSocket server on a separate machine connected via a TCP IP network you have to start the DataSocket server on the remote machine first and configure it according to t...

Страница 98: ...onfiguration panel the following data items from the actual Wavefront Sensor measurement are sent to the DataSocket server As soon as a measurement is complete the data on the DataSocket server is upd...

Страница 99: ...float Optometric_Sphere float Optometric_Cylinder float Optometric_Axis float deg RoC_mm float mm Wavefront_Variations float array unit according to Wavefront_Unit_Um_Wav es Zernike float array unit...

Страница 100: ...pdate for connecting and automatically updating the data items as soon as they are modified on the DataSocket server Mark the Enable beep when data is updated switch for an acoustic signal on each dat...

Страница 101: ...ntire window Beforehand a panel will be displayed to set some printing options Select the printer connected to your PC or network Just click OK for immediate printing It is recommended however to keep...

Страница 102: ...ght Height entire paper Horn offset Centered Vert offset Centered The option Use Bitmap Printing is enabled by default which results in a printout which is pixel by pixel a copy of the screen To incre...

Страница 103: ...Service and Maintenance WFS150 WFS150C Manual Part V...

Страница 104: ...Sensor not recognized by the Windows system install the Wavefront Sensor drivers see Software Installation LED green Wavefront Sensor is properly installed an can be used by the application program Di...

Страница 105: ...your system If required lead the system to this directory c Windows Inf containing all installed drivers 2 No measurement values are updated Displayed power values and graphs seems to be not updated...

Страница 106: ...ons and setting values in the main panel are not reacting on your clicks There is a Wavefront Sensor popup window open like Wavefront Sensor Message The input focus lies only on this open popup window...

Страница 107: ...Listings WFS150 WFS150C Manual Part VI...

Страница 108: ...pean Union FPS Frames per Second FWHM Full Width Half Maximum GUI Graphical User Interface MLA Microlens Array NI National Instruments OEM Original Equipment Manufacturer PC Personal Computer PCB Prin...

Страница 109: ...pe thorlabs com USA Thorlabs Inc 435 Route 206 North Newton NJ 07860 Sales and support Phone 1 973 579 7227 Fax 1 973 300 3600 Email sales thorlabs com Email techsupport thorlabs com Japan Thorlabs In...

Страница 110: ...Appendix WFS150 WFS150C Manual Part VII...

Страница 111: ...ver the unit circle and are easily normalized to form an orthonormal basis Zernike modes are conveniently expressed in either polar or rectangular coordinate reference frames Polar coordinates r q are...

Страница 112: ...ual 2007 Thorlabs GmbH The next table illustrates the wavefront aberrations for Zernike functions of order 0 7 for all angular frequencies Literature D Malacara Optical Shop Testing 2nd ed John Wiley...

Страница 113: ...photolithographic techniques based on semiconductor processing technology which allows for excellent uniformity in the shape and position of each microlens unlike some microlens arrays produced from...

Страница 114: ...112 WFS150 WFS150C Manual 2007 Thorlabs GmbH Geometric Parameters of the MLA150 Series Specifications of the MLA150 Series...

Страница 115: ...shows the typical reflectivity of the lenslet array Its guaranteed reflectivity in the wavelength range 400 to 900 nm is below 1 Reflectivity of MLA150 7AR including AR Coating Note The total reflect...

Страница 116: ...114 WFS150 WFS150C Manual 2007 Thorlabs GmbH Typical Response of the CCD camera...

Страница 117: ...115 Appendix 2007 Thorlabs GmbH 7 4 Wavefront Sensor Drawing...

Страница 118: ...by the Thorlabs Wavefront Sensors WFS150 WFS150C are related to the reference position of the sensor This position is identical to the location of the microlenses on the back face of the microlens arr...

Страница 119: ...Sensor in order to supply standard threads M4 and UNC8 32 which are compatible to the palette of Thorlabs mounts and posts holders Mount this adapter plate on the bottom side of the Wavefront Sensor...

Страница 120: ...ver 92 DCU 9 Default 3D View 56 Default Setup Parameters 63 Default Top View 56 Description 24 Difference 56 Display 43 Display Graphics time consuming 77 Drawing 115 Driver 9 E EcologicalBackground 7...

Страница 121: ...150 7AR 113 Right hand coordinate system x 39 y z 39 RMS 80 RMS Variations 80 RMS wavefront variations 61 RoC 80 Rremote DataSocket server 95 S Safety 5 Save Instrument Settings 92 Save Measurement Da...

Страница 122: ...rence 72 wavefront resolution 64 Wavefront Sensor Drawing 115 Wavefront Sensor Setup 63 Wavefront Unit 72 Wavelength 72 Wavelength Curves 113 waves 72 WEEE 6 WFS_Receiver example program 98 wRMS 80 Z...

Страница 123: ......

Отзывы: