


Default Mode
Each
INPUT SELECT
button can have a different default
MODE
assigned to it. To assign a default
MODE
for a
given
INPUT SELECT
button, first press the applicable
INPUT SELECT
button,
SETUP
,
INPUT
then button #
4
(
MODE
). Edit this parameter to select the desired default
MODE
, then press
SETUP
twice to exit. Repeat this
procedure for each
INPUT SELECT
button.
Note
: Pressing the front panel
MODE
function button allows the user to audition different modes for a given source,
when applicable, however changing modes via the
MODE
button does not store a mode selection.
Onscreen Display (OSD) Setup
Pressing
SETUP
,
ACTIVE INPUT SETTINGS
, then
ON-SCREEN DISPLAY
button #
5
activates the On-Screen
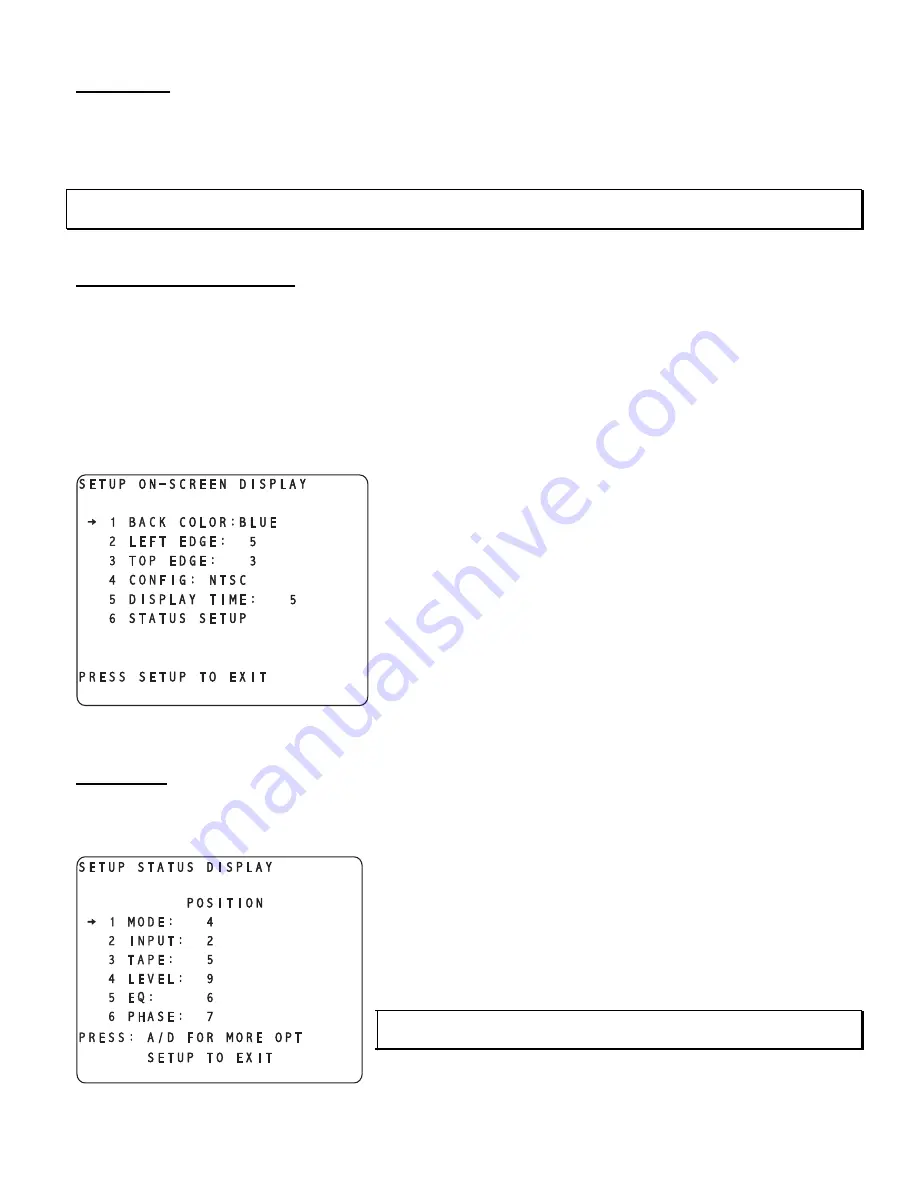
(OSD) set up menu, shown in figure 88.
In this display, button #
1
(
BACK
COLOR
) allows the user to select up to 7 different OSD background colors. The
entire OSD can be offset from the left and top edges of the screen (button #’s
2
and
3
respectively) to accommodate
differences in monitors.
The configuration (
CONFIG
) feature (button #
4
) can switch the Casablanca III’s OSD to accommodate either an
NTSC
or
PAL
monitor.
The configuration (
CONFIG
) feature (button #
4
) can switch the
Casablanca III’s OSD to accommodate either an
NTSC
or
PAL
monitor.
When a function button is pressed, its OSD will remain on the screen
until the user is no longer in any function menu. The
DISPLAY
TIME
(in seconds) setting (button #
5
) allows the user to set the amount of
time (delay) that the video monitor displays the
INPUT SELECT
menu,
when changing inputs.
Button #
6
allows the user to decide which parameters will show on
the
STATUS
page as well as their placement on the screen. This
feature is discussed next.
Figure 88 - Video Display of the SETUP
/
INPUT Page 3
/
ON-SCREEN DISPLAY Sub Menu
Status Setup
STATUS SETUP
(button #
6
) displays a sub menu, which allows the user to change the position of the Status screen
text on the video monitor only. The first Status Setup sub menu is shown in figure 89.
The items in the two Status sub menus show the only ones displayed in
the OSD when the
STATUS
button on the hand held remote is
pressed. Each item has a value range between 0 and 10. Setting any
value to
0
will disable that item from being displayed in the OSD.
1
is
the highest position vertically and
10
is the lowest.
Press the
A-D
button to go to the second Status Setup sub menu, and
set the values for
SOURCE
and
SAMPLE RATE
.
Note
: It is possible to have conflicting results if more than one item is
displayed on the same line.
Figure 89 - Video Display of the SETUP
/
INPUT
/
OSD
/
STATUS page 1 Setup Sub Menu
90
Содержание Casablanca III
Страница 1: ...THETA DIGITAL C O R P O R A T I O N Casablanca III Owner s Manual V 3 00 Rev A a Digital Done Right ...
Страница 16: ...Casablanca III Block Diagram DAC and Analog Out Sections Figure 4 Block Diagram of DAC and Analog Outputs 6 ...
Страница 23: ...13 Setup Menus and Pages Figure 14 Setup Menus and Pages ...
Страница 25: ...15 STEP BY STEP SETUP GUIDE ...
Страница 34: ...24 Setup Flowcharts A P Flowchart A Setup Subwoofer s ...
Страница 35: ...Flowchart B Front Left Right Configuration 25 ...
Страница 36: ...Flowchart C Front Center Configuration 26 ...
Страница 37: ...Flowchart D Left Right Surround Configuration 27 ...
Страница 38: ...Flowchart E Surround Center Configuration 28 ...
Страница 39: ...Flowchart F Sides Configuration 29 ...
Страница 40: ...Flowchart G Setup Speaker Levels 30 ...
Страница 41: ...Flowchart H Setup Speaker Delays 31 ...
Страница 42: ...Flowchart I Setup Dolby Digital 32 ...
Страница 43: ...Flowchart J Setup DTS 33 ...
Страница 44: ...Flowchart K Setup Circle Surround 34 ...
Страница 45: ...Flowchart L Copy Input Speaker Parameters 35 ...
Страница 46: ...Flowchart M Setup Default Mode 36 ...
Страница 47: ...Flowchart N Setup Post Process 37 ...
Страница 48: ...Flowchart O Map Input Jacks 38 ...
Страница 49: ...Flowchart P Setup Analog Input Levels 39 ...
Страница 88: ...REMOTE CONTROL 78 ...
Страница 114: ...APPENDIXES 104 ...
Страница 120: ...Figure 115 Wiring diagram for the Casablanca III Digital Output board and a 6 Channel External Volume Control unit 110 ...


