


The configuration sub menus (
CONFIG)
allow the user to configure speakers to reflect the audio system configuration
or the listener’s preference, for the available speakers and their respective frequency responses.
All of the speaker configuration parameters are accessed by pressing button #
1
(
CONFIG
). This leads to a series of
sub menus shown that are described next. The first sub menu,
SPEAKER
CONFIG
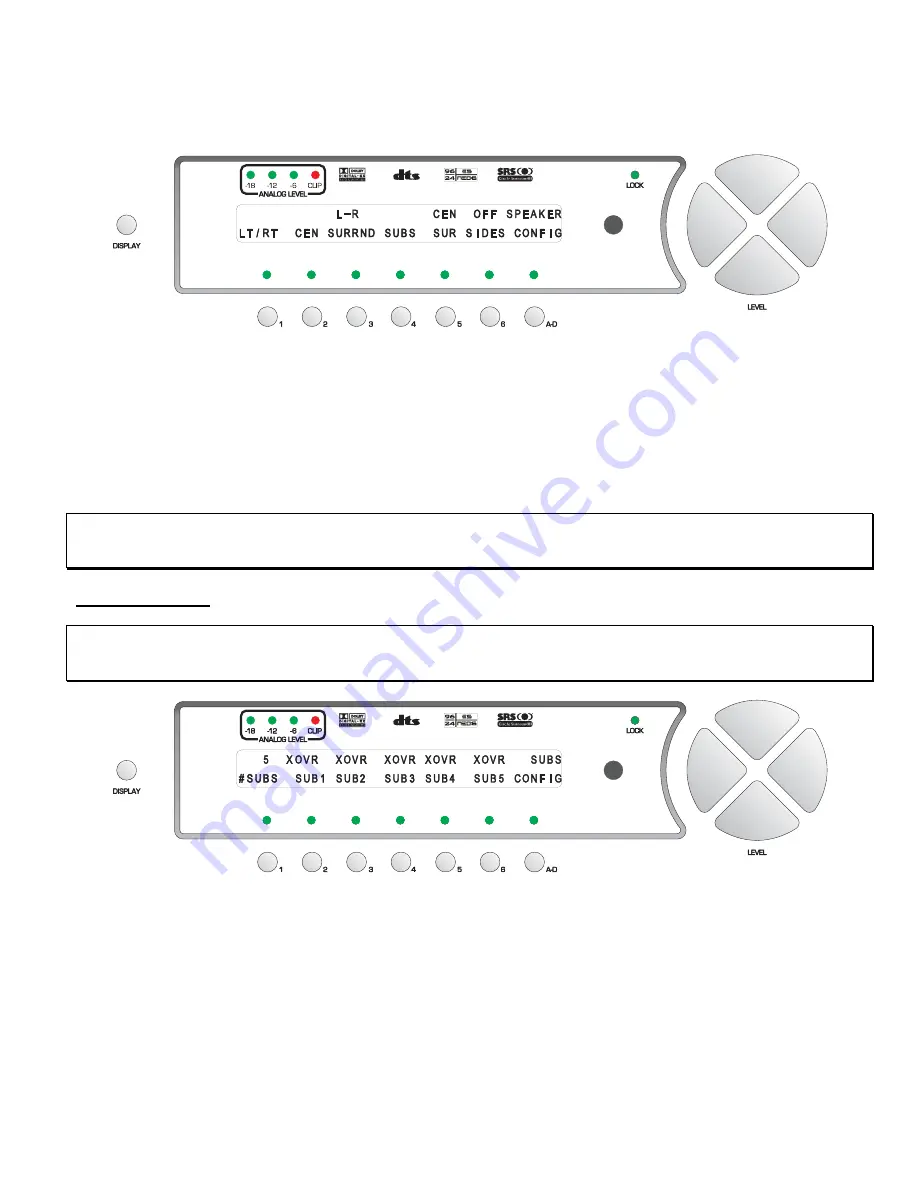
is shown below, in figure 24.
Figure 24 - Front Panel Display of the Speaker Configuration Submenu
As indicated in figure 24 above, the front left/right speaker configuration is accessed by pressing button #
1
, the center
via button #
2
, the left/right surrounds with button #
3,
#
4
is for the sub woofer(s), #
5
for the center surround and #
6
allows the user to turn the side speakers, if any,
ON
or
OFF
. Before configuring any speakers in the system, it is
important to configure the sub woofer, then the crossovers for each speaker set. First, determine whether or not a sub
or subs are required or desired. Press button #
4
to go to the
SUB
CONFIG
sub menu, shown in figure 25, and set up
the sub(s). If no sub(s) is present, or is not desired, set the number of subs (
#SUBS
) to
0
and disregard any crossover
types (in the other speaker set’s configuration submenus) at this time. Lastly, configure the other speakers in the
system via buttons
1
-
3
and
5-6
.
Note
: Information for the side channels is derived from the left/right surrounds. Therefore, whatever the configuration
setting is for the surrounds also applies to the sides. However, level and delay settings can be applied separately for
the sides via the Levels and Delays submenus, respectively.
SUB Configuration
Note
: If the source does not contain a discrete sub woofer or LFE channel, no signal will be routed to the
SUB
output(s) unless one or more speakers are crossed over. If the source contains a discrete LFE channel and the
#SUBS
is turned off (set to
0
), the LFE signal will be routed equally to all other channels whose
CFG
is set to
FULL
.
Figure 25 - Front Panel Display of the Subs Configuration Submenu
Unlike most configuration submenus in the Casablanca III, this one is not dynamic. In other words, if there are 1-5
DAC channels installed that are configured as sub woofers, this submenu will show, and allow configuration editing for
all 5, except for the
#SUBS
parameter. In this case, should a Casablanca III be installed with only one sub channel,
this value will allow only one or zero, etc.
If the number of Subs (
#SUBS
) is set to
1
, all of the low-pass portion of all crossed over speakers and the full
LFE
are
routed to the
SUB 1
output. (Sometimes labeled
SUB
if there is only one sub output, or
LEFT FRONT SUB
or
SUB1
if
there is more than one sub output). If the number of
SUBS
is set to more than 1, any low pass signals and LFE will be
routed as follows:
If the
#SUBS
is set to 2, which would be
L-R
or
F-R
, in the case of it being set to
L-R
(Front Left/Right), any
LFE
and
the low pass portion of any front speakers that are crossed over will be routed to the front left/right sub woofers. (The
49
Содержание Casablanca III
Страница 1: ...THETA DIGITAL C O R P O R A T I O N Casablanca III Owner s Manual V 3 00 Rev A a Digital Done Right ...
Страница 16: ...Casablanca III Block Diagram DAC and Analog Out Sections Figure 4 Block Diagram of DAC and Analog Outputs 6 ...
Страница 23: ...13 Setup Menus and Pages Figure 14 Setup Menus and Pages ...
Страница 25: ...15 STEP BY STEP SETUP GUIDE ...
Страница 34: ...24 Setup Flowcharts A P Flowchart A Setup Subwoofer s ...
Страница 35: ...Flowchart B Front Left Right Configuration 25 ...
Страница 36: ...Flowchart C Front Center Configuration 26 ...
Страница 37: ...Flowchart D Left Right Surround Configuration 27 ...
Страница 38: ...Flowchart E Surround Center Configuration 28 ...
Страница 39: ...Flowchart F Sides Configuration 29 ...
Страница 40: ...Flowchart G Setup Speaker Levels 30 ...
Страница 41: ...Flowchart H Setup Speaker Delays 31 ...
Страница 42: ...Flowchart I Setup Dolby Digital 32 ...
Страница 43: ...Flowchart J Setup DTS 33 ...
Страница 44: ...Flowchart K Setup Circle Surround 34 ...
Страница 45: ...Flowchart L Copy Input Speaker Parameters 35 ...
Страница 46: ...Flowchart M Setup Default Mode 36 ...
Страница 47: ...Flowchart N Setup Post Process 37 ...
Страница 48: ...Flowchart O Map Input Jacks 38 ...
Страница 49: ...Flowchart P Setup Analog Input Levels 39 ...
Страница 88: ...REMOTE CONTROL 78 ...
Страница 114: ...APPENDIXES 104 ...
Страница 120: ...Figure 115 Wiring diagram for the Casablanca III Digital Output board and a 6 Channel External Volume Control unit 110 ...


