Temp
Control
|
25
24
|
Temp
Control
THX-DL Operation
USB
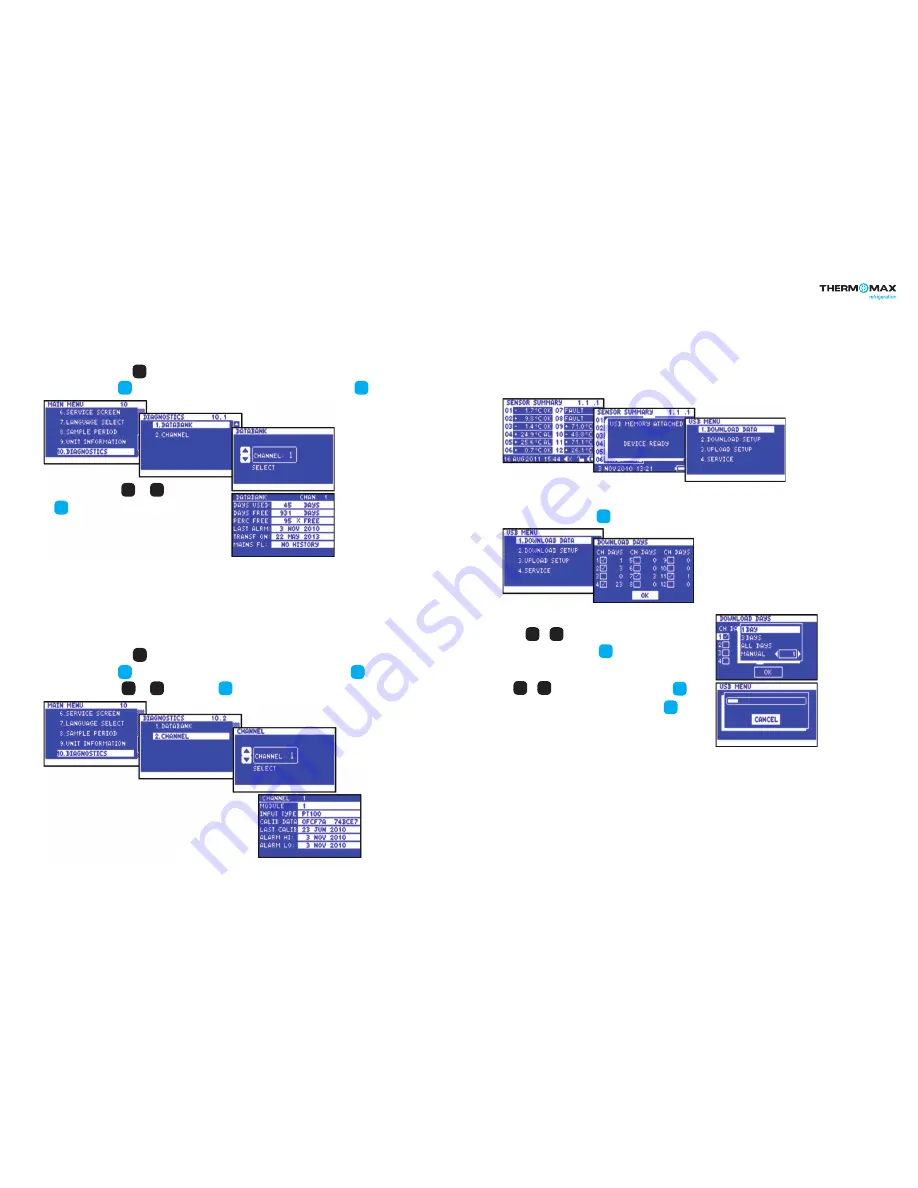
10.0 DIAGNOSTICS
10.1 Databank
From the Main Screen, press the key to scroll down to the second page of the menu. Select Sample Period from the main menu.
Confirm selection using the key to reveal the Diagnostics Menu. Select Databank from the menu and press the key to confirm.
Select the channel using the and keys and press
the key to confirm.
• The DAYS USED window shows the used capacity of the
internal databank.
• The DAYS FREE window shows the number of days which
have not yet been used.
• The PERC FREE window shows the percentage of the databank
which has not been used.
• The LAST ALRM window shows the last date on which an alarm condition occurred.
• The TRANSF ON window shows the date on which the contents of internal databank
need to be transferred.
• The MAINS FL window shows the last date on which the power failed. During a power
fail situation, this window will display the duration in minutes of the power failure
10.2 Channel
From the Main Screen, press the key to scroll down to the second page of the menu. Select Sample Period from the main menu.
Confirm selection using the key to reveal the Diagnostics Menu. Select Channel from the menu and press the key to confirm.
Select the channel using the and keys and press the key to confirm.
• The CHANNEL window shows the number of the currently selected channel.
• The MODULE window shows the number of the currently selected module.
• The INPUT TYPE window shows which type of sensor is being used.
• The CALIB DATA window shows calibration values, for factory use only.
• The LAST CALIB window shows the date when the THX was calibrated.
• The ALARM HI window shows the date when the last high alarm condition
occurred for this channel.
• The ALARM LO window shows the date when the last alarm condition occurred for this channel.
THX data logger can transfer data to/from a USB memory stick. The user can download the logged data and the unit settings to any USB
memory device in FAT 32 format.
The USB memory key can also be used to load new unit settings; this is useful, for example, for importing the settings from a previously
configured unit.
To enter to the USB menu, connect the USB stick to USB port when the Sensor Summary Screen is displayed.
1. Download Data
From the USB Menu screen, press key to reveal the Download Data Screen.
Use the or key to select the required channel and
then confirm the selection using the key.
Choose the sample period from the pop-up menu using
the or key and then confirm the selection using the key.
Choose another channel or select OK and confirm using the key.
The download bar will appear indicate the downloading progress.
Do not remove the memory stick until the progress bar disappears.
The data is saved to a file in ‘.csv’ format, compatible with Microsoft
®
Excel.
The file name is automatically generated by the Data Logger.
OK
OK
OK
OK
OK
OK
OK
OK
OK
▲
▼
▲
▼
OK
▲
▼
▼
▲
▼
▼


