CL-B101D40HZ Manual (d0098)
Page 13
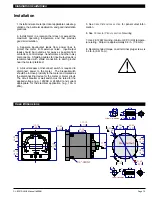
101.60
4.000
42.85
1.687
42.85
1.687
42.85
1.687
42.85
1.687
6.50
0.256
113.79
4.480
113.79
4.480
56.90
2.240
56.90
2.240
17.50
0.689
97.77
3.849
119.70
4.713
13.70
0.539
1/4"-28UNF
Panel Cutout
5.0
0.197
R4
0.157
16.30
0.642
13.70
0.539
4.80
0.189
screw-10-32 UNF
8
0.315
7
0.276
16.30
0.642
13.70
0.539
2.60
0.102
6.32
0.249
screw-1/4”-28 UNF
Case Dimensions
Installation Guidelines
Installation
1� Install and wire meter per local applicable codes/reg-
ulations, the particular application, and good installation
practices�
2. Install meter in a location that does not exceed the
maximum operating temperature and that provides
good air circulation�
3. Separate input/output leads from power lines to
protect the meter from external noise. Input/output
leads should be routed as far away as possible from
contactors, control relays, transformers and other noisy
components� Shielding cables for input/output leads is
recommended with shield connection to earth ground
near the meter preferred�
4� A circuit breaker or disconnect switch is required to
disconnect power to the meter� The breaker/switch
should be in close proximity to the meter and marked as
the disconnecting device for the meter or meter circuit�
The circuit breaker or wall switch must be rated for the
applied voltage (e�g�, 120VAC or 240VAC) and current
appropriate for the electrical application (e�g�, 15A or
20A)�
!
5� See
Case Dimensions section
for panel cutout infor-
mation�
6� See
Connector Pinouts section
for wiring�
7. Use 28-12 AWG wiring, minimum 90˚C (HH) tempera-
ture rating. Strip wire approximately 0.3 in. (7-8 mm).
8� Recommended torque on all terminal plug screws is
4�5 lb-in (0�51 N-m)�


