background image

34

Working with Documents

4.

Press 

x

or

·

to complete the swap.

Note:

 Press 

d

 to cancel the swap.

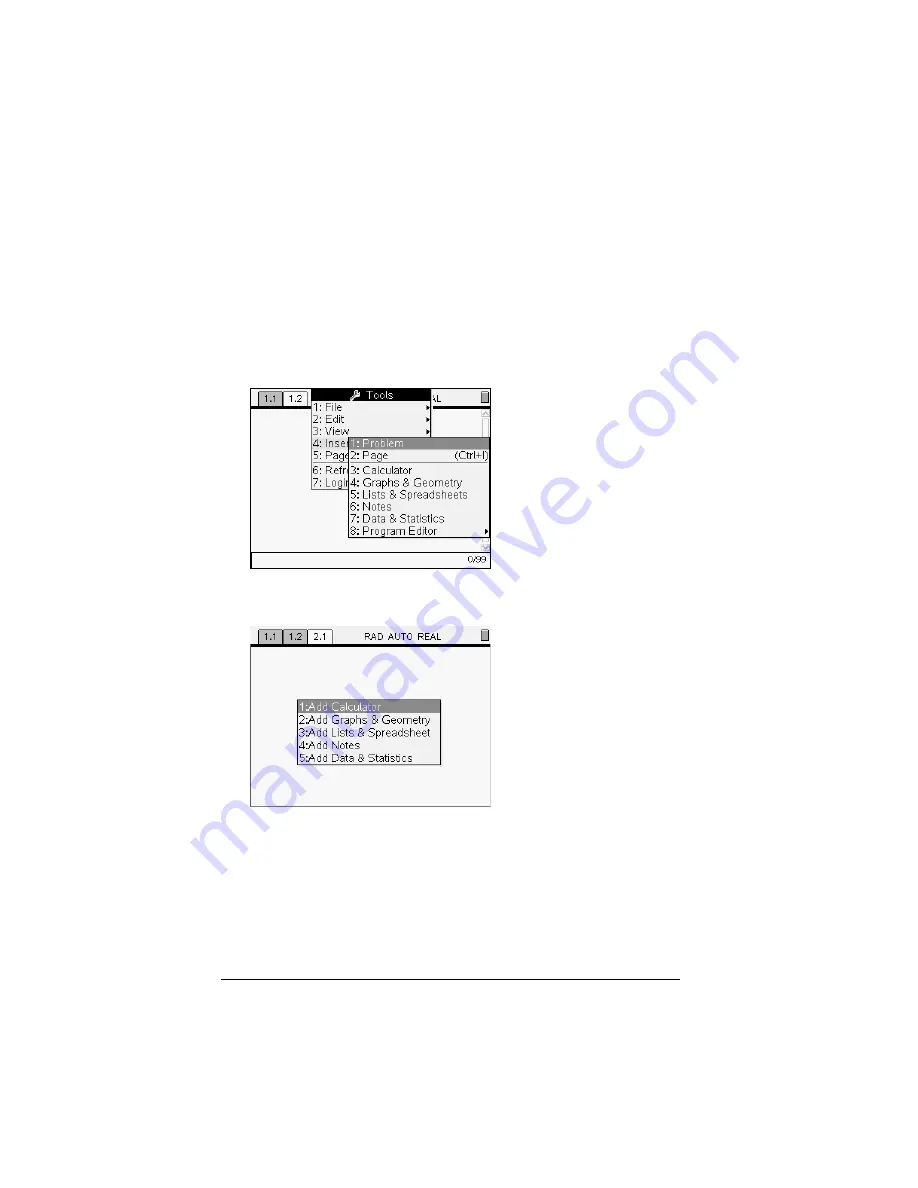
Adding a problem to a document

A document can contain as many as 30 problems. To add a new problem:

1.

Press 

/c41

.

A new problem with one page is added to the document.


Note:

 The tab at the top left of the screen indicates that this is the 

first page of the second problem.


2.

Press the number of the application you want to add to the new 
page. 

Adding a page to a problem

Each problem can contain up to 50 pages. To add a new page to a 
problem:

f

Press 

/c42

to add a blank page

Содержание NS/CLM/1L1/B - NSpire Math And Science Handheld Graphing Calculator

Страница 1: ...Math and Science Learning Technology Handheld ...

Страница 2: ...ith the limits for a Class B digital device pursuant to Part 15 of the FCC Rules These limits are designed to provide reasonable protection against harmful interference in a residential installation This equipment generates uses and can radiate radio frequency energy and if not installed and used in accordance with the instructions may cause harmful interference to radio communications However the...

Страница 3: ... Power Down 8 Turning on your TI Nspire handheld for the first time 8 Choosing a language 9 Choosing a font size 9 The Home menu 10 Using the Home menu 10 The TI Nspire handheld screen 11 Viewing status information 12 Viewing system settings 12 Document settings 13 Document settings Options 13 Changing document settings 14 System settings 14 Changing system settings 15 Handheld status 15 Checking ...

Страница 4: ...ments 25 Page Sorter 25 My Documents 26 Creating documents 26 Creating a blank document 26 Adding an application 27 Creating a document with an application 27 Working with applications 28 Application menu 28 Using the Application menu 28 Context menu 29 Using the Context menu 29 Page Tools menu 30 Using the Page Tools menu 30 Changing the page layout 30 Choosing a standard layout 30 Creating a cus...

Страница 5: ...52 Program Editor 53 Sending a document to another handheld 53 Rules for sending files 53 Sending a document 53 Receiving a document 54 Canceling a transfer 54 Using Calculator 55 Getting started with the Calculator application 55 Before you begin 60 Entering and evaluating math expressions 60 Options for entering expressions 60 Entering simple math expressions 60 Controlling the form of a result ...

Страница 6: ... animation 89 Stopping animation 89 Creating a Scatter Plot 90 More Information 91 Using Lists Spreadsheet 93 Getting started with tables 93 Navigating in a spreadsheet 97 Methods of entering table data 97 Working with individual cells 98 Creating absolute and relative cell references 98 Inserting items from the Catalog 99 Deleting the contents of a cell or block of cells 101 Copying a cell or blo...

Страница 7: ... 121 Selecting text 121 Applying a text format 121 Inserting geometric shape symbols 122 Entering and evaluating expressions 122 Entering an expression 123 Evaluating an expression 123 Data Collection 125 Compatible sensors 125 Starting the Data Collection tool 125 Data Collection controls 126 Running an experiment and collecting data 126 Data Collection names 126 Storing collected data 127 To sav...

Страница 8: ...viii ...

Страница 9: ... this guidebook include Getting Started Provides start up information for the learning handheld and offers students and educators an overview of the basic operations of the TI Nspire handheld Working with Documents Provides instruction for creating and working with documents Using Calculator Provides an overview of the Calculator application Using Graphs Geometry Provides an overview of the Graphs...

Страница 10: ...he product information is available in electronic form The comprehensive guidebook for using the TI Nspire handheld is included on the CD ROM that came with your learning handheld This guidebook is also available online as a free download at education ti com guides ...

Страница 11: ...pabilities and features of the TI 84 Plus mode see the TI 84 Plus guidebook on your CD or at education ti com The capabilities and features of the TI Nspire mode are described in this guidebook Note There are many TI 84 Plus applications Apps Apps that are certified by TI to be compatible with your TI Nspire handheld will operate correctly All apps preinstalled on your handheld are certified Other...

Страница 12: ...the handheld right side up and slide the keypad away from the display screen 3 Lift the keypad off the handheld 4 Insert the other keypad Ensure that it fits comfortably into the guides on the bottom and sides of the handheld Note The keypad does not slide in from the bottom edge of the unit Instead fit it into the guides just above the batteries 5 When the keypad is properly seated on the handhel...

Страница 13: ...e menu Clears erases the entry line or deletes selected object Evaluates an expression executes an instruction or selects a menu item gMakes the next character typed upper case bDisplays application or context menu kDisplays the catalog for entering commands NavPad Press 3 4 5 or 6 to move the cursor xClick button Selects an object on the screen x or pressing and holding x Displays the grab cursor...

Страница 14: ... backslash g p Managing Documents create new document N insert new page I select application K save current document S Navigation Home 7 End 1 Page Up 9 Page Down 3 Up a level in the hierarchy Down a level in the hierarchy 6 Navigating in Documents displays previous page displays next page displays Page Sorter Wizards and Templates add a column to a matrix g add a row to a matrix integration templ...

Страница 15: ...en Do not mix new and used batteries Do not mix brands or types within brands of batteries Do not mix rechargeable and non rechargeable batteries Install batteries according to polarity and diagrams Do not place non rechargeable batteries in a battery recharger Properly dispose of used batteries immediately 1 Remove the keypad from the handheld 2 Carefully remove the batteries Caution You may need...

Страница 16: ...lode releasing hazardous chemicals Discard used batteries according to local regulations Adjusting the contrast To lighten the display press and hold and tap To darken the display press and tap Turning the handheld on and off To turn the handheld on press w To turn the handheld off press w The next time you turn on the handheld it is in the same state as when you left it The settings and memory co...

Страница 17: ...o select it 2 Press e to highlight the OK button and press x or to select it Choosing a font size Next you are prompted to select the font size you wish to use to display text on the handheld 1 Press 6 until the font size you wish to display is highlighted and then press x or to select it 2 Press e to highlight the OK button and press x or to select it Note You can reset the font size on your hand...

Страница 18: ...n then press x or to display the home menu The Home menu The Home menu provides a starting point for all activities on your handheld Use the Home menu to perform the following tasks creating new documents opening and managing existing documents viewing and changing system and document settings viewing hints for operating the handheld Using the Home menu The Home menu displays when you power on you...

Страница 19: ...the home menu 2 Press x or to select a highlighted option or press the number associated with the option For example press 6 to open a new document To learn more about applications and documents see the Working with Documents chapter The TI Nspire handheld screen The handheld screen provides information about the document you are working in as well as the system settings and status The example bel...

Страница 20: ...The icons that display across the top of the handheld screen provide a quick look at the operating status of the handheld Icons indicate whether any modifier keys are active and display the current page number and the total page number Battery status and low memory indicators also display in this area Viewing system settings The system information menu allows you to view the following system infor...

Страница 21: ...andheld displays and interprets information in each document All numbers including elements of matrices and lists display according to the document settings Document settings Options The following table lists the document settings and their possible values Field Values Display Digits Float Float1 Float12 Fix0 Fix12 Angle Radian Degree Gradian Exponential Format Normal Scientific Engineering Real o...

Страница 22: ...y until the OK button is highlighted 6 Press x or to apply the new document settings Note If you want to apply the new settings to the device highlight Apply to System and press x or System settings System settings apply default settings to all documents on the handheld When you create a new document by default it uses the system settings to control how the document displays and interprets informa...

Страница 23: ...ou wish to select 5 Press x or to select the new setting 6 When you have changed all the settings to suit your needs press e until OK is highlighted and press x or to apply your changes Note Click Defaults to return the handheld to the factory settings Handheld status The Handheld Status screen shows the amount of memory in bytes used by all documents and variables on your TI Nspire handheld The H...

Страница 24: ...ocuments and or folders from memory If you wish to keep the documents and folders for use later you can back them up to another handheld or to a computer Deleting items from memory If have documents stored on your handheld that you no longer need you can delete them from memory to create additional space Before you delete documents from memory consider restoring sufficient available memory by copy...

Страница 25: ...I Nspire handheld to a computer or to connect one TI Nspire handheld using TI Nspire TI 84 Plus keypad to another TI 84 Plus Mode cables If you already have TI 84 Plus handhelds and use the I O port for connectivity you can use the same cables to connect to a TI Nspire handheld using the 84 keypad TI Nspire USB connection cable to connect handheld to a computer using TI Nspire Computer Link softwa...

Страница 26: ...m the Document menu 4 When the file transfer is complete a message displays on the receiving unit Connecting a TI Nspire with TI 84 Plus Keypad to a TI 84 Plus handheld The TI Nspire handheld USB A port is located at the center of the top of the handheld 1 Firmly insert either end of the USB unit to unit cable into the USB A port 2 Insert the other end of the cable into the receiving unit s USB A ...

Страница 27: ...ected by OS restoration It is a good practice to back up your important documents and folders before installing an updated operating system See the important information below concerning batteries before performing an OS upgrade Important Operating System download information It is always a good practice to install new batteries before beginning an OS download When in OS download mode the Automati...

Страница 28: ...ry The Reset button on the underside of the handheld resets all memory When resetting all memory on the TI Nspire handheld RAM and Flash memory is restored to factory settings All files will be deleted All system variables are reset to default settings Caution Before you reset all memory consider restoring sufficient available memory by deleting only selected data If you reset all memory the pre i...

Страница 29: ...ay the About screen press c 8 4 For information regarding OS updates see the chapter Transferring Files in the electronic version the the handheld guidebook This guidebook is available on the CD that came with your handheld or on the Texas Instruments web site http education ti com guides Viewing Hints Hints provide helpful information for navigating the handheld To view Hints press c 9 ...

Страница 30: ...mmands special characters and templates Opening the catalog 1 Press k to open the catalog 2 Press the number key for the category of the item For example press 4 to show a table of symbols 3 Press 6 until the item you want to insert is highlighted contains all commands and functions in alphabetical order contains all math functions provides a symbol palette for adding special characters contains m...

Страница 31: ...r function arguments To use the wizard press e until the Use Wizard box is highlighted Press x or to select the check box Entering special characters The symbol palette contains a subset of the objects found in the catalog 1 To display the symbol palette press k 2 Press 3 4 5oor 6 until the item you want to insert is highlighted 3 Press to insert the item Entering Math expressions Math expression ...

Страница 32: ...haracters in applications that allow text input 1 Open an application that allows text input 2 Type the desired text 3 Position the cursor after the letter that you want to accent For example e while in the French locale 4 Press on the keypad Notice that the e changes to é Keep pressing until you find the accented version of e that you want Press _ or the next letter of your text to accept the cha...

Страница 33: ...hen you understand its structure Each document is divided into one or more problems Each problem contains one or more pages Each page can be divided into as many as four work areas Each work area can contain any of the TI Nspire math and science learning technology applications Calculator Graphs Geometry Lists Spreadsheet Data Statistics and Notes Page Sorter Although the handheld typically displa...

Страница 34: ...ment and then add applications and apply a layout or if no document is currently open you can create a document containing a single application Creating a blank document f Press c 6 to open a document from the home menu or use the shortcut keys Shortcut keys N A new document opens and displays a blank page with the Add Application menu Note The tab at the top left of the screen indicates that this...

Страница 35: ... area Creating a document with an application If no documents are currently open you can create a document with an application already added f Press c and select the number of the application you want to create For example press c 3 to create a new Lists Spreadsheet page A new document opens with Lists Spreadsheet on the page Note If you are currently working in a document this method adds a new p...

Страница 36: ...plication menu the Context menu the Page Tools menu Application menu The Application menu displays tools for working with a specific application Each application has a unique menu Using the Application menu 1 If you are on a blank page Press b to display the Application menu The menu displays applications that you can add to the page 2 Press the number of the application you want to add to the pag...

Страница 37: ...ample below displays the Application menu for the Lists Spreadsheet application Context menu The context menu displays options that are specific to the selected object or the current cursor location Using the Context menu f To access a context sensitive menu from an application press b In the example below the context menu displays options available for the selected cell in Lists Spreadsheet ...

Страница 38: ...option you wish to select For example to change the page layout press 5 Changing the page layout When you create a new document it contains space to add one application If you need to add more than one application to a page you can change the layout to accommodate as many as four applications You can choose a standard layout provided as a menu item or you can customize a layout to suit your needs ...

Страница 39: ...ss 2 3 Press the number that corresponds to the layout you want to apply to the page For example press 2 to create a two pane layout divided vertically on the page The page is divided into the layout design you have selected 4 Press e to move to the right pane on the page ...

Страница 40: ...Geometry application to the right pane press 2 Note If you need to change the layout of the page to add or delete applications you can do so at any time Creating a custom layout If the standard layouts do not meet your needs you can customize the space allotted to applications on a page 1 Press c 5 to display layout options ...

Страница 41: ...on of applications on a page with multiple applications you can do so by swapping the positions of two applications Swapping applications 1 Select Swap Applications from the Page Layout menu Press c 5 4 2 Press e to select the application you want to move The selected application is surrounded by a heavy flashing black border and the Swap App cursor é displays on the screen Note On a two pane page...

Страница 42: ...new problem 1 Press c41 A new problem with one page is added to the document Note The tab at the top left of the screen indicates that this is the first page of the second problem 2 Press the number of the application you want to add to the new page Adding a page to a problem Each problem can contain up to 50 pages To add a new page to a problem f Press c42 to add a blank page ...

Страница 43: ...ab at the top left of the screen indicates that this is the second page of the second problem Moving through pages in a document Use the following keys to navigate through your documents 3 displays the previous page 4 displays the next page 5 displays the Page Sorter Saving a document If you are working in a document and want to save it 1 Press c 1 3 or Shortcut keys S If you are saving the docume...

Страница 44: ... 6 Press xor to save the document Viewing and reordering pages in a document The Page Sorter displays all of the problems in your document and all pages within each problem in thumbnail format You can use the Page Sorter to rearrange and delete pages copy a page from one problem and paste it in another and apply templates to pages Opening the Page Sorter from a document f Press c33 or Shortcut key...

Страница 45: ...u want to move A heavy border around the page indicates that it is selected 2 Either press and hold xor press xuntil the grab cursor displays 3 Press 3 4 5 and 6 to move the page to the desired position 4 Press x or to finish the move Note You can press d to cancel The page moves to the new location within the problem and the counter adjusts accordingly ...

Страница 46: ...ess C to copy the page 3 Press 3 4 5 and 6 to move the page to the desired position in the new problem 4 Press V to paste the page in the new location The page moves to the new location within the problem and the counter adjusts accordingly Copying a page to another document To copy a page from one document to another document 1 Press 3 4 5 and 6 to select the page you want to copy A heavy border ...

Страница 47: ... position in the document 10 Press V to paste the page in the new location The page moves to the new location within the problem and the counter adjusts accordingly Document settings You can change the mode settings for a document when you want to use settings different from those you have specified for the handheld For instance if you want to change the angle mode or exponential format used by th...

Страница 48: ...ch the setting that you want to change press 6 to expand the selection list 4 Press the 5 and 6 keys to highlight the option you wish to select and press xor 5 Press e until the OK button is highlighted 6 Press x or to apply the new document settings Note If you want these settings to apply to future documents also highlight Apply to System and press x ...

Страница 49: ... illustrates the My Documents screen with its main parts labeled Following the screen you can find descriptions of each labeled part À Expanded folder Á Unsaved document  Collapsed folder à System status indicators Ä File size Opening My Documents To open My Documents f Press c 7 Note If you are working in a document press 5 5 À Á Â Ã Ä ...

Страница 50: ... to open the document o Expanding folders To expand a single folder 1 Press 5 and 6 to highlight the folder 2 Press xor to open the folder 3 The icon changes to the opened icon and a list displays showing all documents within the folder Expanding all folders To expand all folders on the My Documents screen f Press b 5 All folders expand to display their contents Renaming folders or documents To re...

Страница 51: ... Creating folders You can create folders two different ways You can create a folder when you save a new document The Save and Save As menu commands allow you to enter a new folder name for the document You can create a folder directly from the My Documents screen Press b 1 Type a name for new folder and press xor to add it File and folder naming conventions Folder names must be unique File and fol...

Страница 52: ...e Press c 2 1 to Undo a file or folder deletion Duplicating documents and folders Use Copy C and Paste V to duplicate documents and folders To copy a document to another folder select the desired folder then paste Recovering deleted documents Most operations performed in My Documents can be undone Press Z Undo to cancel the last operation until the deleted document is restored ...

Страница 53: ...h application allows you to define a value or function as a variable Defining a variable is the first step in linking values Creating TI Nspire variables Variables can be any portion or attribute of an object or function created within an application Examples of attributes that can become variables are the area of a rectangle the radius of a circle the value contained in a spreadsheet cell or the ...

Страница 54: ...iables options are displayed with Store highlighted Press L to display the Variables options Store is highlighted Open the Tools menu and select the Variables option The Variables options are displayed with Store highlighted 3 Press VAR appears before the selected value This is the default variable name Type over VAR with the variable name you want to give the value ...

Страница 55: ...is inserted into the cell with var as a placeholder for a variable name 3 Replace the letters var with a name for the variable and press The value is now available as a variable to other TI Nspire math and science learning technology applications within the current problem Note If a variable with the name you specified already exists in the current problem Lists Spreadsheet displays an error messa...

Страница 56: ...n underscore as the first character the variable it is considered a type of unit such as _m _ft and _in Units do not allow subsequent underscores in the name You cannot use a preassigned variable or function name such as ans or min Note For a complete list of TI Nspire functions refer to the TI Nspire Reference Guide Here are some examples Preventing name conflicts A TI Nspire shared variable can ...

Страница 57: ...ul tool for math exploration The display of linked variables is automatically updated when the variable s value changes In the following two examples two data lists were created in Lists Spreadsheet and then plotted in Graphs Geometry Use this syntax To refer to Remarks myvar The shared variable myvar No special syntax needed because this name does not conflict with a cell or column reference A1 T...

Страница 58: ...ch you want to link a variable 2 Do one of the following Press h The Variables display Press L to display the Variables options Open the Tools menu and select the Variables option 3 Press and to scroll the list or type part of the variable name As you type the TI Nspire system displays a list of variables that begin with the letters you typed Typing part of the name enables you to locate a variabl...

Страница 59: ...d in Graphs Geometry Calculator or any instance of Lists Spreadsheet Note Do not link to a system variable Doing so could prevent the variable from being updated by the system System variables include ans StatMatrix and statistics results such as RegEqn dfError and Resid 1 Click the cell that you want to link to the variable 2 Click or L and click Cell The VarLink menu displays 3 Under Link To scr...

Страница 60: ...variables functions and or programs that have been defined as library objects Unlike ordinary variables functions and programs which can be used only within a single problem the problem in which they are defined library objects are accessible from any document You can even create public library objects that appear in the TI Nspire Catalog For details see the Libraries chapter in Part 2 of the hand...

Страница 61: ... for sending files If a document with the same name as the one you are sending already exists on the receiving TI Nspire handheld the document will be renamed The system appends a number to the name to make it unique For example if a document called Mydata existed on the receiving TI Nspire handheld it would be renamed Mydata 2 Both the sending and receiving units display a message that shows the ...

Страница 62: ...held the new file name displays Receiving a document No action is required by the user of the receiving TI Nspire handheld Units are automatically powered on when the cable is attached Canceling a transfer 1 To cancel a transmission in progress press Cancel on the dialog of the sending unit Note To cancel a transfer from the receiving handheld press d 2 A link transmission error message displays 3...

Страница 63: ...oblem You can also use Calculator to define library objects such as variables functions and programs which are accessible from any problem of any document For information on creating library objects see the Libraries section of the documentation À Calculator menu This menu is available anytime you are in the Calculator work area Press b to display the menu The menu in this screen snapshot may not ...

Страница 64: ...or modify a function or program that you have defined Delete Variable Inserts the delVar command Clear a z Deletes all variables with single letter names Clear History Deletes all expressions in the Calculator history Insert Comment Lets you insert text Library Lets you refresh all libraries set LibPub or LibPriv access or insert a character Number Convert to Decimal Inserts Decimal command Factor...

Страница 65: ...s Polar command Convert to Rectangular Inserts Rect command Calculations Numerical Solve Inserts nSolve Numerical Function Minimum Inserts nfMin Numerical Function Maximum Inserts nfMax Numerical Derivative Inserts nDeriv Numerical Integral Inserts nInt Finance Solver Starts the Finance Solver Probability Factorial Inserts Permutations Inserts nPr Combinations Inserts nCr Random Lets you select ra...

Страница 66: ...ist calculations such as minimum maximum and mean List Operations Lets you select from several list operations such as sorting filling and converting to a matrix Distributions Lets you select from several distributions such as Normal Pdf Binomial Cdf and Inverse F Confidence Intervals Lets you select from several confidence intervals such as t interval and z interval Stat Tests Lets you select fro...

Страница 67: ... Lets you select rowSwap rowAdd mRow or mRowAdd Element Operations Inserts dot operators such as dot add and dot power Advanced Inserts eigVl eigVc LU or QR Vector Inserts unitV crossP dotP 8Polar 8Rect 8Cylind or 8Sphere Functions Programs Program Editor Lets you view open for editing import or create a new program or function Func EndFunc Inserts a template for creating a function Prgm EndPrgm I...

Страница 68: ...mber on the handheld press v To enter a negative number on a computer keyboard press the hyphen key Suppose you want to evaluate 1 Select the entry line in the Calculator work area Control Lets you select from a list of function and program control templates such as If Then EndIf While EndWhile Try Else EndTry and others Transfer Inserts transfer commands Return Cycle Exit Lbl Stop or Goto Disp Di...

Страница 69: ...a result You might expect to see a decimal result instead of 2752 3 in the preceding example A close decimal equivalent is 917 33333 but that s only an approximation By default Calculator retains the more precise form 2752 3 Any result that is not a whole number displays in a fractional form This reduces rounding errors that could be introduced by intermediate results in chained calculations You c...

Страница 70: ...alog You can use the Catalog to insert system functions and commands symbols and expression templates into the Calculator entry line 1 Press k to open the Catalog Note Some functions have a wizard that prompts you for each argument If you prefer to enter the argument values directly on the entry line you may need to disable the wizard 2 Press the number key for the category of the item For example...

Страница 71: ...essions For example suppose you want to evaluate 1 Press r to open the Template palette 2 Select to insert the algebraic sum template The template appears on the entry line with small blocks representing elements that you can enter A cursor appears next to one of the elements to show that you can type a value for that element 3 Use the arrow keys to move the cursor to each element s position and t...

Страница 72: ... its parameters even though some parameters may not be exactly in the path of the cursor movement For example moving upward from the main argument of an integral always moves the cursor to the top limit Inserting into an expression in the entry line 1 Position the cursor at the point where you want to insert additional elements 2 Type the elements that you want to insert Note When you insert an op...

Страница 73: ...result pair is saved in the Calculator history The history gives you a way to review your calculations repeat a set of calculations and copy expressions for reuse in other pages or documents Viewing the Calculator history The history of the expressions you have entered accumulates above the entry line with the most recent expression at the bottom If the history does not fit in the Calculator work ...

Страница 74: ...its full precision select it either by scrolling with the up and down arrow keys or by triple clicking it 3 Press C to make the copy 4 Select the location where you want the copy 5 Press V to paste the copy Note If you copy an expression that uses variables into a different problem the values of those variables are not copied You must define the variables in the problem where you paste the express...

Страница 75: ...b to display the Calculator menu 2 On the Actions menu select Clear History All expressions and results are removed from the history Where to find more information More in depth information step by step instructions and screen examples of all the Calculator features are contained in the Using Calculator chapter in Part 2 of the user guide which is available on the CD ROM that came with your handhe...

Страница 76: ...68 Using Calculator ...

Страница 77: ...Link to data created by other applications and utilize it in Graphs Geometry À Problem Page number counter Á Sample Graphs Geometry work area in Plane Geometry View with Analytic Window shown  Graphs Geometry data entry line These are the basic components of the Graphs Geometry application The toolbar To quickly access a tool menu use the numeric quick keys Note The number that precedes each titl...

Страница 78: ...w Provides different Zoom settings as well as the ability to define x max x min y max and y min b 4 5 Trace Places and enables the trace tool on the graph b5 6 Points Lines Provides tools for drawing various types of points lines segments rays and vectors b 6 7 Measurement Provides tools for measuring angles lengths areas and slope b 7 8 Shapes Provides tools for drawing circles triangles rectangl...

Страница 79: ...c values on the page Numerical values can be applied to objects The tool can be used to enter a function and graph it b15 6 Coordinates and Equations Displays the coordinates of a point or the equation of a line or circle b16 7 Calculate Opens the calculator to perform calculations using measurements numerical values or calculation results b17 8 Redefine Redefines a previously defined point to a n...

Страница 80: ...tly displayed on the page Displays the axes if none are displayed on the page Cartesian axes are the supported axes 5 Show Hide Grid Turns the grid on or off on the page Objects can be attached to the grid when the grid is displayed 6 Hide Show Entry Line Hides or displays the entry line on the page 7 Show Hide Scale Toggles between showing and hiding the scale legend on the work area When the sca...

Страница 81: ...y shows the q min q max and q step values The defaults are 0 2p for q min and q max and p 24 for q step b33 4 Scatter Plot Displays the Scatter Plot mode entry line at the bottom of the work area b34 Tool name Tool function Press 1 Window Settings Displays the Window Settings dialog that enables you to enter the x min x max y min and y max values for the axes b41 2 Zoom Box Enables you to define a...

Страница 82: ...Zoom User Zoom User restores those settings b47 8 Zoom Trig Automatically sets x min and x max to integer multiples of p The x and y scale factors are equal b48 9 Zoom Data Redefines the axes so that all statistical data points are displayed b49 A Zoom Fit Recalculates y min and y max to include the minimum and maximum y values of all functions between the current x min and x max Hidden functions ...

Страница 83: ...ection of two objects b61 2 Point On Constructs a point defined on an object When the object is a function graph the coordinates are displayed b62 3 Intersection Point Constructs a point at each intersection of two selected objects b63 4 Line Constructs an infinite line defined by two points or by a point and a direction If you press g while creating the line you limit its orientation relative to ...

Страница 84: ...ive to the x axis or the horizontal aspect of the screen by 15 increments b68 Tool name Tool function Press 1 Length Displays the distance between two selected points or the length of a segment perimeter circumference or radius b71 2 Area Displays the area of a selected polygon or circle b72 3 Slope Displays the slope of a selected line or segment A vertical slope is represented by b73 4 Angle Dis...

Страница 85: ... vertex The polygon is completed by clicking the initial vertex or by pressing b84 5 Regular Polygon Constructs an n sided regular polygon Click to define the center and click again to define the radius Move clockwise convex or counter clockwise star to set the value of n b85 Tool name Tool function Press 1 Perpendicular Constructs a line perpendicular to a selected line segment ray vector axis or...

Страница 86: ...ned by a selected segment or the distance between two points b97 8 Measurement Transfer Transfers an entered or measured value to a selected object axis or function graph If the original value changes the change is reflected in the transferred measurement b98 Tool name Tool function Press 1 Symmetry Creates the image of an object rotated 180 around a point bA1 2 Reflection Creates the image of an ...

Страница 87: ...All objects created in this view are analytic objects Therefore their displayed size and proportion are affected only by the scale of the axis system the command Show Scale has no effect The plane geometry view The plane geometry view removes the axes and entry line from the work area to enable you to draw geometric shapes and explore them In this view you can display and set a scale for your draw...

Страница 88: ...ination work area that enables you to use both work area types without toggling the view between them To open the analytic window 1 Ensure that the work area is in Plane Geometry view 2 From the View menu select Show Analytic Window Press b 2 3 3 A reduced size graphing window opens on the lower left corner of the plane geometry space You can alter the work area without changing the view to tempor...

Страница 89: ...ect onto the plane geometry area When you create an object in the plane geometry area it is a geometric object These objects can have an assigned scale such as miles or centimeters instead of u for units You can lock a point such as one vertex of a triangle on the work area but since the object is not tied to a coordinate plane you cannot display coordinates for that vertex When working with a mod...

Страница 90: ...pacing The aspect ratio of the axes is retained To modify the scale of only one axis press the Shift key as you adjust the value or drag the line Uses Define and graph functions to Graph functions of the form f x Create scatter plots Graph polar equations Graph parametric functions Construct analytic objects Label equations Identify coordinates for discrete points Construct Euclidean objects Creat...

Страница 91: ...t arrow keys to display the desired end style The attributes list for the axes also enables you to select a Zoom option 4 Adjust the axes scale and tic mark spacing manually a Click and hold one tic mark and move it on the axis The spacing and number of tic marks increases or decreases on both axes b To adjust the scale and tic mark spacing on a single axis press and holdg and then grab and drag a...

Страница 92: ... hide and redisplay axes using the Hide Show Axes tool f From the View menu select the Hide Show Axes tool Press b 2 4 If the axes are shown on the page selecting this tool hides them If the axes are hidden on the page selecting this tool redisplays them Drawing a circle The following instructions enable you to construct a circle While each tool is a little different depending upon the type of obj...

Страница 93: ...rs The entry line The Entry line appears at the bottom of the Graphs Geometry work area When the line is not active it is grayed out From left to right the parts of this line are À Hide Show function button Á Attributes button  f1 x is the default notation used for a function or inequality à Blank area into which you enter the function polar equation inequality parametric or scatter plot data to ...

Страница 94: ... f Select the Text tool and type the function you want to graph into the box displayed when you move the curson onto the page f Drag the text box to the x axis and drop it on the axis to graph the function Regardless of how you enter functions each function is labeled on the graph for identification Graphing inequalities Function mode enables you to define a function that uses a symbol other than ...

Страница 95: ... press b 6 2 to locate the zeros minima and maxima if these are applicable for objects on the work area They may not display if their location on the graph not visible on your screen Both local and global points of interest display Note Global points of interest display only when they are also local For example inverse sine reaches its global maximum at x 1 but the tooltip M does not display there...

Страница 96: ...ick on the object to identify the point you want to animate 2 From the Actions menu select the Attributes tool Press b 1 3 When the attribute bar displays select the animation attribute 3 The default speed is 0 You can type a number from 1 9 to set speed or you can use or to select a speed from 12 to 12 The higher the number you type the faster the animation speed 4 Select for one way animation or...

Страница 97: ...ion was first started If multiple points are animated on the page all are returned to their original locations when you select Reset Stopping animation To stop the animation of an object 1 Select the Pause or Reset button on the control bar 2 Display the Animation attribute for the point 3 Change the speed to 0 zero 4 Click an empty area of the screen to apply the change or press 5 Select Start to...

Страница 98: ...To create the data lists and scatter plot on the same page select a page configuration with two work areas 2 Create the data lists on the Lists Spreadsheet portion of the page 3 Select the Scatter Plot tool Press b 3 3 4 Select the lists to plot from the drop down list for each axis 5 When both entry fields have a data list specified the scatter plot displays on the Graphs Geometry work area ...

Страница 99: ...nformation step by step instructions and examples of all the Graphs Geometry features are contained in the Graphs Geometry chapter in Part 2 of the user guide available on the CD that came with your handheld or on the web site at http education ti com guides ...

Страница 100: ...92 Using Graphs Geometry ...

Страница 101: ...her column Work with variables created in the Graphs Geometry and Calculator applications Collect tables of real world data from sensors Generate columns of data based on other columns or sequences that you define Share individual cells with other TI Nspire math and science learning technology applications as variables and share columns of data as lists Plot table data using the Data Statistics ap...

Страница 102: ...tion The Lists Spreadsheet tool menu The Lists Spreadsheet tool menu lets you modify your display and enter and evaluate a variety of math expressions Menu Name Menu Option Function Actions Move Column Lets you reposition the current column Resize Lets you set a column to the maximum or minimum width You can set a custom row height or column width by positioning the column edge at the size you wan...

Страница 103: ...ts of a single column Insert Insert Cell Inserts a cell Insert Row Inserts a row above the current row Insert Column Inserts a column before the current column Data Generate Sequence Displays a dialog box for creating a sequence Data Capture Allows manual or automatic capture of variable data from Graphs Geometry Calculator or within Lists Spreadsheet Use to trigger each manual capture Fill Down L...

Страница 104: ...erse F Confidence Intervals Lets you calculate several confidence intervals such as t interval and z interval Stat Tests Lets you perform and plot several hypothesis tests such as t test z test and ANOVA Function Table Switch to Function Table T Toggles the function table view Select Function Lets you select a different function for the current column Edit Function Table Settings Lets you change t...

Страница 105: ...ctions menu to select a specific cell Type the cell s column letter and row number such as G16 A column letter appears at the top of each column and a row number appears in the left cell of each row The top two rows and the left column of the spreadsheet remain in place as you scroll so you can more easily determine your location À Column reference Á Header or formula row  Row reference à Column ...

Страница 106: ... cells Creating absolute and relative cell references Cell references let you enter formulas that refer to spreadsheet data instead of having to duplicate it and remember to update it When you change the contents of a referenced cell all references to the data are updated automatically in the table Anytime you want to update all references and formula results in the table you can select Recalculat...

Страница 107: ... cell in relation to other cells Lists Spreadsheet keeps track of relative cell references It adjusts each reference automatically when you copy or move the cell containing the reference to another location in the spreadsheet If you need a reference that always refers to a cell in a specific location in the spreadsheet use an absolute reference To create an absolute cell reference type a symbol be...

Страница 108: ... press 1 to show the alphabetic list shows an alphabetic list of functions and commands shows math functions and commands by category provides a symbol palette for adding special characters shows expression templates shows Public library LibPub objects 4 LibPub Press and then use or as necessary to select the item that you want to insert Note To see syntax examples of the selected item press e and...

Страница 109: ... contents are deleted Note If other cells contain formulas that refer to the cell s previous contents those cells show an error Copying a cell or block of cells When you copy cells the formulas if any in the original cells are copied to the destination cells replacing the previous contents of those cells 1 Press or to select the cell You can also hold down the g key and then press or to select a r...

Страница 110: ... mode as the cell from which the data was originally copied Otherwise a formula could paste as a string enclosed in quotes instead of a formula Filling adjacent cells You can repeat a cell s formula or value throughout adjacent cells This gives you a quick way to fill cells with the same value or create a series of cells that contain the same formula You can fill down within a column 1 Select the ...

Страница 111: ...mn and then press or Move to the leftmost cell of the row and then press Resizing a row or column 1 Select the row or column that you want to resize 2 Press b to display the Lists Spreadsheet menu 3 On the Actions menu select Resize 4 Use and to resize the column or use and to resize the row 5 Press Inserting an empty row or column 1 Select the column or row where you want to insert the new data 2...

Страница 112: ... 2 If you are deleting more than one row or column hold down g and press and to select additional columns or press and to select additional rows 3 Press The selected rows or columns are deleted Note If other cells contain formulas that refer to the deleted row or column those cells show an error Relative references to cells whose positions have changed because of a deletion adjust accordingly Copy...

Страница 113: ...o any cell in the row or column where you want to place the copied items 5 Press V to paste the selection The copied row or column is pasted in place replacing the previous contents Moving a column 1 Select the column that you want to move 2 Press b to display the Lists Spreadsheet menu 3 On the Actions menu select Move Column An insertion bar appears 4 Press or to place the insertion bar at the c...

Страница 114: ...106 Using Lists Spreadsheet Note Relative references to any cell whose position is affected by the move adjust accordingly ...

Страница 115: ...namically applied to all linked applications explore central tendency and other statistical summary techniques fit functions to data create regression lines for scatter plots graph hypothesis tests and results z and t tests based on summary statistics definitions or data Note In the following example Lists Spreadsheet is shown along with Data Statistics This represents a typical page set up À Prob...

Страница 116: ...ea This includes movable lines for manually fitting data regression curves and functions Window Zoom Lets you specify a zoom factor for the window or determine min and max values for the horizontal and vertical axes Tool name Tool function Dot Plot Depicts data in a dot plot This is the default plot type for a single variable of the data set Box Plot Displays data in a box plot Histogram Displays ...

Страница 117: ... data in the histogram by data density Bins Displays a dialog for setting the histogram values for bin width and alignment Extend Box Plot Whiskers Show Box Plot Outliers Extend Box Plot Whiskers extends the whiskers to the min and max of the data Show Box Plot Outliers stops at 1 5 Interquartile Range and shows outliers as individual dots Note If there are no points outside of 1 5 Interquartile R...

Страница 118: ...zero Note This tool is only available when a movable line or regression line is present in the work area Regression The regression tools perform the selected regression calculation and then plot the regression model Regressions are only available on Scatter plots of X Y line plots Show Hide Linear mx b Calculates and displays the linear regression line in the format mx b for the plotted data Show ...

Страница 119: ...ays the Logistic regression model where D 0 for the plotted data Show Hide Logistic dƒ0 Calculates and displays the Logistic regression model where Dƒ0 for the plotted data Show Hide Residual Squares Displays the squares of residuals Note This tool is only available when a regression line or movable line is present in the work area Plot Value Lets you graph a statistical value on the axis Examples...

Страница 120: ...r display data to be plotted in Lists Spreadsheet You can plot one or two columns of data The example below illustrates two named columns height and weight Tool name Tool function Window Settings Displays a Window Settings dialog that enables you to enter values that define the work area window Values you can set include the x min x max y min and y max values for the axes Zoom Data Adjusts the zoo...

Страница 121: ...ists Spreadsheet 3 From the Lists Spreadsheet Data menu select the Quick Graph tool Press b 3 4 The data plot displays in the Data Statistics work area The example below illustrates the plot of two columns of data which display as a scatter plot The leftmost column of data in the spreadsheet becomes the horizontal axis values and that column name becomes the horizontal axis label ...

Страница 122: ... page TI Nspire adds a new work area with Data Statistics active on it If four work areas are already defined on the page TI Nspire adds a new page to the problem with Data Statistics active on it Note If a list is defined with a formula in Lists Spreadsheet the points in Data Statistics may not move due to the formula s restriction The dots in Data Statistics will only move in directions allowed ...

Страница 123: ...step by step instructions and examples of all the Data Statistics features are contained in the Data Statistics chapter of Part 2 of the user guide available on the CD that came with your handheld or on the web site at http education ti com guides Please refer to this material to gain a thorough understanding of all the capabilities of the application ...

Страница 124: ...116 Using Data Statistics ...

Страница 125: ...n as a tool to create study notes to reinforce your understanding of classroom concepts and to review for exams The Notes application allows you to assign different roles to individuals using your document so that any edits appear in a different text format making it easy to edit collaboratively À Notes tool menu This menu is available anytime you are in the Notes work area Press b to display the ...

Страница 126: ...ts you enter freeform text Insert Expression Box Lets you insert a math expression Shape Marks the selected text as an angle triangle circle line segment ray or vector Comment Lets you enter text that is italicized and prefaced with Teacher or Reviewer Format Keyword Toggles the selected text between bold and not bold and removes all other formatting Title Toggles the selected text between underli...

Страница 127: ...er shown or hidden Proof for an outline structure containing statements and reasons Default for open formatted text entry Subscript Toggles the selected text between subscripted and not subscripted and removes all other formatting Superscript Toggles the selected text between superscripted and not superscripted and removes all other formatting Actions Evaluate selection Replaces the selected math ...

Страница 128: ...n to show or hide the answer so you can create questions for review and hide the answers When you use the document as a study aid you can verify that your answers are correct Press e to move the text cursor between the Question and Answer areas of the template Using the Proof Template The proof template provides an outline structure for statements and corresponding reasons Press e to move the text...

Страница 129: ...allows you to format text to add context to your documents Use the tools on the Text options menu to specify text as a keyword title or subheading or to format text as subscript or superscript Selecting text 1 If you are using the Q A or Proof template press e to place the cursor in the area containing the text 2 Use the NavPad to place the cursor at the start or end of the text to be selected 3 H...

Страница 130: ...such as an angle circle or line segment 1 Position the cursor where you want to insert a shape symbol 2 Press b to display the Notes menu 3 On the Insert menu select Shapes and then select the shape to apply Entering and evaluating expressions You can include math expressions in Notes text using the same tools as in other TI Nspire applications You can also evaluate an expression and display the r...

Страница 131: ...the Catalog if necessary to insert a function command symbol or expression template Evaluating an expression Note The result of the expression will replace the expression If you need both the expression and its result make a copy of the expression and then evaluate the copy 1 Select the entire expression 2 Press b to display the Notes menu 3 On the Actions menu select Evaluate Expression The resul...

Страница 132: ...124 Using Notes ...

Страница 133: ...ors currently supported Starting the Data Collection tool The Data Collection tool can be started automatically or manually f An automatic start occurs when a sensor is connected to either a TI Nspireé handheld or a computer running TI Nspireé computer software The connected sensor will be configured to work with the Data Collection tool in an open Graphs Geometry page or if Graphs Geometry is not...

Страница 134: ...splayed is erased when the new experiment is started Data Collection names The naming system for Data Collection data includes a group designator and a member designator group member For example in a temperature versus time experiment the data is named run0 temp_C and run0 time_s Remember that TI Nspireé computer software is case insensitive RUN0 TEMP_C and run0 temp_c reference the same set of da...

Страница 135: ...teps for each data sample you want to save To permanently save a set of data generated by an experiment save the document To save motion data 1 Cut and paste each column of data into new columns The first two columns Columns A and B will be reused by the next run of the experiment 2 Rename each moved column 3 To save velocity data select a third column Highlight the column and select Select Link t...

Страница 136: ...a Collection 4 Repeat this procedure to save acceleration data 5 Repeat the steps for each experimental data set you want to save To permanently save a set of data generated by an experiment save the document ...

Страница 137: ...has been spilled or objects have fallen into the product If the product has been exposed to rain or water If the product does not operate normally as per the operating instructions If the product has been dropped or the case has been damaged Battery Precautions Take these precautions when replacing batteries Do not leave batteries within the reach of children Do not mix new and used batteries Do n...

Страница 138: ...rvice and Support Disposing of Batteries Do not mutilate puncture or dispose of batteries in fire The batteries can burst or explode releasing hazardous chemicals Discard used batteries according to local regulations ...

Страница 139: ...cking up handheld 19 battery status indicator 12 C Calculator adding to a page 60 getting started with 55 Calculator history 65 viewing 65 Calculator toolbar 56 94 Calculator toolbar using 60 cancelling a file transfer 54 Catalog accessing 14 40 inserting items from 62 99 opening 22 catalog inserting commands 23 cell references absolute and relative 98 cells copying in a table 101 filling adjacent...

Страница 140: ...uments copying pages to 38 creating 26 creating new 26 deleting 43 managing 41 opening existing 42 page sorter 25 receiving from another user 54 selecting for transfer 53 structure 25 transferring 53 viewing pages 37 E editing math expressions 64 entering table data methods for 97 entering math expressions 60 evaluating math expressions 60 evaluating a math expression 63 evaluating math expression...

Страница 141: ... keyboard described 5 key functions 5 modifier keys 6 shortcuts 11 Keypad description 5 L language choosing 9 linked variable removing 51 linking table cell to a variable 51 values 45 linking variables 49 lists examples of 45 Lists Spreadsheet adding to a page 97 getting started with 93 M math expressions editing 64 entering and evaluating 60 selecting in Calculator 65 templates 23 math templates ...

Страница 142: ...to problems 34 copying to another document 38 copying to another problem 38 reordering in problems 37 38 viewing in documents 37 points of interest finding 87 precision of results 61 problem 25 adding to a document 34 copying page to 38 problems adding pages 34 adding to pages 34 Proof template using 120 Q Q A template using 120 R receiving documents from another user 54 relative cell references i...

Страница 143: ... entering data 97 moving a row or column 105 navigating in 97 selecting a row or column 103 working with cells 98 templates Proof 120 Q A 120 using 63 text formatting in Notes 121 selecting in Notes application 121 Text Tool 86 tool menus Graphs Geometry 69 108 toolbar Notes 117 using in Calculator 60 toolbar Graphs Geometry 69 108 toolbars Calculator 56 94 Tools Attributes 88 Axes Setting Graphs ...

Страница 144: ... 51 rules for naming 47 sharing with other applications 45 types 45 using 50 Variables Tool 46 50 View Menu tools Graphs Geometry 72 W Wizards using 23 work areas 25 X x min x max y min y max 84 Z zeroes finding 87 ...

Отзывы: