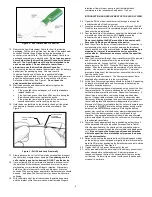
Terumo Azur CX 35 Скачать руководство пользователя страница 16

- 2 -

Figure 1


– Diagram of Azur System Setup 

PREPARATION FOR USE 

1.

Refer to Figure 1 for the set-up diagram.

2.

Attach a rotating hemostatic valve (RHV) to the hub of the guiding
catheter.  Attach a 3-way stopcock to the side arm of the RHV
and then connect a line for continuous infusion of flush solution.

3.

Attach a second RHV to the hub of the microcatheter.  Attach a 1-
way stopcock to the sidearm of the second RHV and connect the
flush solution line to the stopcock.

4.

Open the stopcock and flush the microcatheter with sterile flush
solution and then close the stopcock.  To minimize the risk of
thromboembolic complications, it is critical that a continuous
infusion of appropriate sterile flush solution be maintained into the
guide catheter, the femoral sheath and the microcatheter.

CATHETERIZATION OF THE LESION 

5.

Using standard interventional procedures, access the vessel with
a guide catheter.  The guide catheter should have an inner
diameter (ID) large enough to allow for contrast injection while the
microcatheter is in place.  This will allow for fluoroscopic road
mapping during the procedure.

6.

Select a microcatheter with the appropriate inner diameter.  After
the microcatheter has been positioned inside the lesion, remove
the guidewire.

COIL SIZE SELECTION

7.

Perform fluoroscopic road mapping.

8.

Measure and estimate the size of the lesion to be treated.

9.

At the discretion of the physician, one or more Azur Framing Coils
(platinum 3D coils) may be used to establish an initial framework.

10. For aneurysm occlusion, the diameter of the first and second coils

should never be less than the width of the aneurysm neck or the
propensity for the coils to migrate may be increased.

11. For vessel occlusion, select a coil size that is slightly larger than

the vessel diameter.

12. Correct coil selection increases effectiveness and patient safety.

Occlusive efficiency is, in part, a function of compaction and
overall coil mass.  In order to choose the optimum coil for any
given lesion, examine the pre-treatment angiograms.  The
appropriate coil size should be chosen based upon angiographic
assessment of the diameter of the target or parent vessel,
aneurysm dome and aneurysm neck.

PREPARATION OF THE AZUR


SYSTEM FOR DELIVERY

Figure 2 

– Azur Detachment Controller 

13. Remove the Azur Detachment Controller from its protective

packaging. Pull the white pull-tab from the side of the detachment
controller. Discard the pull-tab and place the detachment

Содержание Azur CX 35

Страница 1: ...gle use only Do not reuse reprocess or resterilize Reuse reprocessing or resterilization may compromise the structural integrity of the device and or lead to device failure which in turn may result in...

Страница 2: ...timate the size of the lesion to be treated 9 For aneurysm occlusion the diameter of the first and second coils should never be less than the width of the aneurysm neck or the propensity for the coils...

Страница 3: ...otating the delivery pusher may result in a stretched coil or premature detachment of the coil from the delivery pusher which could result in coil migration Angiographic assessment should also be perf...

Страница 4: ...ction including but not limited to the transmission of infectious disease s from one patient to another Contamination of the device may lead to injury illness or death of the patient Batteries are pre...

Страница 5: ...age or expense directly or indirectly arising from the use of this device Terumo neither assumes nor authorizes any other person to assume for it any other or additional liability or responsibility in...

Страница 6: ...use reprocess or resterilize Reuse reprocessing or resterilization may compromise the structural integrity of the device and or lead to device failure which in turn may result in patient injury illnes...

Страница 7: ...will allow for fluoroscopic road mapping during the procedure 6 Select a microcatheter with the appropriate inner diameter After the microcatheter has been positioned inside the lesion remove the guid...

Страница 8: ...the introducer sheath Excessive tightening could damage the device 23 Push the coil into the lumen of the microcatheter Use caution to avoid catching the coil on the junction between the introducer s...

Страница 9: ...e risk of aneurysm or vessel rupture Do NOT advance the delivery pusher once the coil has been detached 43 Verify the position of the coil angiographically through the guide catheter 44 Additional coi...

Страница 10: ...not limited to any implied warranties of merchantability or fitness for particular purpose Handling storage cleaning and sterilization of the device as well as factors relating to the patient diagnos...

Страница 11: ...ation of the device and or cause patient infection or cross infection including but not limited to the transmission of infectious disease s from one patient to another Contamination of the device may...

Страница 12: ...e may be increased For vessel occlusion it is suggested that the diameter of the initial coil placed be slightly larger than the actual vessel diameter to prevent displacement or migration For aneurys...

Страница 13: ...catheter tip from moving away from the intended delivery location 20 Once the coil has been deployed and prior to removing the delivery catheter advance the guidewire through the catheter tip to verif...

Страница 14: ...sequential loss damage or expense directly or indirectly arising from the use of this device Terumo neither assumes nor authorizes any other person to assume for it any other or additional liability o...

Страница 15: ...device and or lead to device failure which in turn may result in patient injury illness or death Reuse reprocessing or resterilization may also create a risk of contamination of the device and or caus...

Страница 16: ...er with the appropriate inner diameter After the microcatheter has been positioned inside the lesion remove the guidewire COIL SIZE SELECTION 7 Perform fluoroscopic road mapping 8 Measure and estimate...

Страница 17: ...ppropriately sized coil Movement of the coil may indicate that the coil could migrate once it is detached DO NOT rotate the delivery pusher during or after delivery of the coil into the vasculature Ro...

Страница 18: ...of the patient Batteries are pre loaded into the Azur Detachment Controllers Do not attempt to remove or replace the batteries prior to use After use dispose of the Azur Detachment Controller in a man...

Страница 19: ...not be liable for any incidental or consequential loss damage or expense directly or indirectly arising from the use of this device Terumo neither assumes nor authorizes any other person to assume for...

Страница 20: ...PD110323 Rev A 1 MicroVention Inc Instructions for Use Detachable...

Страница 21: ...sitioned in the vessel or aneurysm within the specified reposition time from the time the device is first introduced into the microcatheter If the coil cannot be positioned and detached within this ti...

Страница 22: ...ation replace the device If the green light remains solid green for the entire three second observation continue using the device 15 Hold the device just distal to the shrink lock and pull the shrink...

Страница 23: ...The coil implant has been determined to be MR conditional according to the terminology specified in the American Society for Testing and Materials ASTM International Designation F2503 08 Non clinical...

Отзывы: