background image


2.  AXON in combination with a software sequencer (here: Cubase 4) 

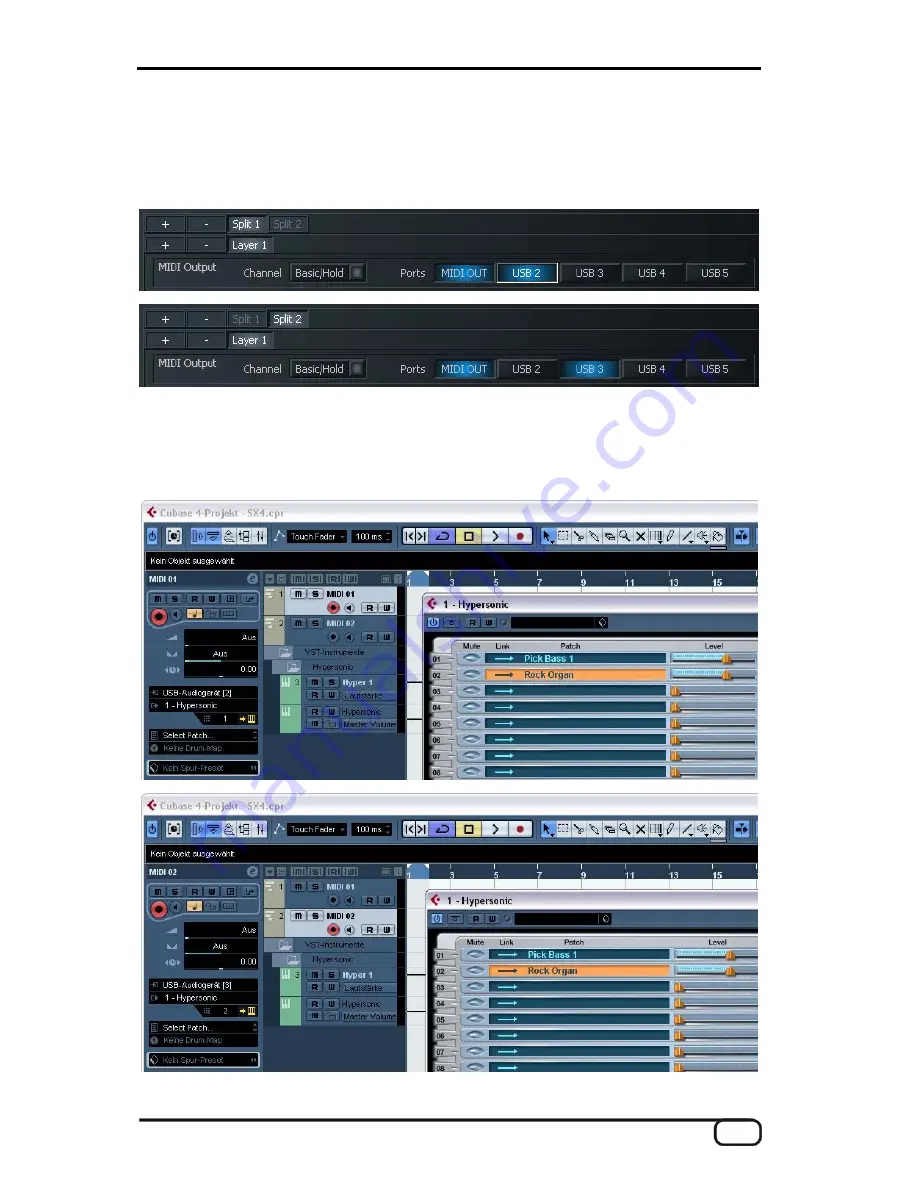
In our example, we are using Cubase 4 to describe the use of the virtual MIDI ports and 
the possibilities they present. Let's start by dividing the fingerboard into two split zones, 
assigning Split 1 to the USB 2 port and Split 2 to USB 3. 


In Cubase, select the MIDI input for each track. Assign track MIDI 01 to the input USB 
audio device [2], and track MIDI 02 to USB audio device [3]. Now you can change the 
assigned sound simply by switching the track, without the need for any changes on the 
AXON. 


AXON AX 50 USB v2.0 (English) 

31 

Содержание AXON AX 50 USB

Страница 1: ...AXON AX 50 USB English Manual Version 2 0 January 2008...

Страница 2: ...nufacturer reserves the right to change the contents of this document and or the associated products at any time without the provision of prior notice to specific persons or organisations The manufact...

Страница 3: ...unching the software for the first time 11 Tuning 12 The Computer Editor 13 Global 14 Global Parameters 14 Basic Channel 1 16 14 Pitchbend Range 0 24 15 Tunebase 99 99 15 Guitar Number 1 8 15 Guitar 1...

Страница 4: ...t 1 Split 2 Split 12 22 Layer Layer 1 Layer 4 24 MIDI Output 24 Controller 25 Notes 26 MIDI Tuning 27 CC Defaults 28 Controller reset values 28 MIDI Mapping 29 Program Change commands 29 Practical Exa...

Страница 5: ...ur AXON Technologies Team Scope of delivery Start by making sure that the contents of the package are complete The AXON AX 50 USB package should contain the following items 1 AXON AX 50 USB 1 USB cabl...

Страница 6: ...o date This is due to the AXON s unusual splitting options For example you can use a string split to divide the strings of your guitar into two zones each with its own sound properties Or use a fret s...

Страница 7: ...an external MIDI instrument for audio output connect the MIDI OUT of the AXON to the MIDI IN of the instrument Connect your guitar to the AXON AX 50 USB Your guitar must be equipped with one of the in...

Страница 8: ...mode Press the button briefly to activate this mode Pressing the button again will return it to preset mode FIRMWARE UPDATE Press the Tuner button and hold it for around 3 seconds while the device is...

Страница 9: ...THRU All data arriving at MIDI IN is available in unchanged form here 5 MIDI OUT All MIDI data generated by your AXON AX 50 USB is available here 6 INST OUT The normal unmodified pickup signal of your...

Страница 10: ...the autorun application to launch If the autorun application on the CD does not launch automatically start the application manually by double clicking Autorun exe in the root folder of the CD 2 Select...

Страница 11: ...f parame ters and lets you configure the AXON via the editor software You can also transfer MIDI data to your computer directly via the USB port Stand alone mode the AXON is not configurable in this m...

Страница 12: ...mitones such as F or G an additional bar will be displayed in the middle character followed by the indication of whether the string s pitch is too high or low The information is shown as symbols cov e...

Страница 13: ...g up the connection with the editor If you have other USB devices connected to your computer their numbers will be in pa rentheses rather than square brackets 1 USB audio device AXON AX 50 USB virtual...

Страница 14: ...nerated by the AXON from the vibrations of your guitar strings to the sound module or MIDI instrument Ideally a MIDI channel is assigned to each string see STRING MODE SEPARATE This has the advantage...

Страница 15: ...ither direction Strictly speaking 100 cents are a semitone but let s not get carried away All MIDI notes generated by your AXON are based on the refer ence frequency of 440 Hz plus or minus a deviatio...

Страница 16: ...h acoustic guitars An important advantage for guitarists is that piezo pickups which can be installed invisibly in the bridge of the instrument can also be used on instruments with nylon strings such...

Страница 17: ...ction control the sensitivity of the inputs at the A D converter The scale ranges from 8 to 64 with 64 being the highest sensitivity For best results set this value to the highest possible value witho...

Страница 18: ...before you start Hold the TUNE button while switching on the power of the AXON AX 50 USB UPD will appear in the display The ID of the device changes while in update mode causing Windows to recognise...

Страница 19: ...12 completely different split areas that can be combined freely Countless effects and playing parameters can be as signed to each of the splits independently Preset Management Get Preset calls up the...

Страница 20: ...MIDI instrument can only receive on one MIDI channel Also not all sequencer pro grams support recording multiple channels at the same time You should also select this mode in this case Wheel Controll...

Страница 21: ...en no longer have an effect Your AXON does not do this as it would re sult in an enormous increase in MIDI data These controllers are reset to NULL when changing presets or changes to the NRPN RPN its...

Страница 22: ...tiple splittings For example if a simple string split is selected this is displayed as follows The settings now only apply to the three low strings Switching to Split 2 inverts the dis play and the se...

Страница 23: ...ets 1 through 3 will be assigned to the right split zone while frets 4 and up will belong to the left split zone Pick Split 1 and 2 0 99 faders at the pickups if you are using pick split options in yo...

Страница 24: ...selected chan nels are displayed immediately to the left of the fingerboard graphic Ports MIDI OUT USB 2 5 select the destination virtual MIDI ports here These can be set separately for each layer in...

Страница 25: ...t the PAN POS value to MID middle posi tion for example Play your guitar and vary the PAN SPREAD value Please note that your MIDI instrument must be able to support panorama information Please refer t...

Страница 26: ...pitch changes within the set pitchbend range will be realised continuously or stepwise quantised Auto If more than one note is played pitchbend quantisation is enabled automati cally Chords are thus...

Страница 27: ...to raise or lower the overall volume MIDI Tuning Unlike the tuning on the GLOBAL page this has nothing to do with the actual tuning of your instrument but with what you want to hear in the end An exa...

Страница 28: ...wide range of free controllers are avail able that manufacturers can use as they see fit so your AXON lets you set default values for all available controllers The table is already filled with defaul...

Страница 29: ...d to any AXON presets using this mapping table By default a Program Change command will select the AXON preset with the same program number To chan ge this setting select the desired preset from the d...

Страница 30: ...E VI is launched a so called multi instrument GM nkm is loaded automatically The player then responds to all incoming program change commands let ting you select the sounds you need in the AXON Editor...

Страница 31: ...by dividing the fingerboard into two split zones assigning Split 1 to the USB 2 port and Split 2 to USB 3 In Cubase select the MIDI input for each track Assign track MIDI 01 to the input USB audio de...

Страница 32: ...e Sibelius G7 Again in this case it s only necessary to select the input device Select the Play Devices menu item to open the dialog box shown below Select the input devices USB audio de vice 2 USB au...

Страница 33: ...gerboard 1 3 5 7 9 12 E F F G G A A B c c d d e A A B c c d d e f f g g a d d e f f g g a a b c1 c 1 d1 g g a a b c1 c 1 d1 d 1 e1 f1 f 1 g1 b c1 c 1 d1 d 1 e1 f1 f 1 g1 g 1 a1 a 1 b1 e1 f1 f 1 g1 g 1...

Страница 34: ...al B string 2 6 Analog signal G string 3 7 Analog signal D string 4 8 Analog signal A string 5 9 Analog signal E string 6 10 Analog magnetic pickup signal 11 Direct current volume 12 N C 13 Down butto...

Страница 35: ...o No 2 MIDI Timing and Synchronization MIDI Clock Yes No No No Song Position Pointer Yes No No No Song Select Yes No No No Start Yes No Continue Yes No Stop Yes No No No No No No No MIDI Time Code Yes...

Страница 36: ...18 General Purpose Controller 3 MSB No No 19 General Purpose Controller 4 MSB No No 20 No No 21 No No 22 No No 23 No No 24 No No 25 No No 26 No No 27 No No 28 No No 29 No No 30 No No 31 No No 32 Bank...

Страница 37: ...er 7 No No 83 General Purpose Controller 8 No No 84 Portamento Control No No 85 No No 86 No No 87 No No 88 No No 89 No No 90 No No 91 Reverb Send Level No No 92 Effects 2 Depth No No 93 Chorus Send Le...

Страница 38: ...ume control ensure that Wheel Controller is disabled in the instrument setup on the Global page Ensure that the 3 position switch of the pickup is not set to Guitar as that would set the MIDI volume t...

Страница 39: ...s too loud or soft in relation to the others Possible source of problem the sensitivity of the individual strings is not set correctly or the spacing between the pickup and strings is not even Solutio...

Отзывы: