When installing the PSoC Power Management EBK software, the installer checks if your system
has the required software. This includes PSoC Creator, PSoC Programmer, Windows Installer, .NET
framework, Adobe Acrobat Reader, and KEIL Compiler. If these applications are not installed, then
the installer prompts you to install all pre-requisite software, which is also available on the kit CD.
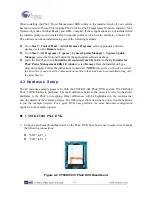
The software can be uninstalled using one of the following methods:
z
Go to
Start > Control Panel > Add or Remove Programs
; select appropriate software
package; select the
Remove
button.
z
Go to
Start > All Programs > Cypress > Cypress Update Manager > Cypress Update
Manager
; select the Uninstall button for the appropriate software package.
z
Insert the kit CD and click
Install the kit contents from CD
button. In the
CyInstaller for
PSoC Power Management EBK 1.0 window
, select
Remove
from the Installation Type
drop-down menu. Follow the instructions to uninstall. (
NOTE:
this method will only un install
the kit software and not all the other material/software that may have been installed along with
the kit software
)
4.3
Hardware Setup
The kit includes example projects for both the CY8CKIT-001 PSoC DVK and the CY8CKIT-030
PSoC 3 DVK hardware platforms. The main difference between the projects for the two hardware
platforms is the PSoC pin mapping. Other differences will be highlighted in the sections that
describe details of the example projects. The following sections describe how to set up the hardware
to run the example projects. For a given DVK base platform, the same hardware configuration
applies to both example projects.
CY8CKIT-001 PSoC DVK
1.
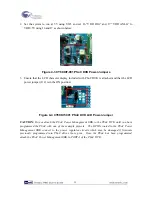
Using the pin header/breadboard area of the PSoC DVK base board, use jumper wires to make
the following connections:
z
“SW1” to P1_4
z
“SW2” to P1_5
Figure 4-2 CY8CKIT-001 PSoC DVK Breadboard
14
Содержание CY8CKIT-035
Страница 1: ......
Страница 38: ...Chapter 5 Schematics 5 1 Primary 12V Power Input 37 ...
Страница 39: ...5 2 DVK Connector and Debug Test Points 5 3 Voltage Regulator V1 5V 38 ...
Страница 40: ...5 4 Voltage Regulator V2 3 3V 5 5 Voltage Regulator V3 2 5V 5 6 Voltage Regulator V4 1 8V 39 ...
Страница 41: ...5 7 I2C SMBus PMBus Interface Connector 5 8 Layout 5 8 1 Top Layer 40 ...
Страница 42: ...5 8 2 Ground Layer 5 8 3 Power Layer 41 ...
Страница 43: ...5 8 4 Bottom Layer 42 ...
Страница 44: ...5 8 5 Top Silkscreen 43 ...


