background image


www.tekvox.com 

ShareView Wireless 

79060-WPS User Manual 

Table of Contents 


1. Product Introduction .................................................................................................................... 8


1.1 Features ............................................................................................................................................... 8


1.1.1 WMS-10 & WMS-20/WMS-40: ................................................................................................... 8


1.1.2 WMT2-C/WMT-Mini/WMT3-H/WMT3-HC: .............................................................................. 8


2. Specifications .............................................................................................................................. 9


3. Panel Layout .............................................................................................................................. 10


3.1 Hardware Interface ........................................................................................................................... 10


3.1.1 WMS-10/20/40 Front Panel .................................................................................................... 10


3.1.2 WMS-10 & WMS-20/40 Rear Panel ......................................................................................... 12


3.1.3 Factory Reset ............................................................................................................................ 14


3.1.4 Dongle Front Panel................................................................................................................... 16


3.2 Software Interface ............................................................................................................................ 20


3.2.1 Home Screen ............................................................................................................................ 20


4. Installation ................................................................................................................................. 22


4.1 Installation methods for the base unit ............................................................................................ 22


4.2 Wiring Diagram .................................................................................................................................. 24


4.3 Power Connection ............................................................................................................................. 24


4.3.1 How to connect the external power adapter ......................................................................... 24


4.3.2 Power over Ethernet................................................................................................................. 25


4.4 Video Connection .............................................................................................................................. 25


4.5 Audio Connection .............................................................................................................................. 26


4.5.1 Audio via HDMI output............................................................................................................. 26


4.5.2 How to connect separate audio .............................................................................................. 26


4.5.3 Sound is not sent out ............................................................................................................... 27


4.5.4 PC/Laptop Sound ..................................................................................................................... 27


4.6 LAN Connection ................................................................................................................................ 28


4.7 Usage of USB Device ........................................................................................................................ 29


4.7.1 USB control ............................................................................................................................... 29


Содержание 79060-WPS

Страница 1: ...www tekvox com ShareView Wireless 79060 WPS User Manual ShareView Wireless Wireless AV Content Sharing BYOD collaboration System Quad Viewer All Rights Reserved Version 79060 WPS_2020V2 0...

Страница 2: ...C Statement This equipment generates uses and can radiate radio frequency energy and if not installed and used in accordance with the instructions may cause harmful interference to radio communication...

Страница 3: ...to rain moisture or install this product near water Do not put any heavy items on the product s power cable Do not remove the housing of the device as opening or removing housing may expose you to da...

Страница 4: ...ctory Reset 14 3 1 4 Dongle Front Panel 16 3 2 Software Interface 20 3 2 1 Home Screen 20 4 Installation 22 4 1 Installation methods for the base unit 22 4 2 Wiring Diagram 24 4 3 Power Connection 24...

Страница 5: ...le Devices 38 5 3 6 Sharing on iOS Devices 41 5 4 Preview Window 41 5 5 Whiteboard Annotation 43 5 5 1 How to Start Whiteboard or Annotation Mode 44 5 5 2 Whiteboard 44 5 5 3 Annotation 46 5 5 4 Downl...

Страница 6: ...ing 75 6 7 Other Settings 76 6 7 1 Auto Create Launcher 76 6 7 2 Clear History After Meeting 76 7 Updating Wireless Media 77 7 1 Check Current Firmware Information 77 7 1 1 Windows OS 77 7 1 2 MAC OS...

Страница 7: ...ptop without Dongle 93 8 1 7 Options for Apple MacOS MacBook Extended Screen 94 8 2 Transmitting IOS Mobile Device 95 8 2 1 How to use AirPlay 95 8 3 Transmit Android Device Wireless 95 8 3 1 Wireless...

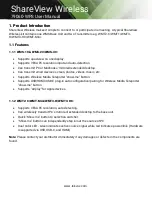
Страница 8: ...os videos music etc Supports Wireless Media Teleporter show me button Supports USB HDMI USB C plug in auto configuration pairing for Wireless Media Teleporter show me button Supports Airplay for Apple...

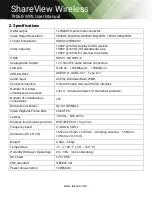
Страница 9: ...0 x1 USB 2 0 x1 Type C x1 Audio Input AirPlay Windows MAC WMH Control connectors 3 5mm Phoenix terminal RS232 interface Number of window simultaneous on screen 4 14 4 main windows 14 thumbnail window...

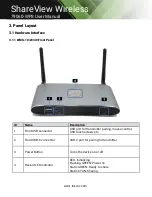
Страница 10: ...D Name Description 1 Front USB connector USB port for transmitter pairing mouse control USB touch screen etc 2 Front USB C connector USB C port for pairing to transmitter 3 Power Button Turns the devi...

Страница 11: ...mirroring to the screen by plugging in the dongle The USB port is used for connecting a USB based touch screen to create upgrade Launcher by clicking the Download button hide SSID PASS Wi Fi IP and L...

Страница 12: ...www tekvox com ShareView Wireless 79060 WPS User Manual 3 1 2 WMS 10 WMS 20 40 Rear Panel...

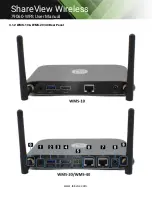
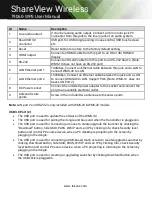
Страница 13: ...to this socket and connect the plug to an available electrical outlet 9 Antenna fixture points Screw in the included two antennae to these two ports Note LAN port 2 and RS 232 is only included with WM...

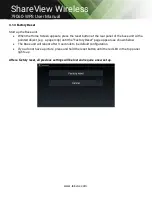
Страница 14: ...l of the base unit with a pointed object e g a paper clip until the Factory Reset page appears as shown below The Base unit will reboot after 3 seconds to be default configuration If you do not have a...

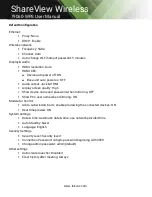
Страница 15: ...uality High Show device name and password when mirroring OFF Show PCs user name when mirroring ON Moderator Control Add a sub window bar to enable previewing the connected devices ON Real time preview...

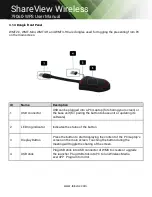
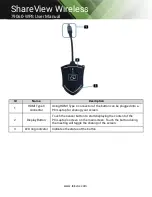
Страница 16: ...n or the base unit for pairing the button to base unit or updating its software 2 LED ring indicator Indicates the status of the button 3 Display Button Press the button to start displaying the conten...

Страница 17: ...upgrading of the button in the Base Unit is in progress When LED indicator is off no light it indicates 1 the button is not plugged in the PC Laptop 2 the button is defective 3 the USB port or comput...

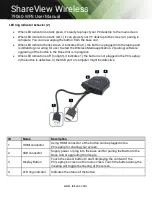
Страница 18: ...ctor of the button can be plugged into a PC Laptop for sharing your screen 2 Display Button Touch the sensor button to start displaying the content of the PC Laptop s screen on the main screen Touch t...

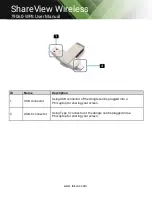
Страница 19: ...er Manual ID Name Description 1 USB connector Using USB connector of the dongle can be plugged into a PC Laptop for sharing your screen 2 USB C connector Using Type C connector of the dongle can be pl...

Страница 20: ...rnal access point is enabled Wi Fi Infrastructure mode Client Mode Wi Fi connection to router is established icon displays the current signal strength A secure Wi Fi connection is established or conne...

Страница 21: ...displayed level are displayed in detail by clicking on the icon the settings can only be changed by an administrator in the webserver console setting menu 10 Download Button Creating upgrading Launche...

Страница 22: ...ring Diagram 4 1 Installation methods for the base unit Introduction to the installation methods The Base unit can be installed in different ways in a meeting room Table mount Wall mount The articulat...

Страница 23: ...ented vertically perpendicular to the ceiling and parallel to the walls The antennas should be installed far enough at least 50cm 1 6ft from metallic surfaces to avoid unwanted reflections and far eno...

Страница 24: ...ct the external power adapter 1 Plug the power connector to the power adapter to the power input connector of the Base Unit 2 Choose the appropriate power plug US to be installed on the power adapter...

Страница 25: ...using the external power adapter WMS 40 LAN2 Port supports POE 4 4 Video Connection 1 Connect the HDMI Output of base unit to a 4K or Full HD display via HDMI cable 2 Connect the power adapter to the...

Страница 26: ...s up to the user to decide whether or not to send the audio signal together with the video signal 4 5 1 Audio via HDMI output When your display projector is connected via HDMI and it supports audio wi...

Страница 27: ...dia setting tab 4 5 4 PC Laptop Sound As default set Wireless Media will mute the internal speaker of PC and route the audio to the base unit after PC is successfully projecting the desktop to the mai...

Страница 28: ...the Internet 1 Connect a network cable with RJ 45 connector into the LAN port of Base Unit 2 Connect the other side to LAN 3 If the LAN Ethernet switcher support PoE Power over Ethernet it will power...

Страница 29: ...ing a presentation Wireless Media transmits Video Audio and the USB HID function for mouse control and click function of a touchscreen Connect touch interface of your screen to the USB port on your la...

Страница 30: ...t the WMS and mobile both in LAN network and to discover and connect to WMS After Factory reset Wireless Media starts in standard configuration Wireless Direct Mode Linked Single Network where the bas...

Страница 31: ...nable LAN Connection Be sure the WMS is connected to the Network When Local IP shows an active IP address such as 192 168 3 32 it indicates WMS is successfully connected to the LAN and has an appointe...

Страница 32: ...ering the Main menu on webserver console is admin 5 2 Pairing Transmitter with Base Unit 1 Connect the USB of WMT2 C to either of the 2xUSB port of WMS WMT mini to USB port type C port WMT3 H HDMI don...

Страница 33: ...below 4 After completing the pairing the message table shows Succeeded to pair on the home page as shown below Then un plug the transmitters and use it for the projecting onto your laptop If error me...

Страница 34: ...op WirelessMedia macOS app for Macbook user manual and WMedia2 apk Plug the USB stick into the USB port of your PC or laptop to copy the relative Launcher as above to PC or laptop Continue with step 4...

Страница 35: ...ly after the plug in of the dongle but requires users to manually click and execute the WirelessMeida pro exe every time 5 3 2 WMT Mini 1 Plug WMT mini into USB USB C port to pair with base unit The W...

Страница 36: ...ox com ShareView Wireless 79060 WPS User Manual 3 It will show Ready to share click to share the desktop to screen Note For second time users WMT mini will automatically share screen no need to click...

Страница 37: ...base unit to pair 2 Plug USB port and HDMI port of WMT3 H USB C port of WMT3 HC to PC Laptop MacBook USB port for power 3 Once the transmitter LED turns static green touch to share the screen or click...

Страница 38: ...irelessMedia application 2 Connect your mobile device to one of the displayed Wi Fi networks 3 Open the WirelessMedia2 application in your mobile device and you will see the Home Page of WirelessMedia...

Страница 39: ...e pairing it shows OSD Welcome on the home page For example if connected by a HUAWEI PLA AL00 it shows a Welcome HUAWEI PLA AL00 on screen as shown below 6 Now you can project your desktop of your mob...

Страница 40: ...eless 79060 WPS User Manual 9 Click Fullscreen to be full screen in the main screen when more than one signal is connected and shared 10 Click the upper right corner icon check the WirelessMedia2 appl...

Страница 41: ...he target WMS to start projecting through the WMS to the main screen It will show OSD on home screen after connecting successfully 5 4 Preview Window At touch screen or with mouse of Base unit you can...

Страница 42: ...s his picture at the main screen in full format A red frame is shown for the active picture The button indicates play button click to show screen The button indicates step out screen click to stop mir...

Страница 43: ...makes collaboration in your business more productive and effective Documents can be easily written edited captured and shared Whiteboard write all your ideas and share the digital notes with anybody...

Страница 44: ...nit SSID password Wi Fi IP and Lan IP address when some device are sharing on main screen This info will show on main screen at least 20s then will disappear automatically In order to let other attend...

Страница 45: ...step backward in changes Redo one step forward in changes Erase part of drawings or annotation change diameter by a longer tap Clear the entire drawing writing on the screen Pen allows writing drawin...

Страница 46: ...d on local storage WMN File options Open WMN file from local storage and continue edit an older project New project Save as WMN on local storage in unit it will be erased after POWER OFF Import from U...

Страница 47: ...ard to go back to Home screen actual project can be saved on local storage WMN Close Whiteboard to go back to Home screen Save the current screenshot on local storage PNG 5 5 4 Download the Drawings t...

Страница 48: ...tion Connect base unit ID Password or LAN IP to PC and enter Wi Fi IP browser page to configure settings of base unit The WirelessMedia windows exe and WirelessMedia Pro exe for windows PC WirelessMed...

Страница 49: ...er to enter into menu to configure A password is required to enter the configuration menu The default password after Reset is admin You can change the password in menu Security setting Note If a user...

Страница 50: ...ew Wireless 79060 WPS User Manual The main interface of Settings is shown below including Network settings Display Audio Moderator control System settings Security settings Firmware upgrade Other sett...

Страница 51: ...a user to create a custom configuration for integration of Wireless Media into the existing wireless infrastructure in larger organizations Segmented Dual Network provides two segmented routing ways t...

Страница 52: ...1 1 Wireless Network Configuration Wizard Enter a device name for the Base unit We recommend a descriptive name The default name is WMS XXXX Only a z A Z 0 9 _ and space are legal characters Click Nex...

Страница 53: ...ectly to it Guests and Staff use the internal Wi Fi access point of Base unit to present with all their units No Internet access is required The LAN Port of Base unit is not connected PC users can pre...

Страница 54: ...se 5G channel system will choose proper channel automatically Default is 5 GHz channel Auto Default channel USA area 36 40 44 48 or 149 153 157 161 Four channels will be opened at the same time system...

Страница 55: ...rk of Wireless Media provides two separated routing ways to connect to the Base unit at same time Guest users are not able to access any resource on the Ethernet of the company Wireless Media uses the...

Страница 56: ...Media Follow the instructions of the configuration wizard for Wireless infrastructure mode When pairing the dongles plugging the dongle in the USB port of the Base unit will automatically pair to the...

Страница 57: ...via LAN Choose a LAN network which is used for the company staff users Note usually in this mode dongle paired for internal staff usage Select SSID Choose a wireless network to connect to base unit fo...

Страница 58: ...WPS User Manual Click Next step to edit or change Guest network SSID and Staff network SSID Wi Fi name of guest and staff will be shown on home screen after Submit settings After submitting successful...

Страница 59: ...ox com ShareView Wireless 79060 WPS User Manual 6 1 2 Ethernet Configure the Ethernet settings WMS 40 has 2 LAN port if the base unit is connected with 2 LAN cable you can configure as shown in the ta...

Страница 60: ...Wi Fi of a mobile unit Users do not need to re pair the dongle again if only the password is changed A Smart mobile device has to enter the correct SSID and password to connect to the Base unit access...

Страница 61: ...n Select the resolution at HDMI output of Base unit Existing HDMI output resolution as below Auto 3840x2160 30Hz 3840x2160 60Hz 3840x2160 50Hz 1920x1080 60Hz 1920x1080 50Hz 1920x1080 30Hz Note if the...

Страница 62: ...ction Device auto power off o ON Default Display will automatically turn off when base unit is powered off o OFF Display will not automatically turn off when base unit is powered off Base unit auto po...

Страница 63: ...Wireless 79060 WPS User Manual 6 2 2 Audio Choose audio output Jack output only 3 5mm mini jack audio HDMI output only HDMI audio Jack HDMI Default output Jack HDMI audio Volume User can select volume...

Страница 64: ...ick to select the image quality when transmitting from an Apple device via AirPlay mode 6 2 4 Screen Display ID Show device name and password when mirroring Name ID and Wi Fi password can be shown or...

Страница 65: ...ackground image of the Home screen Select the image jpg bmp png gif with resolution 1920x1080 p from suitable directory and activate box for selection You can return to Standard Home screen any time 6...

Страница 66: ...www tekvox com ShareView Wireless 79060 WPS User Manual If you do not click the icon the preview window bar will be minimized as below...

Страница 67: ...g the icon the preview window will show a real time preview Otherwise the preview window will only show a static picture as seen below 6 4 System Settings 6 4 1 Buttons Show Device name MAC Address Se...

Страница 68: ...ate Set time and Select time zone Automatic date time Check to use an NTP time server to provide time as system time Set date Click in the input field to fill out the appropriate date Set time Click i...

Страница 69: ...www tekvox com ShareView Wireless 79060 WPS User Manual...

Страница 70: ...last dongle was plugged out or Wi Fi of a mobile unit was disconnected or there is no operation at the system Time is selectable from Never to 30 minutes In Standby green LED in top of Base unit is fl...

Страница 71: ...www tekvox com ShareView Wireless 79060 WPS User Manual 6 4 4 Language Select an installed display language...

Страница 72: ...Reset Using factory reset to restore unit 6 4 6 Configuration File Configuration File is a packaged file which contains all the configuration parameters of the WMS which can be downloaded and copied...

Страница 73: ...any organization such as in a classroom regular meeting room etc Level 2 Higher security provides increased security for companies organizations government agencies etc through powerful encryption of...

Страница 74: ...ebserver The default password or after a RESET is admin You can change the password as you see fit You can also deactivate the password entry set the appropriate checkmark and Confirm settings 6 5 3 C...

Страница 75: ...ew Wireless 79060 WPS User Manual 6 6 Firmware Upgrade 6 6 1 Firmware Update To upload local updating files to upgrade base unit 6 6 2 Automatic Upgrading Click to choose upgrading from OTA via Intern...

Страница 76: ...Base unit Enable or disable the corresponding box 6 7 2 Clear History After Meeting Pictures videos music of mobile units will be stored in memory of the Base unit This memory can optionally be erase...

Страница 77: ...d also There are up to three different areas for updating Firmware Base unit Firmware dongle and Launcher for PC Laptop or MAC WirelessMedia exe All software is stored in the Base unit to be transferr...

Страница 78: ...er Manual 7 1 2 MAC OS Dongle Launcher Firmware version can be viewed in the WirelessMedia app program icon in MAC OSX status bar by clicking the WirelessMedia icon and select About as shown below Cli...

Страница 79: ...firmware or Launcher firmware are an older version or don t match with the base unit version it shows a WirelessMedia ATTENTION alert message box in the window OS or MAC OSX as below When mismatching...

Страница 80: ...Media recognizes the update img file on a plugged in USB stick automatically and starts the FullUpdate procedure You can unplug the USB stick within 10 seconds to stop the update Note Do not disconne...

Страница 81: ...eset 5 The update of Base unit is now finished Second method to upgrade base unit The base unit can be upgraded via the webserver console menu as below Select an update img file to upgrade to target v...

Страница 82: ...rmat not NTSC format After upgrading the Base unit and Dongle the launcher should be updated with the actual launcher program for Windows MAC and Apps for mobile units There are 2 methods to update th...

Страница 83: ...ee pictures as below 2 Open Browser and enter Wi Fi IP 192 168 43 1 8000 3 Click to enter Launcher download webpage Shown as below 4 Choose and click Windows or MAC launcher to download 5 Find the Lau...

Страница 84: ...d Desktop functionality if it is needed This may require admin rights 7 5 Clean Leftover Files of Older Versions of Launcher Program in Laptop There may be some old version WirelessMedia files left in...

Страница 85: ...1 Mirroring PC Desktop You can operate Wireless Media for Windows optionally with or without Dongle If there are several participants in a meeting mixed operation is also possible 8 1 1 Extended Deskt...

Страница 86: ...transmitter button shows a static green LED indicator or when you see a Ready to share message click the transmission button to start mirroring 3 Click dongle or touch the visual button again to stop...

Страница 87: ...program is not yet installed on PC refer to chapter 7 4 2 Connect your laptop to the Wi Fi network displayed on the Home screen Guest Staff or connect to the LAN using a network cable 3 Double click t...

Страница 88: ...P address click icon Enter the corresponding base unit password press OK and the system is Ready to share 5 Click Ready to share in PC When window color is static red the screen is mirroring to the ma...

Страница 89: ...e software versions of the Base unit the dongle and the launcher program Exit Completely exit the App If you click the close button in the upper right corner of the app the app in the task bar is only...

Страница 90: ...creen 2 will always be displayed on the main screen For first time use of the Extended Screen function click Extended Screen which will present a message to indicate the installation of the ExtendedDi...

Страница 91: ...ape of mouse pointer is equal to its shape in the application There may be a small delay in movement of the cursor approx 150 ms The movement of mouse pointer is displayed very smooth with hardly noti...

Страница 92: ...dongle to the USB port of your Macbook The WirelessMedia application is starting automatically and a symbol is displayed in the dock and in top menu bar 4 When the transmitter button shows a static g...

Страница 93: ...ock icon 4 Enter base unit password and click connect and the system is Ready to share You can also manually connect by entering the name SSID or IP address click icon Enter the corresponding base uni...

Страница 94: ...est Latency Mouse The setting is applied individually for this laptop only The shape of mouse pointer is equal to its shape in the application There may be a small delay in movement of the cursor appr...

Страница 95: ...Fi of WirelessMedia Please open the control center on the desktop with the appropriate gesture Click the airplay icon on your Apply device and select the receiver device WMS to connect Now you can mir...

Страница 96: ...Wireless 79060 WPS User Manual 3 The main interface of WirelessMedia2 is shown below Click the device list refresh button which is shown below 4 Select the base unit you want to connect and then enter...

Страница 97: ...evice 7 Click the Share Screen button again to stop mirroring You can click my device to check the device status and firmware version 9 Wi Fi Recommendation Setting 9 1 Check Wi Fi Configuration on Ba...

Страница 98: ...se unit Reconnect the mobile by entering password showed on home screen The image quality on the main display screen isn t satisfactory The quality or length of the cable between the Base Unit and the...

Страница 99: ...Can t get Wireless Media to run when plugging the transmitter into laptop When you are using WirelessMedia for the first time on your laptop or for guests you have to copy the Launcher program Wirele...

Страница 100: ...showing HDCP source If possible connect the source device to local HDMI input at base unit The display cable HDMI is not correctly connected Insert the display cable to the display and the Base unit...

Страница 101: ...d password Enter the correct SSID No audio when transmit local file to Base Unit Unsupportive audio format including Dolby MS11 DDCO DTSLBR DTSE DTSNeoUltra SRS THEATERSOUND DTS_StudioSound3D DTS_HD I...

Страница 102: ...set too low on the mobile device Increase the volume on the mobile device There is no sound at main screen when mirroring a video by the App WirelessMedia for Android Due to the limit of the Android s...

Страница 103: ...PS User Manual b Streaming Videos Internet YouTube the image will not be displayed on the iOS device picture is jerky Can t work with Android device Operation System Requirement Android 2 3 and later...

Отзывы: