background image

4

Caring for Your Printer

4-10

Phaser 540 Color Printer

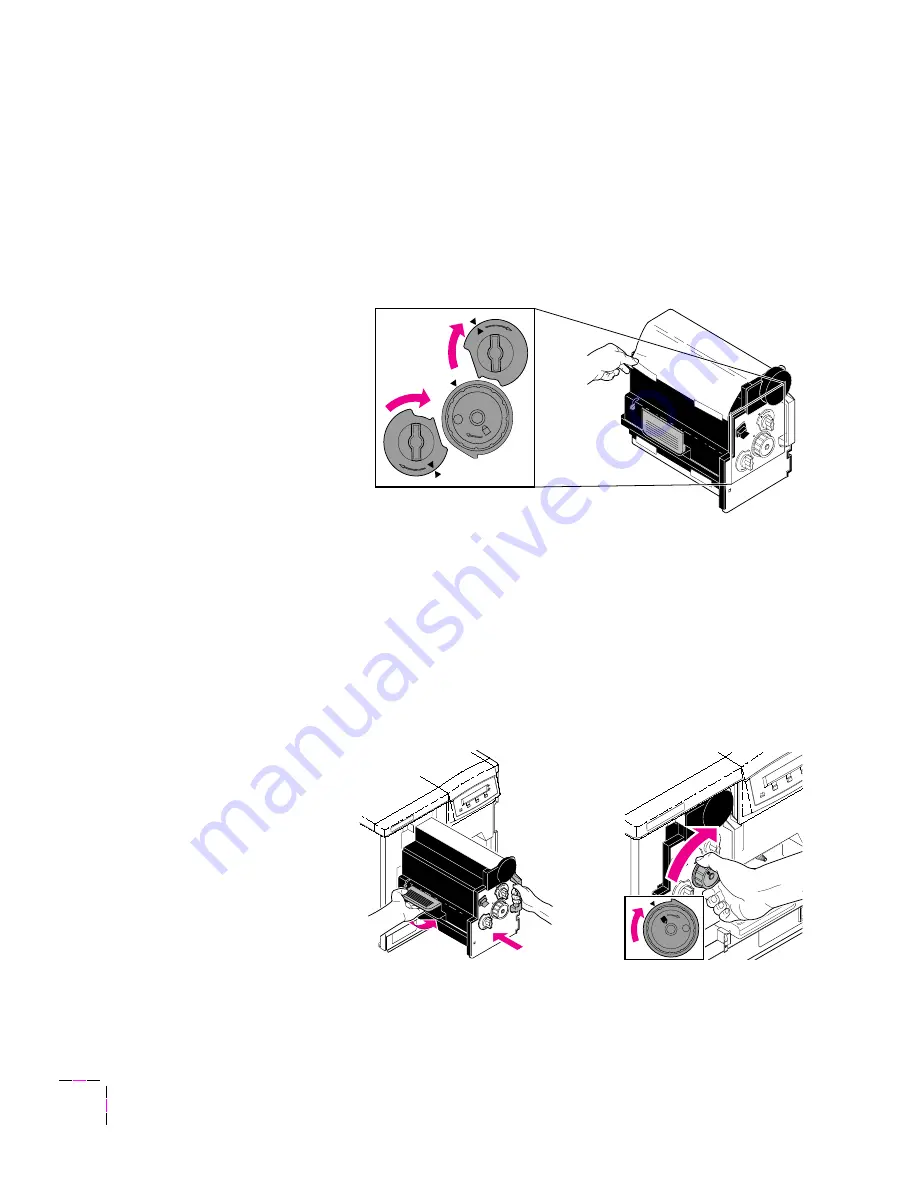
Insert the new imaging unit

1.

Turn the two small blue knobs clockwise to align the triangles.

2.

Remove the protective plastic sheet.

3.

Insert the new imaging unit into the printer, holding it by the 
blue handles.

4.

Release the left handle and slide the unit in until it stops.

5.

Turn the large blue knob clockwise to insert the imaging unit 
completely and to lock it.

6.

When properly installed, the lock icon aligns with the black 
triangle.

7.

Close the front door and turn the power on.

9008-38

LOCK

LOCK

1

1

2

9008-39

LOCK

LOCK

L

O

C

K

3

4

5

6

Содержание Phaser 540 Plus

Страница 1: ...ilable in the 540 Plus and the changes that apply to the Phaser 540 User Manual The Phaser 540 Plus provides all the features print modes and color matching capabilities of the Phaser 540 and uses the...

Страница 2: ...ull color image area the same as Legal Short but can also print monochrome with top and bottom margins of 23 in The following table and illustration show the page size the print area and the margins f...

Страница 3: ...ze tray can be ordered from your local Tektronix authorized reseller or directly from Tektronix the order number is 436 0314 00 The addition of the legal size paper tray affects references in Chapter...

Страница 4: ...arly two minutes in the time the printer takes to make the first print The printer s default print quality mode is now Fast saving nearly 40 seconds in the time to first print when Fast mode is select...

Страница 5: ...with a color sweep in the background This mode uses a custom halftone that improves color uniformity for shaded area fills The printer s other three modes are Fast Standard and Enhanced Fast is now th...

Страница 6: ...Print 1 in the front panel menu the printer produces four full pages of 25 tint coverage one for each color cyan magenta yellow and black The Phaser 540 Plus Quick Reference Card order number 063 218...

Страница 7: ...User Manual Phaser 540 Color Printer First printing February 1995 070 9008 01...

Страница 8: ...emark of Tektronix Inc TekColor is a trademark of Tektronix Inc Phaser is a trademark of Tektronix Inc for color printers and related products Adobe PostScript and IntelliSellect are trademarks of Ado...

Страница 9: ...nsible for paying any associated taxes or duties This warranty shall not apply to any defect failure or damage caused by improper use or improper or inadequate maintenance and care Tektronix shall not...

Страница 10: ...For example a panel may cover the hazardous area Also applies to a hazard to property including the product itself DANGER A personal injury hazard exists in the area where you see the sign Care of pro...

Страница 11: ...sverriegelung berbr ckt NICH DEM STRAHL AUSSETZEN ATTENTION Rayonnement laser invisible dangereux en cas d ouverture et lorsque la s curit est neutralis e EXPOSITION DANGEREUSE AU FAISCEAU Class 3B PE...

Страница 12: ...TS KAN ANV NDAREN UTS TTAS FOR OSYNLIG LASERSTR LING SOM VERSKRIDER GR NSEN FOR LASERKLASS 1 Apparaten skall anslutas till jordat uttag n r den ansluts till ett N tverk KLASS 1 LASER APPARAT Tekniska...

Страница 13: ...output tray 2 16 Adding paper or transparencies 2 17 Connecting the printer 2 20 Printer ports 2 20 Parallel connection 2 22 Phaser Share network and serial connections 2 23 SCSI connections 2 23 Turn...

Страница 14: ...correction 3 11 Selecting TekColor corrections from the front panel 3 12 Using color sampler charts 3 13 All about media 3 14 Margins and print area 3 15 Media trays 3 16 Selecting a media tray by loc...

Страница 15: ...4 Replacing the imaging unit 4 6 Remove the used imaging unit 4 6 Unpack the new imaging unit 4 8 Clean the sensor 4 9 Replace the filter 4 9 Insert the new imaging unit 4 10 Reset the copy count 4 11...

Страница 16: ...Chooser Macintosh 6 17 Power indicator blinks and stops but the file does not print 6 17 Printer will not power up to Ready 6 17 Print job does not finish the printer times out 6 18 Error indicator i...

Страница 17: ...4 Enabling and disabling the startup page A 5 Printing the configuration page A 6 Printing the front panel menu map A 7 Energy Star mode A 8 Changing the Energy Star timeout A 9 Parallel port A 10 Spe...

Страница 18: ...r printer C 1 D Regulatory Information Canadian EMC Electromagnetic Compatibility regulatory standards D 1 Declaration of conformity D 2 FCC Class B device for 115 VAC equipment D 3 Material Safety Da...

Страница 19: ...color consistency High speed Color up to 3 5 pages per minute on paper 1 3 pages per minute on transparencies Black and White up to 14 pages per minute on paper 1 7 pages per minute on transparencies...

Страница 20: ...o print the colors you want The Phaser 540 has 39 resident PostScript fonts Additionally it accepts Adobe Type 1 Type 3 and TrueType downloadable fonts as well as a variety of user defined fonts For a...

Страница 21: ...optional Phaser CopyStation loading the media tray s and installing the fuser imaging unit and toner cartridges 2 Connecting power and interface cables 3 Selecting a language for the front panel 4 In...

Страница 22: ...in the printer box 1 Quick Start Installation Instructions 2 Phaser 540 Color Printer User Manual 3 Phaser 540 Drivers and Utilities Printing Reference manual and diskettes 4 TekColor Care envelope i...

Страница 23: ...m s F ro n t p a n e l re a d s A c ti o n 9008 01 7 6 5 2 S u p p l i e s Q u i c k S t a r t I n s t a l l a t i o n 1 U s e r M a n u a l 4 T e k C o l o r C a r e D r i v e r s U t i l i t i e s...

Страница 24: ...2 Getting Set Up 2 4 Phaser 540 Color Printer Optional accessories 1 Lower Tray Assembly paper tray and transparency tray 2 Phaser CopyStation 9008 63 Phaser CopyStation 1 2 A Letter PA PE R...

Страница 25: ...ll out the card and mail it By registering your printer with Tektronix you are validating the product warranty and ensuring that you will be sent information about upgrades service and accessories as...

Страница 26: ...lbs Observe standard precautions for lifting heavy objects The printer is not permanently attached to the Lower Tray Assembly When you move the printer move the pieces separately moving the printer in...

Страница 27: ...Getting Set Up 2 User Manual 2 7 9008 02 1 2 3...

Страница 28: ...aceable components Note Instructions for loading each toner cartridge are the same except for the slot into which you insert each cartridge From top to bottom the order of the colors is Black Yellow M...

Страница 29: ...the slot labeled for its color 5 Repeat Steps 2 4 for each toner cartridge From top to bottom the order of the color toner cartridges is Black Yellow Magenta Cyan 9008 10 Black Magenta Yellow Magenta...

Страница 30: ...nstall the fuser Make sure that the power is always off when installing the user replaceable components 2 Remove the fuser from its packaging Save all packing material in case you need to return the f...

Страница 31: ...Getting Set Up 2 User Manual 2 11 3 Slide the fuser into the printer 4 Lock the fuser by turning the small blue screw clockwise several turns 5 Close the right side door 9008 04 9008 05...

Страница 32: ...he imaging unit 1 Open the printer s front door to install the imaging unit Make sure that the power is always off when installing the user replaceable components Note The imaging unit weighs approxim...

Страница 33: ...tive make sure that it is not exposed to light for more than 45 seconds or it may damage the unit Never expose it to direct sunlight Save all packing material in case you need to store the imaging uni...

Страница 34: ...into the printer holding it by the blue handles Release the left handle and slide the unit in until it stops Caution Be careful not to touch the underside or right side of the imaging unit fingerprint...

Страница 35: ...User Manual 2 15 6 Turn the center blue knob clockwise to insert the imaging unit completely and to lock it The lock icon should align with the black triangle 7 Close the printer s front door 9008 08...

Страница 36: ...haser 540 Color Printer Installing the output tray 1 Insert one side of the plastic output tray into the opening on the printer 2 Press the opposite side to insert it into its opening on the printer 9...

Страница 37: ...g media type in a tray you will get an error message If you have the Lower Tray Assembly installed make sure that all trays in the printer at any one time are the same media size required for the auto...

Страница 38: ...prints which can result in a smudged print 3 Place paper or transparencies in the tray under the hooks 4 Load transparencies so that the notched corner is placed closest to the load level label 5 5 Yo...

Страница 39: ...ou have a single media tray Slide the paper tray completely into the slot If you have a LowerTray Assembly Install a media tray into each of the three slots 9008 15 A Letter Paper 9008 16 A Letter Tra...

Страница 40: ...the same time on a first come first served basis The ports include 1 Parallel standard 2 SCSI standard The SCSI port is used only for connecting an external hard disk or for connecting the Phaser Copy...

Страница 41: ...necessary for configuring and using the optional connections Note See Supplies and accessories on page 5 2 about ordering cables for connecting the printer 9008 89 Parallel SCSI 1 2 Serial LocalTalk...

Страница 42: ...rinting Reference for instructions on changing parallel communications For information on cables and adapters see Supplies and accessories on page 5 2 Note Make all printer port connections before you...

Страница 43: ...ll data input ports and network protocols are simultaneously active Print jobs are processed on a first come first served basis To order the optional hardware contact your local Tektronix reseller or...

Страница 44: ...les you are ready to connect the power cord and turn on the printer Caution To protect your printer from a power surge make sure that the power switch on the printer is in the off position before plug...

Страница 45: ...t is between five and eight pages a registration page The startup page prints whenever you turn on or reset the printer If you want to turn off the startup page you can use the front panel menu or use...

Страница 46: ...utton scrolls forward through the selections and Menu enters the currently displayed menu 2 Using the left or right arrow buttons scroll through the selections until you see this message Language Menu...

Страница 47: ...e Ready message appears press the Menu button You see this message Help Pages Menu 2 Press the Menu button You see this message Test Print Print 3 Using the left or right arrow buttons scroll through...

Страница 48: ...t Windows driver The Windows 3 1 Driver and Printer Utilities diskette includes a Microsoft Windows 3 1 driver for this printer To use Microsoft Windows applications with this printer install the Tekt...

Страница 49: ...Network LPTx or COMx Requires a Phaser Share card Note For information on ordering options refer to Upgrade kits on page B 1 If you selected a parallel port Go on to Step f If you selected a network...

Страница 50: ...re only available through the Tektronix driver for Windows 3 1 For instructions on updating the standard Microsoft driver refer to the manual Phaser 540 Drivers and Utilities Printing Reference PC DOS...

Страница 51: ...our computer s parallel port 1 Type the following command at the DOS prompt if LPT1 is not available use LPT2 MODE LPT1 P NUL See your DOS documentation for details on the MODE command 2 You can add t...

Страница 52: ...5 and QuickDraw GX you must disable QuickDraw GX before using this driver the Phaser 540 driver does not work with QuickDraw GX Use the Phaser 540 GX driver if you are using QuickDraw GX and System So...

Страница 53: ...u need this software do the following steps a Open the Old System Items folder on the Macintosh Driver and Printer Utilities diskette b Drag the Backgrounder V1 3 and PrintMonitor V7 0 from the disket...

Страница 54: ...the printers you have connected to your Macintosh or printers that are available on a network If the printer driver icon does not appear Restart your Macintosh and repeat the printer driver installati...

Страница 55: ...iles in the following ways Mount the PC diskette on the workstation Download utility files from the Tektronix Bulletin Board Service BBS Request utility files from the Tektronix Color Printer Informat...

Страница 56: ...Printing contains useful information on basic printing features such as color correction fonts and printing hints For detailed information on printing options refer to the Phaser 540 Drivers and Utili...

Страница 57: ...nix and VMS Workstations Macintosh To print from a Macintosh or a PC running Windows you should have first installed the Tektronix driver for your computer as described in Chapter 2 For information on...

Страница 58: ...he default printer it will already be selected on the list 3 Use the Setup dialog box to select the paper size orientation portrait or landscape and paper source printing options 4 Click the Options b...

Страница 59: ...ter or a generic color PostScript driver Note Generic PostScript printer drivers do not have information about your Phaser 540 for example its page sizes and image area size Using a standard Letter or...

Страница 60: ...nVMS AXP Phaser Print works with the workstation s native spooling system to print PostScript files and raster files in these formats Sun Raster Format SRF xwd and SGI RGB If you ordered the TCP IP Et...

Страница 61: ...ou set up your spooling system to select between media trays print quality modes color correction modes and other features Most workstations with 3 5 inch disk drives provide a device driver that allo...

Страница 62: ...iver in the Chooser 3 To print a file use the Page Setup and Print commands from the File menu within your application a In the Page Setup dialog box select the desired paper size from the pop up menu...

Страница 63: ...t to use then select Set Default Printer from the Printing menu Refer to the Phaser 540 Drivers and Utilities Printing Reference for more information on using the Phaser 540 GX printer driver Printing...

Страница 64: ...vers and Utilities Printing Reference From the printer s front panel Settings you make on the front panel are only used when printing from a non Tektronix driver Refer to the instructions included in...

Страница 65: ...clarity in scanned images and prints about 1 8 pages per minute This print quality mode requires an additional 16 Mbytes of RAM be installed for a total of 36 Mbytes Fast This mode produces the faste...

Страница 66: ...ttons scroll through the selections until the following message appears Print Quality Menu 3 Press the Menu button to access print quality selections The printer displays the following message Print Q...

Страница 67: ...rinter settings affect all prints made with non Tektronix drivers Color correction mode Description None No correction made to colors Vivid Color Adjusts the color blue to appear less purple Produces...

Страница 68: ...Correction Menu 3 Press the Menu button to access color correction selections The printer displays the following message TekColor Correction Vivid Color OK 4 Using the right or left arrow buttons scro...

Страница 69: ...and use the coordinate values to select colors within an application For example your printer can produce PANTONE approved process color simulations Use the PANTONE Color sampler chart to select the...

Страница 70: ...lity Store paper and transparencies in the original dust free package To avoid having transparencies or paper stick together fan them before loading into the appropriate media tray Use a high grade la...

Страница 71: ...print area Note To assure the correct page margins use the Tektronix software drivers The following table and illustration show the page sizes the largest print areas and the margins for the media siz...

Страница 72: ...lable Caution Load only paper in the paper tray and transparencies in the transparency tray otherwise the printer reports a media jam If you have the Lower Tray Assembly installed make sure that all t...

Страница 73: ...opriate tray until that tray is empty When that tray is empty printing stops until the selected tray is filled Paper orTransparency If you specify a particular media type the printer picks media from...

Страница 74: ...intosh driver you select manual feed and media type separately If no media is loaded in the manual feed tray when manual feed is selected the printer waits 60 seconds before it picks media from a tray...

Страница 75: ...ser Manual 3 19 Image orientation Orientation refers to how the image appears on a print You specify the image orientation through your software application or printer driver 1 Portrait 2 Landscape 83...

Страница 76: ...until you feed media at the manual feed slot or make another selection This front panel setting is overridden by a driver selection If no media is loaded in the manual feed tray when manual feed is se...

Страница 77: ...Manual 3 21 Insert the paper 1 Adjust the guides to the width of the paper 2 Insert a piece of paper until it stops 3 Wait 5 seconds after the first sheet enters the printer before inserting a second...

Страница 78: ...facing up and the notched end at the upper right side of the box 3 Place the transparency in the manual feed tray with the printable side up the end that is notched enters the printer first with the...

Страница 79: ...de the transparency tray When using manual feed 2 insert the side with the notched end into the printer first with the notched corner closest to the front of the printer Note Do not re use transparenc...

Страница 80: ...ITC Bookman Demi ITC Bookman Demi Italic Helvetica Narrow Helvetica Narrow Bold Helvetica Narrow Oblique Helvetica Narrow Bold Oblique Palatino Palatino Italic Palatino Bold Palatino Bold Italic Time...

Страница 81: ...s to download fonts to the printer For details see the manual Phaser 540 Drivers and Utilities Printing Reference Installing Macintosh screen fonts The Macintosh Driver and Printer Utilities diskette...

Страница 82: ...for that type of data or enable Adobe IntelliSellect automatic language selection Refer to the Phaser 540 Drivers and Utilities Printing Reference for instructions If automatic language selection is...

Страница 83: ...ix supplies and drivers Always use Tektronix supplies to ensure the highest quality prints and printer performance Tektronix print drivers provide the best access to printer features See Chapter 5 for...

Страница 84: ...has received the processed image is predictable the others can vary greatly depending on your system configuration and the type of image you are printing However the Phaser 540 PostScript interpreter...

Страница 85: ...not touch the underside or the right side of the imaging unit fingerprints may appear on your output Keep the imaging unit s light exposure to a minimum less than 45 seconds or you may damage the unit...

Страница 86: ...so that it is easy to maintain several of the components are replaceable What this means to you is that scheduled cleaning is not necessary These are the replaceable components 1 Transfer kit transfe...

Страница 87: ...ngle color A straight narrow and even vertical light streak in one color Imaging unit Replace the imaging unit 40 000 images Dark vertical streaks on the whole page Dark color spots and streaks in all...

Страница 88: ...ill yield about 500 pages depending on the complexity of your prints Replace the used toner cartridge Caution Do not leave the right side door open for more than 45 seconds when a toner cartridge has...

Страница 89: ...waste 4 Remove the new toner cartridge from its packaging 5 Remove the shipping cover from the new toner cartridge 6 Insert the new toner cartridge into the printer Note The cartridge and printer lab...

Страница 90: ...kit consists of these items Imaging unit including the corona wire Filter Blower brush cleaning tool Caution When replacing the imaging unit make sure that you do not expose either the new or used un...

Страница 91: ...s 5 Lift up the blue handle on the left side of the imaging unit to release the catch Caution The imaging unit weighs about 6 8 kg 15 lbs take care to handle the imaging unit as shown to avoid damage...

Страница 92: ...ipment is necessary Caution To ensure print quality do not touch the underside or the right side of the imaging unit you may see fingerprints on your output Never allow exposure to direct sunlight whi...

Страница 93: ...sor 1 Using the blower brush cleaning tool that was included in the imaging unit packaging clean the sensor inside the printer Replace the filter 1 Pull out the used filter and dispose of it as normal...

Страница 94: ...e new imaging unit into the printer holding it by the blue handles 4 Release the left handle and slide the unit in until it stops 5 Turn the large blue knob clockwise to insert the imaging unit comple...

Страница 95: ...display Help Pages Menu 2 Press the right arrow button until the display reads System Counts Menu 3 Press the Menu button to enter the System Counts menu 4 Press the right arrow button until the disp...

Страница 96: ...unit takes care of whatever print quality symptom you observed dispose of the used imaging unit as normal office waste If the new imaging unit did not take care of the symptom put the original unit b...

Страница 97: ...fuser when the front panel reads Fuser replace Refer to Troubleshooting and print quality quick reference on page 6 8 for more information on diagnosing print quality symptoms Remove the used fuser 1...

Страница 98: ...tab on the right pull the fuser until the safety catch stops it 5 Press the blue tab on the left to release the safety catch Caution The fuser may be hot Be careful not to touch the areas marked with...

Страница 99: ...material in case moving or subsequent shipment is necessary 2 Using both hands slide the new fuser into the printer Push firmly to seat the fuser in place 3 To lock the fuser turn the small blue screw...

Страница 100: ...enu You will see this message in the display Help Pages Menu 2 Press the right arrow button until the display reads System Counts Menu 3 Press the Menu button to enter the System Counts menu 4 Press t...

Страница 101: ...n the front panel reads Transfer Kit replace Refer to Troubleshooting and print quality quick reference on page 6 8 for more information on diagnosing print quality symptoms Remove the used transfer r...

Страница 102: ...rn the blue screws counterclockwise about four turns to unlock the cover 5 Lift the cover until it catches and stays open 6 Hold the transfer roller by its blue handles rotate the handles toward the p...

Страница 103: ...w transfer roller 1 Holding the new transfer roller by its blue handles place the roller into the paper feeder 2 Rotate the handles away from the printer to seat the roller securely 3 Close the cover...

Страница 104: ...s the safety catch to release it and remove the waste bin 2 Place the used waste bin in the plastic bag provided in the kit close the plastic bag securely and dispose of it as normal office waste 3 In...

Страница 105: ...u will see this message in the display Help Pages Menu 2 Press the right arrow button until the display reads System Counts Menu 3 Press the Menu button to enter the System Counts menu 4 Press the rig...

Страница 106: ...ire needs to be cleaned If cleaning doesn t take care of the problem the corona wire may be worn out and need to be replaced Separate replacement of the corona wire should not be required often since...

Страница 107: ...Caring for Your Printer 4 User Manual 4 23 3 Pinch the handle of the corona wire to remove it 4 Remove the cleaning tool from inside the printer 9008 75 9008 70...

Страница 108: ...4 Caring for Your Printer 4 24 Phaser 540 Color Printer 5 Insert the cleaning tool on the underside of the corona wire housing as shown 6 Wipe the corona wire with a back and forth motion 9008 71...

Страница 109: ...Caring for Your Printer 4 User Manual 4 25 7 Replace the cleaning tool inside the printer 8 Replace the corona wire in the printer 9 Close the front door and turn the power on 9008 90 9008 97...

Страница 110: ...panel menu You will see this message in the display Help Pages Menu 2 Press the right arrow button until the display reads System Counts Menu 3 Press the Menu button to enter the System Counts menu 4...

Страница 111: ...ce consistent high quality color images Always order Tektronix supplies for your Phaser 540 printer to guarantee the best print quality media feed reliability and trouble free printer performance Orde...

Страница 112: ...16 1368 00 A Letter U S 500 sheets 016 1369 00 A4 Metric Letter 500 sheets Transparencies 016 1325 00 A Letter U S 50 sheets 016 1326 00 A4 Metric Letter 50 sheets Accessories 436 0282 00 A Letter pap...

Страница 113: ...e with 013 0297 00 to connect the printer s SCSI port to a hard disk drive with Macintosh SCSI 25 pin plug 013 0297 00 SCSI 1 LD to SCSI 2 HD SCSI adapter converts 50 pin low density plug to 50 pin hi...

Страница 114: ......

Страница 115: ...pm PST For technical support outside the United States and Canada contact your local Tektronix dealer or local Tektronix office Printer service If your printer needs service call 1 800 835 6100 in th...

Страница 116: ...ring these files from the PC diskette you can request files from the Tektronix Color Printer Information Server an automatic file serving program on the Internet that responds to requests for files If...

Страница 117: ...and a touch tone voice telephone you can order a HAL catalog listing all of the information offered by HAL by calling 503 682 7450 direct or in the U S and Canada call 1 800 835 6100 1 Before you cal...

Страница 118: ...If your telephone does not have these keys or has a dial you will need to buy a tone dialer from your local telephone or electronics shop This small box is held to the phone and will send the standar...

Страница 119: ...rst as shown in the following table Country Country code Your area code and fax number Press when finished Austria 00 43 area code fax number Belgium 00 32 area code fax number Denmark 00 45 area code...

Страница 120: ...lutions See page 6 8 Test Print Found in the Help Pages menu accessed from the front panel it helps you diagnose print quality problems For example if a user replaceable component such as toner needs...

Страница 121: ...est Print Print 3 Press the Printbutton The printer prints the diagnostic test print Use it to diagnose and correct any problems you might be having with print quality If you need to call Technical Su...

Страница 122: ...ill on after the power up sequence the printer requires service See page 6 1 Front panel reports Jam at Location See inside front door Media jam To find the jam refer to the paper path illustration on...

Страница 123: ...one pressing the button Front panel timeout if no activity occurs in 5 minutes the front panel returns to Ready Press Menu to enter the front panel menu Print appears faded in a single color The color...

Страница 124: ...l bands in a single color The roller in the color toner cartridge is damaged Replace the color toner cartridge The media has a color streak in the margin Color toner cartridge is leaking Replace the c...

Страница 125: ...imaging unit Dark and uneven vertical streaks appear in all colors most easily visible in yellow The imaging unit is worn out Replace the imaging unit Dark color spots and streaks appear in all colors...

Страница 126: ...f the imaging unit Artifact s fades after several prints On the test print each color bleeds into the color band below it the most visible is magenta in the yellow band The cleaning blade inside the i...

Страница 127: ...t the problem Put the old imaging unit back into the printer Repack the new imaging unit Replace the fuser Front panel reports Fuser replace The fuser is worn out Replace the fuser A piece of the prin...

Страница 128: ...lace The transfer kit transfer roller and waste bin is worn out Replace the transfer kit Toner spots appear on the backside of the media The transfer kit is worn out Replace the transfer kit Light hor...

Страница 129: ...and Canada or call your nearest Tektronix reseller To verify that your computer can communicate with the printer use one of these methods If you have a Macintosh Make sure that you have the correct dr...

Страница 130: ...le COM1 COM2 LPT1 LPT2 for the variable port in this command For example if you are testing a parallel connection on LPT1 type echo lpt1 echo showpage Ctrl D lpt1 If the communication link between you...

Страница 131: ...you have given it a unique name not the same as any other printer in the zone or on the network Make sure that the correct network is selected in the Network Control Panel Power indicator blinks and...

Страница 132: ...smission Retry value for the printer s assigned port is set to 850 For more information see PC Microsoft Windows driver on page 2 28 Error indicator is blinking The Error indicator blinks with any har...

Страница 133: ...ds Wrong media in tray check that the paper is loaded in the paper tray or transparencies are loaded in the transparency tray Frequent media jams Make sure that you use a high quality laser paper 75 1...

Страница 134: ...t the incorrect page size the image may be cut off Make sure that the correct size media is in the media tray Image shifts or margins are incorrect Macintosh Make sure that you have installed the Phas...

Страница 135: ...ight streaks or faded prints Make sure that the toner cartridges are installed correctly Make sure that you have loaded the correct media in the correct tray Load only paper in the paper tray and load...

Страница 136: ...mmediately before installing it in the printer Exposure to light for more than 45 seconds can damage the imaging unit Do not touch the right side or underside of the imaging unit fingerprints affect p...

Страница 137: ...vers and Utilities Printing Reference Make sure that you have not selected Monochrome in the TekColor Options dialog box If you have a PC Be sure to use a driver that supports color PostScript If you...

Страница 138: ...t In this case the page contains one or more of the error messages listed in the following table Depending on your needs you may not need to call for service immediately Error messages on the startup...

Страница 139: ...rs the front panel reports Jam at Location The Locations are the various sensors throughout the paper path listed as A through E If you have an optional Lower Tray Assembly installed Jam A can occur a...

Страница 140: ...t any of the three media trays whichever tray you selected for the current print job Jam at A 1 Open the left side door corresponding to the selected media tray 2 Remove the jammed media 1 Remove the...

Страница 141: ...ng 6 User Manual 6 27 Jam at B 1 Open the left side door corresponding to the selected media tray 2 Pull out the paper feeder the jammed media is visible 3 Pull the media toward the inside of the prin...

Страница 142: ...media out toward the inside of the printer 1 Open the front door and the right side door to access the fuser 2 Turn the small blue knob counterclockwise to unlock the fuser pull the fuser out until it...

Страница 143: ...y damage the fuser Instead follow these steps Unlock the fuser by turning the small blue knob counterclockwise Pull the fuser out The media will probably tear Turn the fuser s large blue knob clockwis...

Страница 144: ...Jam at E Remove the jammed media from the output tray Pull open the access door above the plastic output tray and remove the media Jam at Manual Feed Remove the jammed media from the manual feed tray...

Страница 145: ...er is on and ready for operation The printer is processing or printing an image The printer is in interactive mode you have pressed the Menu button The printer is not ready or there is an error 2 Erro...

Страница 146: ...selections 3 During normal printer operation button 3 has the following effect Cancel Cancels a print job or selection When you enter the front panel menu button 3 has the following effect Scrolls fo...

Страница 147: ...errors and warnings such as color low Displays the names of menus and parameters you can set Line 2 Displays button labels such as for previous and for next for moving through selections in a given m...

Страница 148: ...access the full menu structure through a combination of front panel button pushes An unlock utility file can also be downloaded to the printer to unlock the front panel menu for user viewing To learn...

Страница 149: ...ter Defaults Menu Exit Serial Settings Default Tray Output Order Startup Page Energy Star Startup Mode Energy Star Timeout Menu Exit Network Settings Baud Rate Parity Data Bits Flow Control Stop Bits...

Страница 150: ...connector to add a Phaser CopyStation or a hard disk for font storage 3 Optional Phaser Share card with serial and network connectors 4 Test print button 9008 17 Parallel SCSI 1 2 Serial LocalTalk Ph...

Страница 151: ...the printer while demonstrating its printing quality Startup Page Lists the number of pages printed installed interface ports software version numbers installed RAM memory the number of fonts and othe...

Страница 152: ...the problem When you call Technical Support always print the test print first it contains useful diagnostic information 1 While the Ready message is displayed press the Menu button The printer display...

Страница 153: ...essage appears press the Menu button The printer displays the first item in the menu Help Pages Menu 2 Press the Menu button to access the Help Pages The following message appears Test Print Print 3 P...

Страница 154: ...automatically prints a startup page containing diagnostic information regardless of the startup page setting 1 While the Ready message is displayed press the Menu button The printer displays the firs...

Страница 155: ...ys the first item in the setup menu Help Pages Menu 2 Using the left arrow or right arrow buttons scroll through the selections until the following message appears Printer Defaults Menu 3 Press the Me...

Страница 156: ...n the menu Help Pages Menu 2 Press the Menu button to access the Help Pages The following message appears Test Print Print 3 Press the left arrow or right arrow buttons until the following message app...

Страница 157: ...r 7 1 While the Ready message is displayed press the Menu button The printer displays the first item in the menu Help Pages Menu 2 Press the Menu button to enter the Help Pages menu The following mess...

Страница 158: ...our default it cools down completely When the printer exits the Energy Star cool down mode it is ready to print in about 5 minutes Refer to the menu map in Chapter 7 to locate the Energy Star Timeout...

Страница 159: ...essage appears Printer Defaults Menu 3 Press the Menu button to access printer default selections The printer displays the following message Default Tray Menu 4 Using the left or right arrow buttons s...

Страница 160: ...el port supports two modes Compatibility Mode and Nibble Mode The interpretation of interface signals depends on the current mode Compatibility Mode provides host to printer communication in a manner...

Страница 161: ...Negative true data transfer acknowledge Data qualifier 4 nFault nDataAvail 22 Printer C mode N mode Negative true printer fault exists that prevents printing Negative low data ready then data bits 0...

Страница 162: ...ve true transfer Extensibility Request value into printer input latch on rising edge 16 nSelectIn 1284 Active 34 Host C mode N mode Negative true select printer Used in conjunction with HostBusy for 1...

Страница 163: ...bles 20 o C to 60 o C 4 o F to 140 o F Humidity Operating 10 to 80 Relative Humidity non condensing Non operating 10 to 90 Relative Humidity non condensing Altitude Operating 0 to 2 500 m 8 000 ft Non...

Страница 164: ...in Width 489 mm 19 in 712 mm 27 4 in with the output tray Dimensions with LowerTray Assembly Height 666 mm 26 2 in Depth 492 mm 19 5 in Width 489 mm 19 in 712 mm 27 4 in with the output tray Weight of...

Страница 165: ...kes the printer to put the colored toner on the paper once it has received the processed image 300 dpi Paper 600 dpi Paper Transparency mode 1st print Continuous throughput rate 1st print Continuous t...

Страница 166: ...es A 16 Phaser 540 Color Printer Safety and emissions standards FCC Part 15 Subpart J Class B verified Vfg 243 Class B CISPR 22 Class B verified UL 1950 listed CSA 220 certified EN60950 IEC 950 TUV li...

Страница 167: ...er 4676FTA Option 01 4540 Phaser CopyStation accessory adds color copying capability to your Tektronix Phaser printer 4676FP1 Ethernet networking card upgrade kit includes EtherTalk and Novell NetWare...

Страница 168: ...e I O ports Adding a 16 Mbyte SIMM to a Phaser 540 provides the following specific benefits Larger I O buffers increases from 256 Kbytes to 1 Mbyte Improved imaging performance Improved network perfor...

Страница 169: ...ies reduced to 25 or enlarged to 200 of the original s size and you can adjust copies for color balance and lightness Note To order a Phaser CopyStation use Tektronix order number 4540 For instruction...

Страница 170: ...push button control of Tektronix printer features Phaser Print works with the workstation s native spooling system to print PostScript files and raster files in these formats Sun Raster Format SRF xw...

Страница 171: ...k To connect an external disk you need these items A SCSI peripheral cable for each disk The printer uses a SCSI 2 50 pin connector One SCSI cable terminator unless your disk has an internal terminato...

Страница 172: ...sk are 0 through 6 Note If you have a Phaser CopyStation connected to the printer it must be located at one end of the chain with the printer at the other end and the external disk s in the middle The...

Страница 173: ...3 External disk SCSI port 4 Terminator not required if the disk has a built in terminator or if you have a Phaser CopyStation connected at the other end of the chain Each disk must have a unique SCSI...

Страница 174: ...4 Terminator not required if the end disk has a built in terminator or if you have a Phaser CopyStation connected at the other end of the chain The middle disk must not have an internal terminator Ea...

Страница 175: ...our Printer Repacking your printer 1 Turn off the printer remove the power cord 2 Remove the media tray s Repack them for shipping or storage in their original shipping boxes 9008 16 A Letter Transpar...

Страница 176: ...sensitive keep its light exposure to a minimum less than 45 seconds Also keep it upright to avoid spilling any waste toner 4 Remove the four toner cartridges replace the protective cover for each cart...

Страница 177: ...to Step 9 8 If you have a LowerTray Assembly a Lift the printer up and away from the Lower Tray Assembly Warning The printer weighs about 39 kg 85 lbs and the Lower Tray Assembly weighs 14 kg 31 lbs...

Страница 178: ...you must first remove the fuser toner cartridges and imaging unit then ship the printer in its Tektronix shipping box with the appropriate packing materials Call Tektronix at 1 800 835 6100 or call y...

Страница 179: ...oise emissions from digital apparatus set out in the Radio Interference Regulations of the Canadian Department of Communications Le pr sent appareil num rique n met pas de bruits radio lectriques d pa...

Страница 180: ...n of the Low Voltage Directive 73 23 EEC the Electromagnetic Compatibility Directive 89 336 EEC Machinery Directive 89 392 EEC and the law governing the operation of radio frequency equipment HFfG 9 A...

Страница 181: ...nstructions may cause harmful interference to radio communications However there is no guarantee that interference will not occur in a particular installation If this equipment does cause harmful inte...

Страница 182: ...Tektronix establishes and maintains sound environmental management practices to accomplish this goal and to assure compliance with the laws regulations and orders of the responsible governmental auth...

Страница 183: ...Eyes Contact unlikely If any particles get into the eye flush thoroughly with water Skin Not expected to be an irritant Inhalation Minimum irritation expected as with any non toxic dust Ingestion Not...

Страница 184: ...Section IX Physical and chemical properties Appearance Black blue red or yellow powders Odor None Solubility Not water soluble Section X Stability and reactivity Stability Stable Incompatibility With...

Страница 185: ...All components of these toners are listed in the Toxic Substances Control Act inventory as verified by our suppliers SARA Not reportable RCRA TCLP below hazardous waste levels set by EPA CERCLA No rep...

Страница 186: ...tial Health Effects Eyes Direct contact may cause temporary discomfort Skin A prolonged exposure may cause slight irritation Inhalation Not an irritant to respiratory passages Ingestion Swallowing a l...

Страница 187: ...tion None needed Skin Protection None should be needed Respiratory Protection None needed Section IX Physical and chemical properties Appearance Colorless liquid Odor Slight Solubility Not water solub...

Страница 188: ...edients None California Prop 65 Not listed Canadian WHMIS Not considered a hazardous chemical TSCA This product is listed in the Toxic Substances Control Act inventory as verified by our suppliers OSH...

Страница 189: ...4 printer doesn t appear 6 17 selecting a driver 3 6 6 15 cleaning corona wire 4 22 sensors 4 9 CMYK color sampler chart 3 13 color correction 3 11 CMYK color sampler chart 3 13 Help button 3 11 HSB c...

Страница 190: ...7 EuroHAL automated fax system 6 4 Euroscale Press 3 11 F fastest printing available 3 28 filter replacing 4 9 font disk see hard disk fonts 1 2 3 24 downloading 3 25 Macintosh screen fonts 3 25 resid...

Страница 191: ...e cover 2 14 replacing 4 6 troubleshooting 6 11 unpacking 4 8 weight 2 12 indicators at power up 2 25 error 2 25 6 8 6 18 7 1 power 2 25 6 8 6 17 7 1 installation 2 28 driver 2 28 fuser 2 10 imaging u...

Страница 192: ...2 18 sizes 3 15 3 16 trays 2 17 3 16 media jams 6 19 6 25 clearing 6 8 Jam at A 6 26 Jam at B 6 27 Jam at C 6 28 Jam at D 6 29 Jam at E 6 30 Jam at Manual Feed 6 30 troubleshooting 6 8 media selectio...

Страница 193: ...driver 2 32 printing 3 7 using 3 7 Phaser 540 Quick Reference Card 6 6 Phaser CopyStation 2 20 B 3 Phaser Print 3 4 B 4 Phaser Share 3 2 3 6 cards 2 20 7 6 B 3 connections 2 23 Phaser Share networking...

Страница 194: ...ng filter 4 9 fuser 4 13 imaging unit 4 6 toner cartridges 4 4 transfer kit 4 17 user replaceable components 4 3 waste bin 4 20 Resetbutton 7 2 resetting the copy count 4 11 4 16 4 21 4 26 resident fo...

Страница 195: ...TokenTalk 2 20 B 3 toner cartridges installing 2 8 ordering 5 2 replacing 4 4 shipping cover 2 8 troubleshooting 6 10 waste disposal 4 5 transfer kit front panel message 4 17 replacing 4 17 transfer r...

Страница 196: ...A 2 verify communications 6 15 wavy vertical streaks 6 11 TrueType fonts 1 2 3 25 turning on the printer 2 24 U Unix workstations 3 4 installing a driver 2 35 unpacking 2 2 upgrade kits B 1 Ethernet...

Отзывы: