2-7
EM18-33017
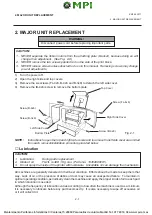
2. MAJOR UNIT REPLACEMENT
NOTE:
Never remove the bracket.
6) Replace the print head and reassemble in the reverse order of removal.
7) Refer to page 6-44 and clear the maintenance counter.
8) Refer to page 6-31 and perform a test print.
2.6 REPLACING THE PLATEN
1) Remove the front plate. (Refer to Fig. 2-6.)
2) Loosen the two screws (SM-4 x 10C) securing the stepping motor.
3) Remove the (FL-4 x 6) screw to detach the platen positioning plate.
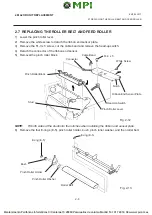
4) Take the platen belt off the platen pulley, move the platen fully to the right and remove the platen
from the left end.
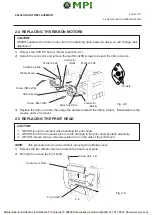
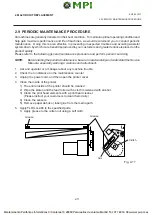
Connector
Print Head
Head Fixing Screw
Head Lever
Connecter
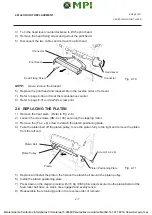
Fig. 2-10
3) Turn the head lever counterclockwise to lift the print head.
4) Remove the head fixing screw and pull out the print head.
5) Disconnect the two cables and remove the print head.
5) Replace and install the platen, then place the platen belt around the platen pulley.
6) Install the platen positioning plate.
7) Press down on the stepping motor with 3.5 Kg
±
300 g force and secure it so the platen belt and the
feed roller belt have no slack, are engaged and evenly tense.
8) Reassemble the remaining parts in the reverse order of removal.
Platen Belt
Platen Pulley
Platen
Screw (FL-4 x 6)
Platen Positioning Plate
Fig. 2-11
2.6 REPLACING THE PLATEN

