background image

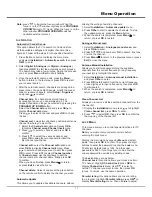
Menu Operation

Using


Menu


System

10

    a setting. Use 

OK/

    to open the corresponding submenu. 

1. Press 

Menu

 to display the main menu.

2. Press                  to select the desired item, then press 
    

OK

 button to open the corresponding submenu.  

3. In submenus, use         to select menu options, use        
    to set functions or change values. Press 

OK

 to activate 

4. Press 

Menu

 to return to the previous menu or press 


Exit

 to close the menu. 

Picture Menu

The menus for adjusting the picture are used to obtain 
the best picture settings according to your preference,
the type of program you are watching and the ambient 
lighting. (see figure 3.)
Display the main menu by pressing 

Menu 

and select 

Picture

, then press 

OK

 to confirm. The 

Picture

 options 

are as below:

Note:

 some options may not be available for certain 

signal sources.

Picture preset:

 use        to scroll through the picture 

preset settings: 

Personal, Movie, Standard, Dynamic

and 

Studio

.


This section explores the menus of your TV. Each menu 
is outlined and detailed to help you get the most from 
your TV. To access the menu system: 

/

/

/

/

/

/

Brightness:

 adjusts the brightness of the picture.

Contrast:

 adjusts the difference between light and 

dark areas of the picture.

Saturation:

 adjusts the richness of colour.

Note: this function is not available in VGA mode.

Sharpness:

 adjusts the crispness of the edges in the 

picture.

Note:

 this function is not available in VGA mode.

Color temperature:

 adjusts the color temperature of 

the picture. Use        to scroll through the color settings: 

Cool

 for a more blue palette of picture colors; 

Normal

Custom

;

 Warm

 for a more red palette of picture colors.

Screen mode:

 use        to select the picture size. 

(

Note:

 You are recommended to use the full screen 

mode. Do not use the display mode with black bars 
on both sides of the picture (such as 4:3) for a long time, 
otherwise the TV screen may be damaged permanently.)

Auto format:

 use        to select 

On

 or 

Off

, when 

On 

is 

selected, the TV will display the picture according to 
HD Signal's format.

Note: 

Auto format is available only in  part of  TV and AV 

mode.

Advanced settings:

 press           to display its submenu.

Use         to select the items such as 

Noise reduction

to obtain a clearer picture. 

/

/

/

OK/


/

Note:

 some options may appear in the next page of 

Picture

 menu, you can press         to switch.

/

Sound Menu

Display the main menu by pressing the 

Menu

 button and 

select 

Sound

, then press 

OK

 to confirm. The 

Sound


menu appears with the following options(see figure 4): 

Sound preset:

 press           to display its submenus:

  - 

Sound preset

: use        to select a sound type(e.g. 


Rock

Pop

) directly.


Use         to select the desired

    frequency range(e.g. 100Hz, 300Hz), use         to
    adjust the level. 

Balance:

 use        to balance the sound between the 

left and right speakers.

Audio delay

: if the sound output does not match the 

picture, press         to adjust the delay time to 
synchronize the sound with the picture.

Wide stereo

: use         to switch 

On

 or 

Off

.

Auto


volume


control

select 

On

 mode to


reduce 

the annoying blasts in volume during commercial 
breaks, this also amplifies softer sounds in program 
material. Eliminates the need to constantly adjust 
the volume.

Audio description

:


it refers to an additional narration

track for the blind and visually impaired viewers of
visual media, including television programmes and
movies. The description narrator talks through the
presentation description what is happening on the 
screen during the natural pauses in the audio(and
during dialogue if deemed necessary).  

1. You can use this function if the current broadcast

    contains audio description.

2. You can turn on the audio description on or off in
    the Audio Description menu.  


/

/

/

Sound


type

use        to select


a


sound


type


from


the


list

.

Note:

 the options offered depend on the programme 

you are watching.

/

OK/


/

/

To 

display

 the pictures from different source inputs side 

by side. Note that one window is for both analog and 
digital TV inputs, the other is for HDMI and CMP 


inputs.

 See figure 5.

 (Note: AV input is not available for AV on 

both windows.)

1. Display main menu by pressing 

Menu

. Select 

PAP  

    and press 

OK

 to confirm. 

2. Select the 

PAP 

item, and press        to turn on/off 


PAP

 function. 

3. When 

On

 is selected, select 

TV position

, press     

    to reposition the TV window.

PAP Function

/

/

/

Содержание L32S4690S

Страница 1: ...OPERATION MANUAL LED TV L32S4690S L40S4690FS L50S5610FS L50S5600FS L55S4690FS For use with models Figures and illustrations in this User s Guide are actual product appearance Product design and...

Страница 2: ...10 10 10 10 11 12 12 14 14 15 15 16 16 16 Using Menu System Picture Menu Sound Menu PAP Function Installation Timer Menu Option Menu 13 13 13 Customising the input settings Diagnostics on digital TV c...

Страница 3: ...d and the signal cable to moisture Do not place the set on an unstable cart stand or table Use Environment Place the set in an area that allows good ventilation Do not use the set near damp and cold a...

Страница 4: ...te The location and names of the function buttons and power button on the TV may vary according to TV model 4 SPDIF SPDIF socket output The SPDIF socket can be used to connect a compatible digital aud...

Страница 5: ...s can recognize if the device you re connecting to is Y Pb Pr compatible or Y Cb Cr compatible The component sockets provide excellent picture quality because the video is separated into three separat...

Страница 6: ...our buttons To select tasks or Teletext pages The red button can also be used for MHEG and HbbTV function Standby quit standby To select the previous photo music or video To start or pause playback To...

Страница 7: ...mode press the button on the remote control or on the TV the TV set remains powered up but with low energy consumption To switch off the TV set unplug the mains socket from the mains outlet Initial Se...

Страница 8: ...OK 500 Audio Description PAP PAP Off Back Exit Select Menu Exit Options Teletext SPDIF type PCM SPDIF delay T Link Off Location Home 140 Subtitle Back Exit Select Enter Menu Exit OK Network update On...

Страница 9: ...Smart TV Press to select Smart TV source Press the TV up When the highlight cursor moves to Smart TV on TV screen Controller icon click the TV Controller not availible for some models...

Страница 10: ...ormat is available only in part of TV and AV mode Advanced settings press to display its submenu Use to select the items such as Noise reduction to obtain a clearer picture OK Note some options may ap...

Страница 11: ...s 1 Select Installation Automatic update menu 2 Press to start to update the channels To stop the update process press the Menu button 3 When the search is completed press Menu to return or press OK t...

Страница 12: ...ect then press to select the channel you want to watch when the TV is turned on automatically next time and press OK to confirm Power off timer use to select Once Daily or Off If you select Once or Da...

Страница 13: ...s You can configure your TV according to the equipment you connect to it 1 Select Setup Input settings 2 Press to enter Input settings 3 Press to select a connector your equipment is connected to 4 Pr...

Страница 14: ...your TV s USB 1 port 1 Press MENU on the remote control and select Setup Network Settings Internet connection Press to select On Network connection OK OK OK OK 2 Press to select Interface then set to...

Страница 15: ...ellow button to enter Channel list selection Press to select favourite list and press OK to enter 3 Press the blue button to start editing your favourite list Press to scroll through the channel list...

Страница 16: ...urned on T Link option will be available in the Quick access menu which you enter by pressing the Option button on the remote control Use one touch play With one touch play pressing the play button on...

Страница 17: ...se this function to play back music if available 1 Select Smart TV Media Music then press OK to enter the main file content browser 2 Use to select a song in either main or sub file content browser in...

Страница 18: ...e through the different types and subtypes using the navigation buttons on the remote control Select one or more types which you want to highlight from the Type list press OK to select or deselect A c...

Страница 19: ...to the best resolution or other standard resolutions of the Windows system Snowy dots and interference If the antenna is located in the fringe area of a television signal where the signal is weak the...

Страница 20: ...72 MMT51A EAUBB...
Отзывы: