background image


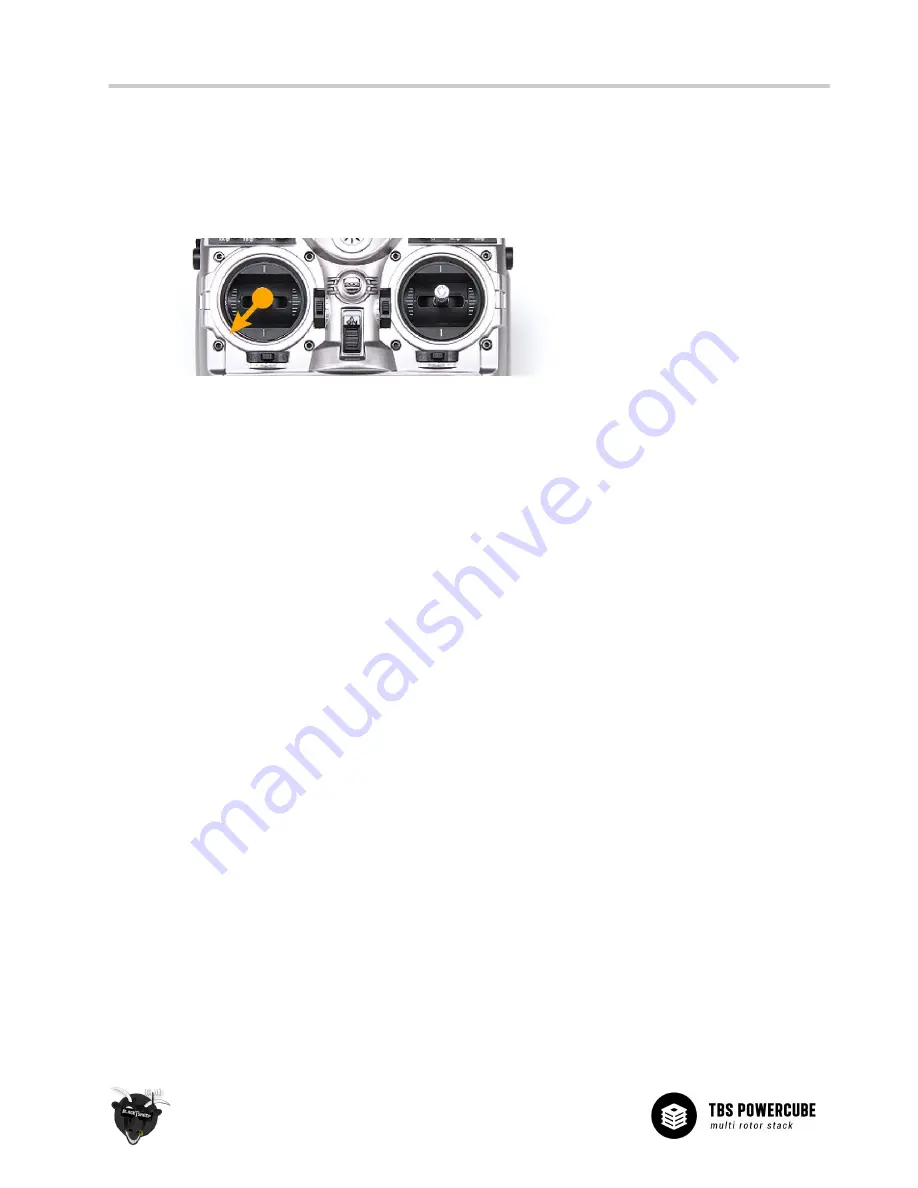
Entering OSD configuration menu 

After the initial calibration is done, the main OSD overlay will show and the CORE PRO is ready to be 

configured. 

1. To enter the OSD configuration menu, hold the throttle stick down-left for 4 seconds (mode 2) 


2. A countdown will let you know that you are about to enter the OSD menu 

RC Calibration (mandatory)  

R/C Calibration is required to teach the TBS CORE PRO and the flight controller which stick performs which 

action on your remote control. RC Calibration comes up either automatically if you are running the CORE PRO 

for the first time, or it is available in the R/C menu under “Flight Controller” 

 “Calibration” 

 “RC Calibration 

Wizard” if you need to access it again.  

The default settings for RC calibration match the CleanFlight/BetaFlight settings. If your R/C matches these 

settings you may choose to skip the R/C calibration setup step. 

Calibrate new setup 

The CORE PRO is by default expecting an SBUS signal since this is the most commonly used protocol 

nowadays among FPV racers. If you are using any other receiver such as CROSSFIRE CRSF, Spektrum DSM 

satellite, or any PPM-compatible receiver, press the ENTER key of the CORE PRO to cycle through the available 

signal options.  

A restart of the flight controller is required so please allow it some time. At the same time for it to load, center 

all of your R/C sticks, and the RC Calibration Wizard will launch. Follow the instructions to assign the right RC 

channels. After these steps you will be able to control the OSD with your Roll- and Pitch-stick. 

(procedure shown on the next page) 


35 


Содержание PowerCube

Страница 1: ...ack Designed to be bundled and sold with any 120 to 330mm size frame Stacked boards for extreme durability Based on fast STM32F3 flight controller Innovative patent pending wire free power distributio...

Страница 2: ...RT1 1x Piezo buzzer port for active driven buzzers 1x Internal BUS system 6x PWM 1x BST 5V 12V 4x ESC solder pads NEW 1x Servo Output for tricopters or any Servo function 2x VBatt North East South Wes...

Страница 3: ...SCs Weight 70g brass standoff version 62g aluminum gold standoff version available in PRO tuning kit Basic kit contents 1x TBS COLIBRI V2 0 flight control NEW 4x TBS BULLETPROOF speed control w 2mm fe...

Страница 4: ...nd use stick commands to arm your multirotor rather than switches NEVER leave the platform powered on and unattended Always check proper failsafe power down functionality and try not to break too many...

Страница 5: ...RI V2 Flight control Overview and connections North East South West Configuration and tuning Default Values Driver installation Updating firmware using TBS Agent recommended Updating firmware using Cl...

Страница 6: ...d Connecting TBS equipment Connectivity with TBS CORE PRO OSD TBS CORE PRO Connection Entering OSD configuration menu RC Calibration mandatory Calibrate new setup Read RC data from existing setup Main...

Страница 7: ...TBS POWERCUBE Overview Check out the POWERCUBE in all its glory The following diagrams indicate the locations of each component and their purpose 7...

Страница 8: ...r this reason the two screws carrying power VBatt are hidden underneath the double sided sticky tape on the bottom of the TBS POWERCUBE The tape isolates them from the carbon fiber frame The ground ca...

Страница 9: ...to power distribution boards or G10 frames you can use smaller nylon washers or stand offs 3mm shorter instead of the plastic isolation bed Frame type Mounting options G10 other glass fiber materials...

Страница 10: ...ght diagram If they do not match you may need to flip two of the three connector cables Also now is a good time to double and triple check that motor 1 2 3 and 4 are wired up to the correct layer in t...

Страница 11: ...ERCUBE installed at its core It powers the R C receiver flight control motors buzzer LED backplate and DCDC power system The OSD is powered by a separate TBS CORE PRO The instructions for the TBS VEND...

Страница 12: ...consult the TBS CORE PRO manual as this is what is at the heart of the FPVision board While for the VTX check the TBS UNIFY PRO VTX manual in more detail There are some additional features built into...

Страница 13: ...5V 12V software selector The camera port is set to 5V from the factory To change the output voltage to 12V connect the TBS FPVision to the TBS Agent Windows software and look for the CAM VOLTAGE prope...

Страница 14: ...rs Note TBS COLIBRI V2 is only compatible with TBS PDB V2 only use V2 FC on V2 PDB STM32F303 based chipset for ultimate performance PPM SBUS DSM DSMX input 5V and 3 3V provided over internal BUS 6 PWM...

Страница 15: ...t GND 5V Buzzer Signal Additional soldering pads for direct soldering first batch has reverse signed and pads ESC Outputs V2 Control signal output connector for 4 ESCs Pin out from left ESC4 GND ESC3...

Страница 16: ...2 Micro USB Connect via USB for configuration via CleanFlight BetaFlight and firmware upgrades SWD header V1 Used for direct microcontroller programming Boot button V2 To enter DFU mode for firmware u...

Страница 17: ...m left Data Out 5V GND Signal pin connects to DIN on WS28xx pads GPS Mag Alt UART3 Connector for external GPS magnetometer and altitude sensors or other uses can be configured in Cleanflight BetaFligh...

Страница 18: ...WM1 PWM3 PWM5 BST SDA UART2_TX 5V PDB V2 and FPVision NEW 12V PDB V1 LEDs Status indicator DCDC LED lights up once 12V is available over internal BUS PWR control LED controlled via CleanFlight BetaFli...

Страница 19: ...ion are set in the configurator for proper control of the ESCs and aircraft FliteTest Naze32 Tutorial PID Tuning Explained Default Values The ideal parameter values for COLIBRI with the BULLETPROOF 20...

Страница 20: ...Driver Navigate to the following folder to locate the correct driver C Program Files x86 STMicroelectronics Software Virtual comport driver Updating firmware using TBS Agent recommended Getting the l...

Страница 21: ...e pre tuned settings and click UPDATE the process should finish within 15 seconds To access beta versions press F1 and check off Include beta releases 5 Now restore or configure your receiver flight m...

Страница 22: ...t Configurator supports flashing firmware for the COLIBRI RACE However the code for BST communication with TBS CORE PRO and the passthrough 1wire technology has not yet merged into the CleanFlight pro...

Страница 23: ...6 Upgrade via DFU developer use Use the following procedure to update the COLIBRI firmware using DFuSE a free tool from ST Microelectronics It is the most barebones method you can use 1 Download STM D...

Страница 24: ...you are all set More seasoned builders and pilots may wish to directly solder motor cables to the ESC for greater reliability The ESCs stack into the TBS POWERCUBE in alternating fashion The location...

Страница 25: ...Connect 5 Hit Check 6 All your ESC should be listed 7 Flash them using Flash BlHeli button 8 Make sure you restore the settings after flashing them continue always hit enter will continue that way Th...

Страница 26: ...E PDB V2 Power distribution This board measures current and controls power distribution across the entire TBS POWERCUBE provides regulated and filtered power for the ESCs flight controller and FPV sys...

Страница 27: ...oard regulator or requires more power than the TBS DCDC board can provide If your are experienced with soldering you can make the change without disassembling the stack but it is recommended to disass...

Страница 28: ...era and transmitter is directly supported and plugs into the connector Molex Picoblade be sure the output voltage is right for the equipment you are going to connect By looking at the side of the PDB...

Страница 29: ...This pin is an additional 5V pin on newer TBS PDB V2 boards Unless you are using an older flight controller V1 0 V1 1 you will not need to make any changes Owners of POWERCUBE FPVision layer or PDB V...

Страница 30: ...it by soldering the 6 pin headers that connect the power distribution board with the TBS DCDC especially on the TBS DCDCD side Lines in video In some instances high draw R C receivers or telemetry de...

Страница 31: ...tup The installation is simple The flight control has 4 signal pins holes that match to the 4 signal pins on the PDB Simply drop the FC and the PDB onto the stack together no spacers in between and th...

Страница 32: ...upply This works essentially as a short term energy storage with huge discharge capabilities For drag races and full throttle aficionados the TBS Drag Race Shield adds a whopping 2200uF to your power...

Страница 33: ...red by the BST 5V or by the Flight Controller over the ext FC port TBS GPS Can only be powered by the BST 5V TBS CURRENT SENSOR Provides VBatt but needs BST 5V to run itself TBS CROSSFIRE RX Can be po...

Страница 34: ...ayer which allows a connection to the CORE PRO This connection provides battery power and current sensor data for the OSD on the CORE PRO The FPV transmitter and camera must be connected to the CORE P...

Страница 35: ...ess it again The default settings for RC calibration match the CleanFlight BetaFlight settings If your R C matches these settings you may choose to skip the R C calibration setup step Calibrate new se...

Страница 36: ...he instructions on the screen and move your sticks accordingly If the direction does not match it needs to be adjusted in your R C radio configuration Cleanflight can not interpret reversed channels C...

Страница 37: ...ng the CORE PRO select READ CLEANFLIGHT RC DATA in the CORE PRO menu and the CORE PRO will apply the settings from your CleanFlight setup The same process will be run if you choose to SKIP a mandatory...

Страница 38: ...use the same setting The flight control and power distribution boards are terminating layers meaning they are the head and the tail of the cube In between are the ESCs which are stacked on top of eac...

Страница 39: ...ace to protect your ESCs against the elements Be sure to add tape to all parts that need to remain exposed such as the standoff holes any sockets pin headers or connectors Weatherproofing your setup c...

Страница 40: ...Shielded wires or twisted cables only anything else picks up RF noise and can cause problems When using powerful R C transmitters make sure your groundstation equipment is properly shielded Adding Re...

Страница 41: ...nty of power Try to achieve as much separation of the VTx and R C receiver as possible to lower the RF noise floor and EMI interference Do not buy the cheapest equipment unless it is proven to work re...

Отзывы: