background image

Item N

0

. Part 

N

0

Qty 

Description 

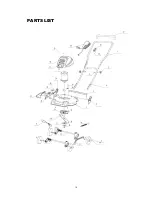
1 3331237 1 Upper 

handle 

2 3410737 2 Knob 

3 3220837 2 Long 

bolt 

4 3331337 1 Lower 

handle 

3420237 

Rear rubber curtain 

3330737 

Left handle bracket   

7 3310137 1 Deck 

3330537 

Height adjustment lever 

9 3420137 4 Wheel 

10 3290137 6 Hairpin 

clip 

11 3330537 1 Link 

bar 

12 

3320137 

Front wheel shaft assembly 

13 

3320237 

Rear wheel shaft assembly 

14 3340137 1 Spring 

15 

3220737 

Blade nut M10 

16 3331035 1 Blade 

plate 

17 

3411635 

Blade locking plate 

18 3330137 1 Blade 

19 3410237 1 Fan 

20 3220137 1 Cross 

screw 

21 

3410637 

Side discharge chute 

22 

3410537 

Side discharge cover 

23 

3320537 

Side discharge cover shaft 

24 

3330637 

Side discharge cover bracket   

25 3340237 1 Spring 

26 

3330737 

Right height adjustment level 

27 3331237 1 Cord 

path 

28 3410403 1 Cord 

holder 

29 3220303 2 Cross 

screw 

30 3610137 1 Motor 

assembly 

31 3411237 1 Grill 

32 3410337 1 Motor 

housing 

33 3220337 4 Cross 

screw 

34 3110137 1 Switch 

assembly 

35 3410737 1 Cord 

restraint 

36 3220437 2 Cross 

screw 

37 3490137 1 Foam 

sleeve 


19

Содержание 227684

Страница 1: ...684 Instruction Manual IMPORTANT Read safety rules and instructions carefully before operating equipment 1 TM Questions problems or missing parts Call our Customer Care Center at 1 877 888 3872 Monday through Friday 8 00 am C 5 00 pm EST ...

Страница 2: ...Failure to comply with these instructions may result in personal injury DANGER This machine was built to be operated according to the rules for safe operation in this manual As with any type of power equipment carelessness or error on the part of the operator can result in serious injury This machine is capable of amputating hands and feet and throwing objects Failure to observe the following safe...

Страница 3: ...ilt in GFCI protection and may be used as an added measure of safety 12 To prevent electric shock use only with a CSA CUL listed extension cord set suitable for outdoor use such as Type SW A SOW Α STW Α STOW Α SJW Α SJOW Α SJTW A or SJTOW A 13 Extension Cord Make sure your extension cord set is in good condition is heavy enough to carry the current your mower will draw and is polarized one blade o...

Страница 4: ...te hands and feet 24 Never attempt to make a wheel or cutting height adjustment while the motor is running 25 Avoid dangerous environments Never operate the mower in the rain or in wet or damp grass 26 Mow only in daylight or in good artificial light Walk never run 27 Stop the blade when crossing gravel driveways walkways or roads 28 If the equipment should start to vibrate abnormally stop the mot...

Страница 5: ... 2 Never allow children under 14 years old to operate a power mower Children 14 years old and over should read and understand the operating instructions and safety rules in this manual and should be trained and supervised by a parent SERVICE 1 When servicing use only identical replacement parts listed in this manual Use of parts which do not meet the original equipment specifications may lead to i...

Страница 6: ...wn Mower Double insulation eliminates the need for the usual three wire grounded power cord and grounded power supply system Wherever there is electric current in the mower there are two complete sets of insulation to protect the user All exposed metal parts are isolated from the internal metal motor components with protecting insulation IMPORTANT Servicing of a lawn mower with double insulation r...

Страница 7: ...al Top handle Nuts Tools Required Pliers Assembling Handle 1 Remove any packing material which may be between the upper and lower handles for shipping purposes 2 Pull up and back on the upper handle to raise the handle into the operating position Make certain the lower handle is seated securely into the handle mounting bracket see Fig 1 3 The upper handle may be adjusted to three different height ...

Страница 8: ...s are tightened securely INSTALLING THE CHARGE CHUTE y Pull out the key and wait for blade to come to a complete stop y Open mulch door by pulling on the mulch door finger grip y Align the discharge chute arrows with the positioning arrows on the lawnmower deck and insert the discharge chute y Position the chute until the chute hooks are trapped under the deck hooks and release the chute and door ...

Страница 9: ... cord restraint is located on the back of the upper handle and when used properly helps to protect the motor blade control assembly and extension Height Adjustment Lever A single height adjustment lever located by the left rear wheel provides cutting height adjustments The lever adjuster has six height positions Height of cut will be changed when the lever is moved from one position to another Sim...

Страница 10: ...extension cord should be CSA approved for outdoor use IMPORTANT Using extensions cords of the wrong gauge will diminish the performance and possibly the life of the electric motor and may also cause breakers to trip or fuses to blow in your home s fuse box Cord Restraint Attach the extension cord not provided with unit to the cord restraint as follows 1 Form a small loop in the extension cord Allo...

Страница 11: ...your source of power This outlet may be located either outdoors or indoors To avoid blowing fuses pick an outlet that is not overloaded Do not use oversized fuses without consulting an electrician T Obstacles Outlet Start here Switch use NOTE The wheels on mower are set to a low cutting position for shipping purposes For best results raise the cutting position until you determine the height best s...

Страница 12: ...effective cutting and a proper discharge of the clippings For a healthy lawn always cut off one third or less of the total length of the grass The average lawn should be approximately 1 1 2 2 during cool months and over 2 during hot months If there is growth the lawn should be cut in the fall Mulching Tips For effective mulching do not cut wet grass because it tends to stick to the underside of th...

Страница 13: ...ntenance on the lawn mower Cutting Blade Replacement WARNING Always protect hands by wearing heavy gloves and or wrapping cutting edges with rags other material when performing blade maintenance Be certain to disconnect the power supply Removing the Blade Stop the motor and disconnect the power supply to the mower Turn the mower on its side Wedge a block of wood between the blade and mower deck to...

Страница 14: ... wheel When sharpening the blade follow the original grinding angle as a guide It is extremely important that each cutting edge receives an equal amount of grinding to prevent unbalancing the blade Test the blade by balancing it on a round shaft screwdriver or a blade balancer If the blade is not balanced remove metal from the heavy side until it balances evenly WARNING An unbalanced blade will ca...

Страница 15: ...n Store mower in a dry clean area Do not store next to corrosive materials such as fertilizer and rock salt Wipe extension cord to remove any foreign substance such as oil or stains Replace extension cord if cut or damaged in any way Wind cord in a series of equal loops to prevent it from tangling Store mower indoors in a cool dry place out of the reach of children Do not cover lawn mower with a s...

Страница 16: ...live 120 V AC 60 Hz AC receptacle Reset the house circuit breaker If it trips again call a qualified electrician Mower cutting grass unevenly Lawn is rough or uneven Cutting height not set properly Move the wheels to a higher position All wheels must be placed in the same cutting height for the mower to cut evenly Mower not mulching properly Wet grass clippings stick to the underside of the deck W...

Страница 17: ...hments not specifically recommended Repairs necessary because of operator abuse or negligence or the failure to install operate maintain and store the product according to the instructions in the owner s manual Damage caused by cold heat rain excessive humidity corrosive environments and materials or other contaminants Expendable items that become worn during normal use Cosmetic defects that do no...

Страница 18: ...PARTS LIST 18 ...

Страница 19: ...e nut M10 16 3331035 1 Blade plate 17 3411635 1 Blade locking plate 18 3330137 1 Blade 19 3410237 1 Fan 20 3220137 1 Cross screw 21 3410637 1 Side discharge chute 22 3410537 1 Side discharge cover 23 3320537 1 Side discharge cover shaft 24 3330637 1 Side discharge cover bracket 25 3340237 1 Spring 26 3330737 1 Right height adjustment level 27 3331237 1 Cord path 28 3410403 1 Cord holder 29 3220303...

Отзывы: