background image

En-18

Turning On & Basic Operations

Turning On/Off the AV 
Receiver

Tip

• The 

HYBRID STANDBY

 indicator may light depending on the 

status of settings (

page 47

).

• For details on power management settings, see “Auto Standby” 

(

page 62

).

8

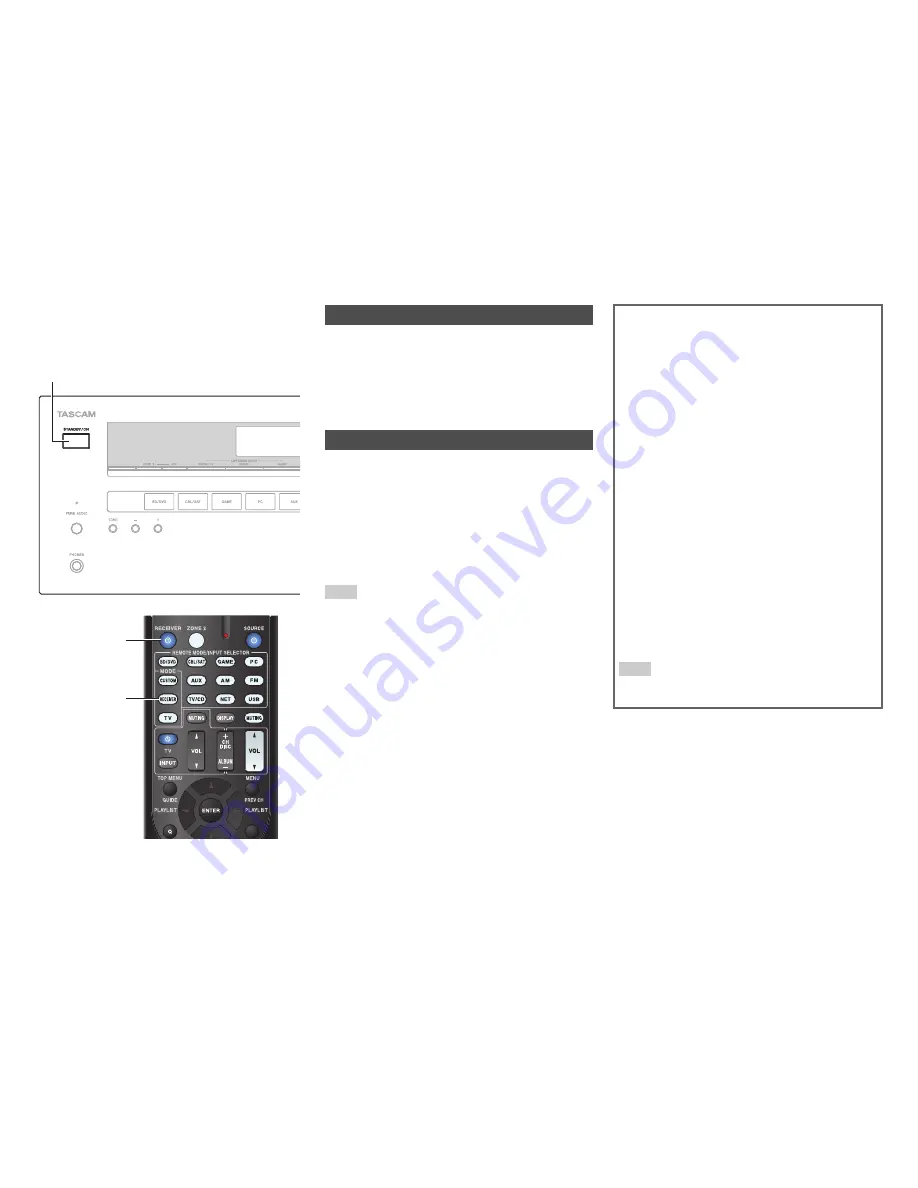
RECEIVER

RECEIVER

STANDBY/ON

Turning On

1

Press 

STANDBY/ON

 on the front panel.

or

Press 

RECEIVER

 followed by 

8

RECEIVER

 on the 

remote controller.

The AV receiver comes on and its display lights.

Turning Off

1

Press 

STANDBY/ON

 on the front panel.

or

Press 

RECEIVER

 followed by 

8

RECEIVER

 on the 

remote controller.

The AV receiver will enter standby mode. To prevent 
any loud surprises when you turn on the AV receiver, 
always turn down the volume before you turn it off.

Smooth Operation in a Few Easy Steps 
(Initial Setup)

To ensure smooth operation, here’s a few easy steps to 
help you configure the AV receiver before you use it for 
the very first time. These settings only need to be made 
once. See “Initial Setup” for details (

page 19

).

If the “Firmware Update Available” window 
appears.

When a new version of the firmware is available, the 
notification window “

Firmware Update Available

” 

pops up. This notification only appears when the AV 
receiver is connected to your home network 
(

page 89

). To perform the firmware update, follow 

the instructions on screen.

Use 

q

/

w

 and 

ENTER

 on the AV receiver or remote 

controller to select one of the options.

`

Update Now

:

Starts the firmware update.
Refer to “Firmware Update” (

page 80

).

`

Remind me Later

:

The update notification will pop up again the next 
time you turn the AV receiver on.

`

Never Remind me

:

Disables the automatic update notification.

Tip

• The update notification window can be enabled or disabled in 

Update Notice

” (

page 63

).

Содержание PA-R100

Страница 1: ...CEIVER Instruction Manual SN29401376 Y1210 1 Contents Safety Information and Introduction 2 Table of Contents 5 Connections 11 Turning On Basic Operations 18 Advanced Operations 43 Controlling Other C...

Страница 2: ...water D If the apparatus does not operate normally by following the operating instructions Adjust only those controls that are covered by the operating instructions as an improper adjustment of other...

Страница 3: ...om you purchased this unit 8 Handling Notes If you need to transport this unit use the original packaging to pack it how it was when you originally bought it Do not leave rubber or plastic items on th...

Страница 4: ...Installing the batteries Note If the remote controller doesn t work reliably try replacing the batteries Don t mix new and old batteries or different types of batteries If you intend not to use the re...

Страница 5: ...etup 32 Using the Listening Modes 35 Using the Home Menu 40 Using the Sleep Timer 41 Setting the Display Brightness 41 Displaying Source Information 41 Changing the Input Display 41 Using the Music Op...

Страница 6: ...Switching 2 Inputs 1 Output Banana Plug Compatible Speaker Posts In Europe using banana plugs to connect speakers to an audio amplifier is prohibited Zone 2 Pre Line Out IR Input Output and 12 V Trig...

Страница 7: ...46 k TUNING q w 29 PRESET e r 30 cursor and ENTER buttons l RETURN button m MASTER VOLUME control 21 n MUSIC OPTIMIZER button and indicator North American models 42 45 o PHONES jack 42 p TONE and Tone...

Страница 8: ...EQ indicator 53 Dynamic Vol indicator 54 g M Opt indicator 45 h Tuning indicators RDS indicator excluding North American models 30 AUTO indicator 29 TUNED indicator 29 FM STEREO indicator 29 i MUTING...

Страница 9: ...nal for control h IR IN and OUT jacks i 12V TRIGGER OUT jacks j AC INLET k u REMOTE CONTROL jack l Composite video and analog audio jacks BD DVD IN CBL SAT IN GAME IN PC IN TV CD IN m MONITOR OUT V ja...

Страница 10: ...M or FM or RECEIVER a q w buttons 29 b D TUN button 29 c DISPLAY button d CH button 30 e Number buttons 29 1 To control a component you must first enter the remote control code See Entering Remote Con...

Страница 11: ...back speakers 2 Front high speakers 2 Connecting the Speaker Cables The following illustration shows how to connect the speakers to each pair of terminals Tip You can specify whether surround back or...

Страница 12: ...to negative terminals If you get them the wrong way around the sound will be out of phase and will sound unnatural Unnecessarily long or very thin speaker cables may affect the sound quality and shoul...

Страница 13: ...other video equipment Optical digital audio Optical digital connections allow you to enjoy digital sound such as PCM 2 Dolby Digital or DTS The audio quality is the same as coaxial Coaxial digital au...

Страница 14: ...of a component connected via HDMI through your TV s speakers enable HDMI Through page 61 and set the AV receiver to standby mode Note In the case of Blu ray Disc DVD players if no sound is output desp...

Страница 15: ...you can enjoy audio from external components while you are in Zone 2 With connection G if your Blu ray Disc DVD player has both the main stereo and multichannel outputs be sure to connect the main st...

Страница 16: ...e 71 Note Use only u cables for u connections u cables are supplied with u capable components Some components have two u jacks You can connect either one to the AV receiver The other jack is for conne...

Страница 17: ...merican models European models Push Insert wire Release Assembling the AM loop antenna Indoor FM antenna supplied AM loop antenna supplied Caution Be careful not to injure yourself when using thumbtac...

Страница 18: ...p To ensure smooth operation here s a few easy steps to help you configure the AV receiver before you use it for the very first time These settings only need to be made once See Initial Setup for deta...

Страница 19: ...he following options and then press ENTER Yes Continues to Audyssey 2EQ Auto Setup No Skips the settings and terminates the initial setup The setup wizard goes to Terminating the Initial Setup You can...

Страница 20: ...Setup Remote Mode Setup 1 Use q w to select one of the following options and then press ENTER Yes Performs the remote control code input Refer to step 5 of Looking up for Remote Control Codes page 69...

Страница 21: ...on a Shared Folder page 28 Listening to AM FM Radio page 29 Playing Audio and Video from Separate Sources page 31 iPod iPhone Playback via RI Dock page 67 Controlling Other Components page 69 3 To adj...

Страница 22: ...his button twice selects the previous song e 5 This button fast reverses the current song f 3 This button pauses playback g SEARCH You can toggle between the playback screen and the list screen during...

Страница 23: ...same operation can be done by selecting USB in the Home menu 2 Connect the USB cable that comes with the iPod iPhone to the USB port on the front of the AV receiver While reading the contents of your...

Страница 24: ...cable supplied with your iPod iPhone or the USB device from the USB port The vTuner Internet Radio Service is a portal site featuring radio stations from all over the world You can search for stations...

Страница 25: ...remote controller 1 Press MENU with the station selected or while a station is playing 2 Use q w to select Add to My Favorites and press ENTER 3 Use q w e r to select OK and press ENTER Adding to vTun...

Страница 26: ...o HDMI OUT 1 Start your computer or media server 2 Press NET The network service screen appears The NET indicator lights If it flashes confirm the network connection Tip The same operation can be done...

Страница 27: ...g A list of media server appears Wording may vary slightly depending on the network location 4 On the Media streaming options select the AV receiver and confirm that it is set to Allow 5 Click OK to c...

Страница 28: ...lder Sharing select Share 6 Select and add Everyone from the pull down menu and then click Share Tip With this setting everyone is allowed to access the folder If you want to assign a user name and pa...

Страница 29: ...r s display 2 Press TUNING q w Searching stops when a station is found When tuned into a station the TUNED indicator lights When tuned into a stereo FM station the FM STEREO indicator lights as shown...

Страница 30: ...ge 31 Note In some cases the text characters displayed on the AV receiver may not be identical to those broadcast by the radio station Also unexpected characters may be displayed when unsupported char...

Страница 31: ...d the message Not Found appears 1 Press RT PTY TP three times If the current radio station is broadcasting TP Traffic Program TP will appear on the AV receiver s display If TP without square brackets...

Страница 32: ...reate a listening environment in your home theater that all listeners will enjoy Audyssey 2EQ takes measurements at up to three positions within the listening area Position the microphone at ear heigh...

Страница 33: ...Audyssey 2EQ Room Correction and Speaker Setup starts Test tones are played through each speaker as Audyssey 2EQ Room Correction and Speaker Setup runs This process takes a few minutes Please refrain...

Страница 34: ...tings page 11 Changing the Speaker Setup Manually You can manually make changes to the settings found during Audyssey 2EQ Room Correction and Speaker Setup See also Speaker Configuration page 50 Speak...

Страница 35: ...s display and analog video circuitry are turned off Only video signals input through HDMI input can be output from an HDMI output The indicator lights when this mode is selected Pressing this button...

Страница 36: ...b a f de A This is mono monophonic sound S This is stereo stereophonic sound Two independent audio signal channels are reproduced through two speakers D This is 5 1 channel surround sound This surroun...

Страница 37: ...zation is distinct with emphasis on bass Game Rock In this mode sound pressure is emphasized to heighten live feel Game Sports In this mode reverberation is increased and sound localization decreased...

Страница 38: ...3 D XCN Dolby Digital Dolby Digital Plus 5 D XCN F XCN 3 Dolby TrueHD D XCN F XCN 3 P u r e A A u d i o D i r e c t S t e r e o M o n o M u l t i c h D S D D o l b y D D o l b y D D o l b y T r u e H...

Страница 39: ...IIx Game Use this mode with video games especially those that bear the Dolby Pro Logic II logo S XCN Dolby PLIIx Movie Dolby PLIIx Music These modes use the Dolby Pro Logic IIx modes to expand 5 1 cha...

Страница 40: ...hrough HDMI you can easily switch between inputs as their previews are displayed on a single screen Press ENTER to display the main preview currently selected HDMI input and the additional previews ot...

Страница 41: ...reappears Tip If you need to cancel the sleep timer press SLEEP repeatedly until the SLEEP indicator goes off To check the time remaining until the AV receiver sleeps press SLEEP Note that if you pres...

Страница 42: ...he AV receiver s display Tip To unmute press MUTING again or adjust the volume Muting is automatically cancelled when the AV receiver is set to standby Using Headphones 1 Connect a pair of stereo head...

Страница 43: ...n change the following settings Bass Treble Subwoofer Level Center Level Audyssey Dynamic EQ Dynamic Volume Late Night Music Optimizer and Cinema Filter Video 2 You can change the following settings W...

Страница 44: ...You can boost or cut high frequency sounds output from the front speakers You can adjust the bass and treble for the front speakers except when Direct or Pure Audio European models listening mode is s...

Страница 45: ...hen TrueHD Loudness Management is set to Off Music Optimizer Music Optimizer Off On The Music Optimizer function enhances the sound quality of compressed music files When set to On the M Opt indicator...

Страница 46: ...item and then press ENTER 4 Use q w to select a sub menu item and then press ENTER 5 Use q w to select a setting target and use e r to change the setting Press HOME to close the menu Press RETURN to r...

Страница 47: ...itor Out HDMI Input Component Video Input Composite Video Input Digital Audio Input Speaker Setup page 50 Speaker Configuration Speaker Distance Level Calibration Audio Adjust page 51 Multiplex Mono D...

Страница 48: ...nent Video Input and Composite Video Input See Video Connection Formats for more information on video signal flow and upconversion page 84 Here are the default assignments BD DVD CBL SAT GAME PC AUX T...

Страница 49: ...enjoy audio and video from separate inputs Refer to Playing Audio and Video from Separate Sources for details page 31 AUX is fixed to the option USB is used only for input from the front panel Digital...

Страница 50: ...he Front setting 2 If the Surround setting is set to None this setting cannot be selected 3 If anything else than None is selected in Front High this setting is automatically set to None 4 If anything...

Страница 51: ...ont High Right Right Surround Right Surround Back Right Surround Back Left Surround Left 12dB to 0dB to 12dB in 1 dB steps Subwoofer 1 15dB to 0dB to 12dB in 1 dB steps Note Speakers that you set to N...

Страница 52: ...L IIz Height Gain Low Mid High The Height Gain Control in Dolby Pro Logic IIz enables the listener to select how much gain is applied to the front high speakers There are three settings Low Mid and Hi...

Страница 53: ...s the problem of deteriorating sound quality as volume is decreased by taking into account human perception and room acoustics It does so by selecting the correct frequency response and surround volum...

Страница 54: ...find that the picture and sound are out of sync With this setting you can correct this by delaying the audio signals To return to the previous screen press RETURN The range of values you can adjust w...

Страница 55: ...ting determines the aspect ratio 4 3 Full Zoom Wide Zoom 1 Use q w e r to select a character and then press ENTER Repeat this step to enter up to 10 characters 2 To store a name when you re done be su...

Страница 56: ...cally converting it to the appropriate progressive signal and reproducing the natural quality of the original picture Edge Enhancement 2 4 5 Off Low Mid High With this setting you can make the picture...

Страница 57: ...put signals will be heard If the input signal is not PCM the PCM indicator will flash and noise may also be produced DTS Only DTS but not DTS HD format input signals will be heard If the input signal...

Страница 58: ...multichannel PCM sources from HDMI IN such as DVD Audio and DSD multichannel sources such as Super Audio CD Main menu Miscellaneous Volume Setup Maximum Volume Off 30 to 79 With this setting you can l...

Страница 59: ...mp noise that s sometimes heard when a source component is turned on You can accomplish this by delaying the trigger signal for your power amplifier so that it s the last component to be turned on Del...

Страница 60: ...to allow p compatible components connected via HDMI to be controlled by the AV receiver page 86 Note When the setting is set to On and the menu is closed the names of connected p compatible components...

Страница 61: ...sound through its speakers In this case TV Speaker appears on the AV receiver s display by pressing DISPLAY When HDMI Control RIHD is set to On this setting is fixed to Auto With some TVs and input si...

Страница 62: ...P is set to Enable If however your router s DHCP server is disabled you re for example using static IP you ll need to configure these settings yourself in which case a knowledge of Ethernet networking...

Страница 63: ...19 Main Menu Remote Controller Setup Remote ID Remote ID 1 2 or 3 When several other components are used in the same room their remote ID codes may overlap To differentiate the AV receiver from other...

Страница 64: ...ting the Zone 2 Out Controlling Zone 2 Components 1 To turn on Zone 2 and select an input source press ZONE 2 followed by an input selector button within 8 seconds Zone 2 turns on the Z2 indicator lig...

Страница 65: ...ode is set to Pure Audio European models will automatically switch it to Direct The Zone 2 level balance and tone functions have no effect on the ZONE 2 PRE LINE OUT jacks when the Zone 2 Out setting...

Страница 66: ...roller and feeds them to the AV receiver located in the cabinet via the connecting block Using a Multiroom Kit with Other Components In this setup an IR emitter is connected to the AV receiver s IR OU...

Страница 67: ...layback while listening to another input source the AV receiver will automatically switch to the input to which the RI Dock is connected Other Remote Operations You can use the remote controller that...

Страница 68: ...expected For detailed operation of iPod iPhone please refer to the instruction manual of the RI Dock 1 TOP MENU works as the mode button when used with some RI Dock 2 This button does not turn the RI...

Страница 69: ...2 Use e r to select Setup and then press ENTER 3 Use q w to select Remote Controller Setup and then press ENTER 4 Use q w to select Remote Mode Setup and then press ENTER 5 Use q w to select a remote...

Страница 70: ...RECEIVER TV and the multi zone button remote control codes from any category can be assigned for the REMOTE MODE buttons However these buttons also work as input selector buttons page 21 so choose a R...

Страница 71: ...remote controller with the appropriate remote control code you can use it to operate your Apple TV Use the following remote control codes 02615 Apple TV Remote Control Codes for Components Connected...

Страница 72: ...upported by the AV receiver is the CEC system control function of the HDMI standard TV operation Blu ray Disc player HD DVD player operation h l m n o i k j g c b d a e f Press the appropriate REMOTE...

Страница 73: ...ailable buttons b TOP MENU h 8SOURCE c q w e r ENTER i DISPLAY d SETUP j MUTING e 1 3 2 5 4 7 6 k CH DISC f A Red 1 l MENU B Green m RETURN C Yellow 1 n AUDIO 1 D Blue 1 o CLR g Number 1 to 9 0 Number...

Страница 74: ...on If the AV receiver turns off again unplug the power cord and contact the dealer from whom you purchased this unit Caution If CHECK SP WIRE appears on the AV receiver s display the speaker cables ma...

Страница 75: ...With some DVD Video discs you need to select an audio output format from a menu Depending on the input signal some listening modes cannot be selected 35 39 European models The Pure Audio listening mo...

Страница 76: ...input signal from HDMI IN is output to a device connected to HDMI OUT 43 Tuner Relocate your antenna Move the AV receiver away from your TV or computer Listen to the station in mono 29 When listening...

Страница 77: ...efore selecting a different input source If playback is not paused the Direct Change function may select your iPod iPhone as the input source by mistake during the transition between tracks Try reconn...

Страница 78: ...release both buttons To reactivate the DeepColor function repeat the above process until Deep Color On appears on the AV receiver s display and release the buttons Others In the following cases the po...

Страница 79: ...o source is connected to a component video input connect your TV to COMPONENT VIDEO OUT If the video source is connected to a composite video input connect your TV to MONITOR OUT V 2 On the main menu...

Страница 80: ...your USB device via a USB hub USB devices with security functions are not supported The AV receiver allows you to update the firmware using network connection on the rear panel Note Make sure your AV...

Страница 81: ...d on again 5 The message Completed appears on the AV receiver s display indicating that the update has been completed 6 Press STANDBY ON on the front panel The AV receiver will enter standby mode Do n...

Страница 82: ...r When the AV receiver has two USB ports you can use either one 5 Make sure the AV receiver and TV are turned on If the AV receiver is in standby mode press STANDBY ON on the AV receiver to light up t...

Страница 83: ...ed in the country you purchased or TASCAM customer support When you contact them please provide the error code Error Code Description 10 20 The USB device was not detected Make sure the USB flash memo...

Страница 84: ...input the inputs will be selected automatically in the following order of priority HDMI component video composite video However for component video only regardless of whether a component video signal...

Страница 85: ...hts In the case of an optical or coaxial connection the DIGITAL indicator lights In the case of an analog connection neither of the HDMI and DIGITAL indicators light Audio Connection Formats IN OUT Bl...

Страница 86: ...I Proper linked operations are not guaranteed when more p compatible components than the above mentioned quantities are connected For p compatible TV The following linked operations are enabled by con...

Страница 87: ...d confirm that the audio is output from the speakers of the TV and not from the speakers connected to the AV receiver 6 Select Use the speakers connected from the AV receiver from the menu screen of t...

Страница 88: ...e AV receiver via HDMI must also support HDCP 1 DVI Digital Visual Interface The digital display interface standard set by the DDWG 3 in 1999 2 HDCP High bandwidth Digital Content Protection The video...

Страница 89: ...ecific routers Please consult your ISP or computer dealer if you re unsure CAT5 Ethernet cable Use a shielded CAT5 Ethernet cable straight type to connect the AV receiver to your home network Internet...

Страница 90: ...commend that you use its AC adapter to power it The AV receiver supports USB MP3 players that support the USB Mass Storage Class standard which allows USB devices to be connected to computers without...

Страница 91: ...3gp 3g2 AAC M4A MP4 3GP or 3G2 AAC stands for MPEG 2 MPEG 4 Audio Sampling rates of 8 kHz 11 025 kHz 12 kHz 16 kHz 22 05 kHz 24 kHz 32 kHz 44 1 kHz 48 kHz 64 kHz 88 2 kHz 96 kHz and bitrates of betwe...

Страница 92: ...electronic accessory has been designed to connect specifically to iPod or iPhone respectively and has been certified by the developer to meet Apple performance standards Apple is not responsible for...

Страница 93: ...p 75 Component Y 0 7 Vp p 75 Component PB CB PR CR 1 Vp p 75 Composite Component Video Frequency Response 5 Hz 100 MHz 0 dB 3 dB FM Tuning Frequency Range North American 87 5 MHz 107 9 MHz European 8...

Страница 94: ...Appendix En 94 Memo...

Страница 95: ...Appendix En 95 Memo...

Страница 96: ...890 9888 5939 Wallace Street Mississauga Ontario L4Z 1Z8 Canada TEAC MEXICO S A de C V http teacmexico net Phone 52 55 5010 6000 R o Churubusco 364 Colonia Del Carmen Delegaci n Coyoac n CP 04100 M xi...

Отзывы: