8 - Touchscreen Functions
Explanation of functions
Menu Screen
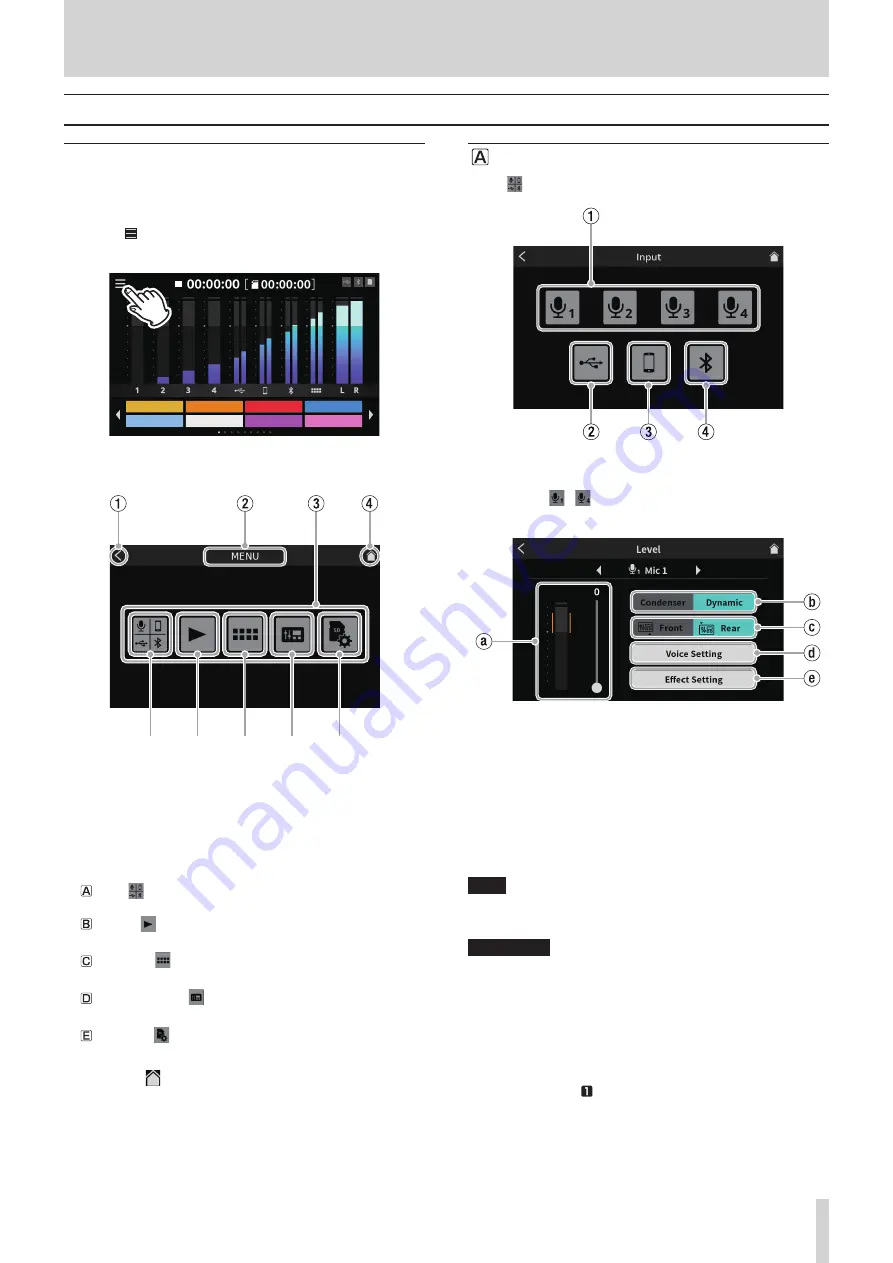
Tap the Menu icon on the Home Screen to open the Menu Screen.
Tap the icons on this screen to access the operations and settings of
various functions.
1. Tap the Menu icon on the Home Screen to open the Menu
Screen.
Applause
Drumbeat
Alarm
AirHorn
Brass
Heartbeat
Bleep
Effect
Home Screen
2. This opens the Menu Screen.
Menu Screen
1
<
icon
Tap this icon to return to the screen that was open before this one.
2
Function name
This shows the function name of the screen being shown.
3
Function icons
Inputs
This opens the Input Screen (page 27).
Playback
This opens the podcast PLAY Screen (page 33).
Sound Pads
This opens the Sound Pad Settings Screen (page 34).
Hardware Settings
This opens the Hardware Settings Screen for the unit (page 35).
SD Settings
This opens the settings screen for SD cards (page 37).
4
Home icon
Tap this icon to open the Home Screen.
Input selection
Tap the
Input icon to open the Input Screen.
Input Screen
1
Mic settings
Tap Mic icon
–
to open the Level Screen.
(This is an example of procedures to adjust MIC INPUT 1.)
Level Screen
(Example: MIC INPUT 1 jack)
`
Mic input level
Use the slider to adjust the level.
(Adjust the mic volume so that it is not too high or low and the vol-
ume peak stays in the orange range on the level meter.)
1
Condenser/Dynamic (mic type) selection
Set the types of mics connected to MIC INPUT 1–4 jacks (
g
) to
“Dynamic” (default) or “Condenser”.
NOTE
Red dots will be shown on the Home Screen next to the labels (
9
)
for channel numbers (1–4) of mic inputs set to “Condenser”.
V
CAUTION
When “Condenser” is selected, +48V power is provided to that MIC
input. Before disconnecting a condenser mic, change the setting to
“Dynamic” to turn +48V power off.
( If a dynamic mic is connected to a MIC INPUT 1-4 jack (
g
) that is set
to “Condenser”, it could be damaged.)
2
Front/Rear input switch (MIC INPUT 1 only)
Select “Front” to use the mic input signal of a headset connected to
the PHONES (TRRS) jack (
q
)as the channel 1 input. (This does not
apply to MIC INPUT 2–4.)
Select “Rear” (default) to switch to the MIC INPUT 1 jack (
g
).
TASCAM Mixcast 4
27
Содержание Mixcast 4
Страница 1: ...D01396920A Podcast Recording Console Reference Manual...
Страница 47: ...TASCAM Mixcast 4 47...


