background image

78


TASCAM  GT-R1

15–Using the Tuner

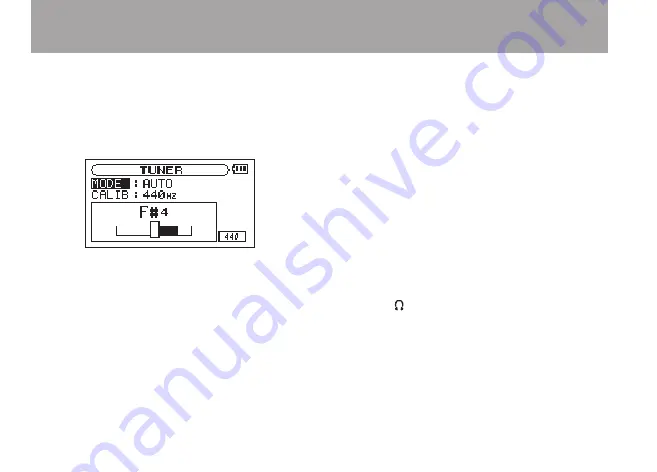
is shown and the center of the meter is 
highlighted. A bar appears to the left if the 
tuning is too low and a bar appears to the 
right if it is too high. The longer the bar is 
the more out of tune the instrument is.

GUITAR (guitar tuner mode)

Change the setting for each string to be tuned. 

1  Use the 

NOTE

 item to select the string that 

you want to tune (1E, 2B, 3G, 4D, 5A, 6E). 

2  The string is in tune when the center of the 

meter is lit. 

  The tuning procedure is the same as in the 

AUTO mode. 

BASS (bass tuner mode)

Change the setting for each string to be tuned.

1  Use the 

NOTE

 item to select the string that 

you want to tune (1G, 2D, 3A, 4E, 5B). 

2  The string is in tune when the center of the 

meter is lit.

  The tuning procedure is the same as in the 

AUTO mode.

OSC. (oscillator mode)

The built-in oscillator can output a sine wave of a 
pitch in the three octaves between C3 and B5 
through the  /

LINE OUT

 jacks. In addition to the 

CALIB

 item described above, the oscillator mode 

has the following three setting items. 

NOTE 

Set the pitch of the tuning tone (C3–B5). 

Содержание GT-R1

Страница 1: ...GT R1 Portable Guitar Bass Recorder D01035410B OWNER S MANUAL This device has a serial number located on the rear panel Please record it and retain it for your records Serial number __________________...

Страница 2: ...e unit 12 3 Part Names and Functions 13 Top panel 13 Right side panel 17 Left side panel 19 Front panel 20 Rear panel 20 Bottom panel 21 4 Screen Overview 22 Home Screen 22 Record Screen 25 Rhythm Scr...

Страница 3: ...verdubbing 50 Preparation for overdubbing 50 Overdub recording 51 8 Playback 54 Starting and stopping playback 54 Selecting tracks 54 Search forward and backward 55 Using the wheel to change the playb...

Страница 4: ...ode 80 Rhythm Screen features 81 Setting the rhythm machine 83 Playing along with the rhythm machine 85 Preparation 85 Practicing with a rhythm 87 Record playing with a rhythm 87 Apply effects to the...

Страница 5: ...or 48 kHz audio file types for recording Mix and record the input signal with the playing audio track overdubbing Practice and record along with the built in rhythm machine Special playback functions...

Страница 6: ...nventions Controls keys and other parts on the GT R1 are written like this MENU Messages shown on the display are written like this Are you sure We use the term key to describe the push button control...

Страница 7: ...ut cards that have been tested with the GT R1 NOTE When new this unit comes with a 1GB SD card inserted This card can be used for recording and playback as is There is no need to reinsert or format it...

Страница 8: ...is connected to the computer by USB Inserting a new card The following pop up screen appears if you insert a new card in the unit Press the key to format the card so that it can be used with this uni...

Страница 9: ...format the card TIP Always make backup copies of important files as soon as you can Powering the unit The GT R1 can be operated using a special lithium ion battery BP L2 or an AC adapter PS P520 One b...

Страница 10: ...ng with a computer Open the cover on the left side panel and use the included USB cable to connect the unit s USB port to a USB port on a computer Please connect this unit directly to a computer Prope...

Страница 11: ...d AC adapter NOTE The charging indicator to the right of the display lights orange during charging The indicator turns off when charging is complete Charging indicator Turning the power on and off To...

Страница 12: ...Use the and keys to move the cursor the part highlighted in inverse and use the wheel to set the values 4 After making the setting press the key to restart the clock from the newly set value The displ...

Страница 13: ...microphone becomes inactive 2 Display In addition to the Home Screen this shows the recording screen various setting screens and other operation information See 4 Screen Overview on page 22 3 MENU key...

Страница 14: ...tting screens use this key to move the cursor left On the Browse Screen press this key to move up a level When the Rhythm Screen is open use this button to select patterns 7 key Press this key during...

Страница 15: ...and hold this key to open the Effect Setting Screen When the Effect Setting Screen is open press and hold this key to return to the Home Screen See 14 Using the effects on page 74 NOTE When the Home...

Страница 16: ...n standby this key flashes If the Input Setting Screen MONITOR item is ON the Overdubbing ON OFF pop up appears See 7 Recording on page 40 When in recording standby press this key to start recording T...

Страница 17: ...keys to adjust the volume of the playback signal including the rhythm machine when in rhythm mode that is mixed with the input signal The playback volume appears on the display during adjustment Use...

Страница 18: ...R IN jack and the MIC IN jack This does not affect the input signal level of the LINE IN jack p LINE OUT jack Use this to connect with headphones or the line input jack of an amp or other equipment De...

Страница 19: ...bout SD cards on page 7 d USB port Use the included USB cable to connect with a computer USB port See Connecting with a computer on page 36 CAUTION Please connect the unit directly to a computer witho...

Страница 20: ...with the built in mic directed toward the sound source Likewise the Rear Panel is the end that faces away from the operator in this situation Rear panel j MIC IN jack Use this input jack to connect a...

Страница 21: ...m into this hole to press the system reset button inside the unit This turns the power OFF and resets the unit s system CAUTION Do not press the reset button if the unit is functioning properly Batter...

Страница 22: ...tion explains the display and operation of the Home Screen and the Record Screen as well as the appearance and operation of the various setting screens Please see 16 Using the Rhythm Machine on page 8...

Страница 23: ...maining battery power The battery icon flashes when charging is necessary 5 Unit status This icon shows the current operation status Track playing File stopped in progress paused File stopped at its b...

Страница 24: ...Shows the remaining playback time of the current track hours minutes seconds q Playback position display bar This bar shows the current playback position The bar darkens from the left as playback proc...

Страница 25: ...f settings related to the built in microphone and MIC IN stereo recording plug in power low cut filter level control and LR swap 2 Recorder operation Recording Recording paused Recording stopped 3 Rec...

Страница 26: ...e recording file type and sampling frequency During overdubbing the playback file information file name or MP3 ID3 tag appears Rhythm Screen When the Home Screen is open press the PB CONTROL and FX ke...

Страница 27: ...n to making settings we call them setting screens in this manual Setting screen structure Most of the setting screens are accessed by first pressing the MENU button to open the Menu Screen but some sc...

Страница 28: ...set single or repeat mode REC SETTING Make settings related to recording file type sampling frequency maximum file size TUNER Access tuner and oscillator functions SETUP Make various system settings...

Страница 29: ...ion and to answer YES to a confirmation message This functions like the ENTER key on a computer key When a setting screen is open moves the cursor part highlighted in inverse to the left within the sc...

Страница 30: ...reen 2 Turn the wheel to select SETUP highlighted in inverse and press the key to open the Setup Screen 3 Turn the wheel to select the CUE REV SPEED item and press the key to show the current setting...

Страница 31: ...he icon appears there is additional information for the current screen above what is shown on the display You can also use the key instead of the key in these steps When the icon appears to the right...

Страница 32: ...See Selecting the input source on page 42 Use input monitoring You can set the unit to always output the input signal from the LINE OUT jack By doing this when practicing an instrument or singing the...

Страница 33: ...reen to INPUT See 14 Using the Effects on page 74 Learn musical phrases You can learn a fast phrase more easily by using the speed and VSA functions which are two of this unit s playback control funct...

Страница 34: ...ly Repeat and loop playback You can loop a selected section of a musical track which is helpful if you want to practice repeatedly a part that is difficult to play You can also repeat playback of a si...

Страница 35: ...on page 67 Reduce guitar or bass sounds You can reduce the guitar or bass sound in a musical track To do this turn the PART CANCEL item on the Playback Control Screen ON This item has two sub items A...

Страница 36: ...eo systems etc Connecting with a computer By connecting this unit with a computer you can copy WAV or MP3 music files from the computer to this unit From the computer you can also erase files on this...

Страница 37: ...irst follow the procedures for your computer to disconnect the GT R1 and then remove the USB cable The GT R1 automatically restarts See the computer manual for how to close the connection on the compu...

Страница 38: ...stereo microphone that you can use to practice or record your singing for example but you can also use an external mic In addition you can connect external sound sources including mixers and other au...

Страница 39: ...s and other audio equipment You can connect the line output of an audio device or mixer to the LINE IN jack stereo mini jack on the rear panel NOTE The GT R1 does not have any controls to adjust the i...

Страница 40: ...Selecting the file type and sampling frequency Select the audio file type that you want to record before you start recording 1 Press the MENU key to open the Menu Screen 2 Select the REC SETTING item...

Страница 41: ...ng you to capture a greater dynamic range When recording rehearsals lectures and songwriting ideas for example and higher quality audio is not as important as smaller file size MP3 may be a better cho...

Страница 42: ...t one of the following input sources INT MIC Sets the input source as the built in microphone when no microphone cable is connected to the MIC IN jack stereo mini jack When a microphone cable is conne...

Страница 43: ...t source The EFFECT SOURCE EFFECT ON OFF and MONITOR ON OFF settings are saved separately for each input source See 14 Using the Effects on page 74 Setting the INT MIC IN input functions After selecti...

Страница 44: ...ery If set to ON the plug in power might damage such microphones LOW CUT The factory default setting of the low cut filter is OFF but you can also select 40HZ 80Hz or 120Hz as the cut off frequency fo...

Страница 45: ...n mics left and right channels are switched TIP If you stand the unit up and angle the built in mics toward the front of the unit the stereo position of the recording might be reversed from that of th...

Страница 46: ...ark background LR SWAP When LR SWAP is set to L R the icon appears When set to R L the icon appears as light letters on a dark background Adjusting the built in microphone angle You can adjust the ang...

Страница 47: ...flashes red and the Record Screen appears 2 Use the INPUT volume control on the right side of the unit to adjust the microphone input level NOTE The PEAK indicator monitors the maximum input level If...

Страница 48: ...T MIC IN input functions on page 43 When LINE is selected as the input source adjust the input level by changing the output level of the sound source Press STOP HOME to end recording standby TIP When...

Страница 49: ...r play an instrument over a backing track Even when overdubbing a new file is created automatically The audio file that is played back is not overwritten TIP By recording repeatedly in OVERDUB mode yo...

Страница 50: ...pause recording press the REC PAUSE key Press the REC PAUSE key again to restart recording in the same track If you press the STOP HOME key after pausing a recorded audio file up to the moment that yo...

Страница 51: ...f the track being played back and the input signal 4 Press STOP HOME to return to the Home Screen TIP By making the above settings in addition to overdubbing you can use a recorded or copied audio tra...

Страница 52: ...g audio file type and sampling frequency also appear so that you can confirm them before you start recording 5 Use the wheel to select ON from the overdubbing ON OFF pop up 6 Press the REC PAUSE key t...

Страница 53: ...ng frequency on page 40 If you try to overdub when the file type is set to MP3 Format is MP3 appears and operation is prevented To play a track that is not in the currently selected playback area you...

Страница 54: ...ayback is stopped press the key to start playback Stop playback During playback press the STOP HOME or key to stop or pause it at the current position Selecting tracks Use the and keys to select track...

Страница 55: ...search forwards NOTE Use the CUE REV SPEED item on the Setup Screen to change the search speed See Making system settings on page 90 Using the wheel to change the playback position You can use the wh...

Страница 56: ...lume level appears on the display while being adjusted NOTE If you used the MIX BALANCE keys to lower playback volume during overdubbing when you play that recorded audio track the monitoring level wi...

Страница 57: ...files the current folder or the playlist as the playback area You can also use the Browse Screen to set a folder as the playback area TIP On the Browse Screen regardless of the playback area setting...

Страница 58: ...as the tracks in the playlist See Playlist on page 60 If there is no playlist defined a No PLAYLIST pop up appears Selecting a folder for the playback area Regardless of the current playback area if y...

Страница 59: ...k area setting Selecting a file to set the playback area When the playback area is set to FOLDER if you select a file on the Browse Screen the folder that contains the selected file becomes the playba...

Страница 60: ...that contains this track becomes the playback area regardless of the playback area folder set previously Playlist You can make a list of tracks for playback playlist On the Play Mode Screen if you sel...

Страница 61: ...numbered in the order that they are added NOTE For an explanation of how to use the Browse Screen and how to select tracks see Browse Screen and Screen navigation on page 63 Editing the playlist You...

Страница 62: ...OP HOME key to cancel this operation For this operation it does not matter which track you select in step 2 All the files are removed from the playlist but they are not erased from the SD card DELETE...

Страница 63: ...play TIP If you connect the GT R1 with a computer by USB or mount the SD card on a computer using a card reader or other input you can change the folder structure within the Music Folder and erase fil...

Страница 64: ...folders that do not contain subfolders Open folder The contents of the folder marked with this icon currently appear on this screen File operations Select the desired audio file on the Browse Screen...

Страница 65: ...g list and press to execute it SELECT Returns to the Home Screen and selects the first file in the folder This folder becomes the new playback area regardless of the previous playback area setting Whe...

Страница 66: ...ack control functions effectively to practice and learn parts Setting the playback control functions Use the Playback Control Screen to set the play back control functions When the Home Screen is disp...

Страница 67: ...fly pressing the PB CONTROL key so you can easily switch between the set speed and the normal speed Since the speed adjustment range is 50 to 16 in 1 increments the slowest speed setting is half the o...

Страница 68: ...he FINE item to adjust the key as long as the KEY item setting is 0 the icon will not appear as light letters on a dark back ground on the Home Screen Reducing guitar and bass sounds You can use the p...

Страница 69: ...nd RANGE settings might make the reduction more effective Listen to the music as you adjust the settings to achieve the best effect RANGE Select GUITAR BASS or ALL for the frequency range of sound red...

Страница 70: ...rt loop playback The current position is set as the IN point 2 Press the IN OUT key at the point when you want loop playback to stop The current position is set as the OUT point and loop playback begi...

Страница 71: ...mode to one of the following options OFF All tracks in the playback area are played in sequence one time This setting is the ordinary playback mode SINGLE The selected track is played once without re...

Страница 72: ...es of MP3s and WAV files listed above TIP You can also prepare your own tracks using digital audio software or use tracks you previously recorded with the GT R1 or another device Copying audio files f...

Страница 73: ...s from your computer Since all storage media including SD cards can fail it is a good idea to make back up copies of your recordings on your computer hard drive CD Rs or other media Managing the Music...

Страница 74: ...t of the Home Screen and shows the selected effect bank A E as shown in the fol lowing illustration Setting the effect Press and hold the FX key to open the Effect Screen As the illustration above sho...

Страница 75: ...ttings 2 Use the wheel to set the desired value 3 Press the key when you are done making the setting to return to item selection status SOURCE Select whether the effect is applied to the input signal...

Страница 76: ...g press the STOP HOME key to close the pop up Please see 20 Effect Module Parameters List on page 98 for the parameters of each type of module LEVEL knob Use this to change the output level of the pre...

Страница 77: ...mode OSC Oscillator mode 3 Use the CALIB item to set the frequency of A above middle C A4 between 435 Hz and 445 Hz The set value appears in the lower right part of the screen This setting affects al...

Страница 78: ...e center of the meter is lit The tuning procedure is the same as in the AUTO mode BASS bass tuner mode Change the setting for each string to be tuned 1 Use the NOTE item to select the string that you...

Страница 79: ...an image of a vibrating pitchfork appears on the screen as shown If you switch from chromatic mode to oscillator mode the OUT item turns ON automatically If you switch from oscillator mode to chromat...

Страница 80: ...is screen shows a variety of information related to the rhythm machine and allows you to start and stop it set the tempo and select the pattern Moreover when the Rhythm Screen is open you can record a...

Страница 81: ...same way as the Home Screen In addition to these the Rhythm Screen shows the following items 1 Playing stopped status When the rhythm machine is playing appears and when stopped appears NOTE In rhyth...

Страница 82: ...the rhythm machine and the input signal are mixed together and recorded During recording the screen appears almost the same as the Record Screen in the ordinary mode but the following points are diff...

Страница 83: ...be set on the RHYTHM setting screen described hereafter The rhythm patterns cannot be edited Setting the rhythm machine Tempo rhythm pattern count in and count recording can be set on the Rhythm Setti...

Страница 84: ...machine can be used as a metronome Setting the count in COUNT IN The count in before a pattern starts can be set in a range between 9 and 9 The numerical value 0 9 shows the number of beats in the cou...

Страница 85: ...e 46 NOTE You can switch to rhythm mode before preparing the input 2 Switch to rhythm mode When the Home Screen is open press the PB Control and FX keys at the same time to put the unit in rhythm mode...

Страница 86: ...Screen if you are using an effect TIP If you hear distortion when you plug in an active guitar or bass one that contains an internal battery turn the volume down on the instrument If the level is sti...

Страница 87: ...achine and the input signal During adjustment with the MIX BALANCE keys the volume of the rhythm machine is shown as a bar at the bottom of the display 4 When you are finished press the key to stop th...

Страница 88: ...mode and open the Home Screen 6 Press the key to play the recorded file NOTE When recording in rhythm mode set the file type to WAV for overdubbing see Selecting the file type and sampling frequency o...

Страница 89: ...in and the count in is also recorded When COUNT REC is OFF and COUNT IN is set to recording starts at beginning of the count in but the count in is not recorded Apply effects to the rhythm machine Yo...

Страница 90: ...eed Use the CUE REV SPEED item to set the speed of forward and backward searching when pressing and holding the and keys during audio file playback Options x2 x4 x8 factory setting x10 Turning the uni...

Страница 91: ...o their factory settings 1 Select INITIALIZE and press the key to highlight Exec 2 Press the key again to open a confirmation pop up window 3 Press the key to initialize the unit Press STOP HOME to ca...

Страница 92: ...errors while formatting so it takes more time than quick formatting and you might have to wait a while 1 Select the FULL FORMAT item and press the key to highlight Exec 2 Press to open a pop up confir...

Страница 93: ...ows the use status of the currently inserted SD card System information page SYSTEM Shows the unit s system setting information and firmware version File information page The FILE page shows informati...

Страница 94: ...OTAL MUSIC Shows the number of playable files contained by the Music Folder TOTAL FOLDER Shows the total number of folders in the Music Folder TOTAL MEMORY Shows the total SD card memory capacity REMA...

Страница 95: ...7 N Y Blues G AMP COMPRESSOR REVERB 8 N Y Blues2 G AMP CHORUS REVERB 9 Delta G AMP ENHANCER REVERB 10 L A Blues G AMP ENHANCER REVERB 11 BoxMan G AMP FLANGER DELAY 12 FunkMan G AMP AUTO WAH DELAY 13...

Страница 96: ...CHORUS REVERB 27 Chorus G G AMP CHORUS REVERB 28 Flanger G G AMP FLANGER DELAY 29 Panning G G AMP TREMOLO REVERB 30 Tremolo G G AMP TREMOLO DELAY 31 AutoWah G G AMP AUTO WAH DELAY 32 AC G COMPRESSOR C...

Страница 97: ...ESSOR PHASE SHIFTER 44 Chorus B COMPRESSOR CHORUS REVERB 45 Flanger B COMPRESSOR FLANGER REVERB 46 Phase B COMPRESSOR PHASE SHIFTER REVERB 47 AutoWah B COMPRESSOR AUTO WAH DELAY Reverb Presets 48 Reve...

Страница 98: ...equalizer settings See page 101 GAIN Adjusts gain level 0 10 AMP Selects preamp tone quality 1 3 EQ Selects equalizer type 1 8 LVL Adjusts output level 0 20 COMPRESSOR CMP Increases sustain by moder a...

Страница 99: ...r by adding a phase shifted copy to the source sound SPD Adjusts rotation speed 0 20 RES Adds resonant peak to effect Higher value adds more resonance 0 20 SW Turns effect ON 1 or OFF 0 0 1 TREMOLO TR...

Страница 100: ...justs pitch in semitones 1 octave 12 FINE Adjusts pitch in cents 50 cents 50 LVL Adjusts volume of effect sound 0 20 SW Turns effect ON 1 or OFF 0 0 1 DELAY DLY Thickens sound or creates an echo like...

Страница 101: ...at neutral sound 3 2 x 12 inch sound with good bite boosts treble 4 2 x 12 inch traditional British sound 5 2 x 12 inch suits high gain sound 6 1 x 12 inch 7 1 x 12 inch 8 2 x 12 inch suits overdriven...

Страница 102: ...t Rhythm 016 ROCK13 4 4 017 ROCK14 4 4 018 POP01 4 4 019 POP02 4 4 020 POP03 4 4 021 POP04 4 4 022 POP05 4 4 023 POP06 4 4 024 POP07 4 4 025 POP08 4 4 026 POP09 4 4 027 POP10 4 4 028 POP11 4 4 029 POP...

Страница 103: ...E01 4 4 060 DANCE02 4 4 No Preset Rhythm 061 DANCE03 4 4 062 DANCE04 4 4 063 DANCE05 4 4 064 DANCE06 4 4 065 DANCE07 4 4 066 DANCE08 4 4 067 DANCE09 4 4 068 DANCE10 4 4 069 JAZZ01 4 4 070 JAZZ02 4 4 0...

Страница 104: ...ower Use a USB connection or an AC adapter sold separately to recharge it I O Too Short When using the I O key the IN and OUT points are too close together to start loop playback Reset the IN and OUT...

Страница 105: ...card reader This message also appears when a new card is inserted in the unit Always use the GT R1 to conduct FAT formatting of cards to be used with it When Are you Sure appears press to FAT format...

Страница 106: ...card timed out Backup files on the card to your computer and format the card using the GT R1 Card Full Erase unnecessary files or move them to your computer to make open space Max File Size The file...

Страница 107: ...r message continues to appear please contact a TEAC Repair Center File Error FX Rx Failed FX Busy Can t Save Data Player Error Device Error Writing Failed Sys Rom Err FX Init Err System Err 50 System...

Страница 108: ...k Nominal input level 64 dBV GAIN set to HIGH 48 dBV GAIN set to MID 32 dBV GAIN set to LOW Maximum input level 48 dBV GAIN set to HIGH 32 dBV GAIN set to MID 16 dBV GAIN set to LOW LINE IN input Jac...

Страница 109: ...playback only ID3 tag support up to Ver 2 4 WAV files 44 1 48 kHz sampling frequency 16 24 bit rate Recording medium SD card 64 MB 2 GB or SD HC card 4 32 GB File system FAT16 32 Physical Lithium ion...

Страница 110: ...sh Power PC iMac G3 G4 266 MHz or faster 64 MB or more memory USB port USB 2 0 recommended 500 mA bus power required Recomended USB host controller Intel chipset Supported OS Windows 2000 XP and Vista...

Страница 111: ...111 TASCAM GT R1 23 Specifications 27 0 mm 70 0 mm 135 3 mm Dimensions...

Страница 112: ...5939 Wallace Street Mississauga Ontario L4Z 1Z8 Canada TEAC MEXICO S A De C V Phone 52 55 5010 6000 www tascam com R o Churubusco 364 Colonia Del Carmen Delegaci n Coyoac n CP 04100 M xico DF M xico T...

Отзывы: