background image

192 


TASCAM GigaEditor 4 Manual 


Saving a Pattern Alternation rule 

Like any iMIDI rule, the Pattern Alternation rule can be saved into a .gig file from the Instrument Editor, 
linking the rule permanently to the instrument.  However, it’s more common to save this rule into an 
instrument performance (.gsi file) from GigaStudio.  This allows you to save custom Pattern Articulation 
setups for each song you are working on for a particular instrument.  When you compose, you can keep 
your performance files in a special folder for each song you work on. 


The Controller Trigger Rule 

 
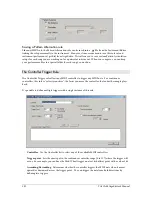
Th e Controller Trigger rule allows any MIDI controller to trigger any MIDI note.  For continuous 
controllers, this rule is “velocity sensitive”: the faster you more the controller, the louder the sample plays 
back.   
 
It’s possible to define multiple triggers with a single instance of this rule. 


Controller.  

Use the Controller list to select any of the available MIDI controllers. 


Trigger point. 

 Sets the exact spot in the continuous controller range (0 to 127) where the trigger will 

occur.  For example, you can have the Mod Wheel trigger a note at its halfway point with a value of 64. 
 

Ascending/Descending. 

 Determines whether the controller triggers the MIDI note when it moves 

upward or downward across the trigger point.  You can trigger the note from both directions by 
defining two triggers. 
 

Содержание GigaStudio

Страница 1: ...TASCAM GigaEditor 4 GigaStudio 4 Instrument Editor User Manual...

Страница 2: ...mation in this manual is subject to change without notice and does not represent a commitment on the part of TEAC America Inc The software described in this manual is provided under the terms of a Sof...

Страница 3: ...ion 46 Changing the Order of Dimension Splits 48 Changing the Dimension Controller 49 Chapter 4 Tutorial Advanced Drum Kit 58 Kick Drum 58 Snare Drum 64 Toms 68 Cymbals 71 Hi Hats 75 Chapter 5 The Ins...

Страница 4: ...telligent MIDI iMIDI Rules 181 iMIDI Rules in GigaStudio 181 iMIDI Rules in the Instrument Editor 182 Using the iMIDI Rule Manager 183 The Transpose Rule 184 The MIDI Filter Rule 185 The Legato Mode R...

Страница 5: ...4 0 includes the following changes from version 3 0 1 The Dynamic Expression Filter which in Giga 3 was accessible only through the use of a specially formatted initialization file is now exposed in...

Страница 6: ...e as the folder 7 The maximum number of layers splits in a layer dimension has been increased from 8 to 128 8 While in the past it s been easy to change the controller assigned to a dimension velocity...

Страница 7: ...n take a few moments if the instrument is particularly large Opening the Instrument Editor from the Windows Desktop When you re doing intense instrument construction you may want to run the Editor alo...

Страница 8: ...l of them and hitting the Enter key Opening a GIG file from the Instrument Editor With the Instrument Editor open you can open any gig file using the standard File Open command 1 Go to the File Menu a...

Страница 9: ...e of a given instrument Users of your instrument will hear this sample when using the audition feature of the QuickSound Explorer The Maximum file size box and the checkboxes underneath it are used wh...

Страница 10: ...strument stack Regions Each instrument can have up to 128 regions A region defines a zone on the keyboard Dimensions Each region can contain as many as eight dimensions A dimension can contain up to 1...

Страница 11: ...mber of instruments to deal with inside the same gig file Banks are the top level of the Giga heirarchy Instruments The next level is the instrument Gig files can have many instruments inside them and...

Страница 12: ...h dimension split is assigned a unique sample to play back We ll refer to the process of assigning samples to splits as mapping the instrument A single sample can be assigned to multiple regions witho...

Страница 13: ...es currently up to 256 can be mapped to a single region while MIDI control and intelligent MIDI rules determine which of those samples will sound at any given moment 5 Map your samples into the region...

Страница 14: ...t integer mono or stereo format As you import samples they are added to the Sample Window in the lower left portion of the Editor Samples are organized into folders preferably in a way that anticipate...

Страница 15: ...le folders When you create a new gig file you will always find a default sample folder in the Sample Window You can rename it if you like You can start importing samples into this folder or you can cr...

Страница 16: ...r and choose Import samples You can right click anywhere in the Sample Window but the samples will be imported to the currently selected folder 2 This will bring up the file browser 3 When you select...

Страница 17: ...wn the SHIFT or CTRL keys 5 The samples will now appear in the Sample Window Within a folder samples can be sorted either alphabetically or by pitch Right click in the Sample Window to select the sort...

Страница 18: ...o a new folder named after the source directory 1 Right click in the Sample Window and choose Import directory This will bring up the folder browser 2 Select a directory and click OK to import the dir...

Страница 19: ...to import directories and samples is to drag and drop them directly from the Windows Explorer into the Sample Window You can drag samples from the Windows Explorer to any folder in the Sample Window...

Страница 20: ...nare samples in the Default Sample Group folder Importing Sample Folders from the Desktop You can also drag an entire directory or even multiple directories from the Windows Explorer into the Sample W...

Страница 21: ...ual 21 2 Drag and drop a folder or several folders from the desktop into the Sample Window 3 All the folders and their samples are now in the Sample Window This is the fastest way to import a large nu...

Страница 22: ...g inaccuracies in the original performance Unity note and fine tuning are sometimes saved along with the audio data in a standard wav file If your samples include this data the Giga Editor will recogn...

Страница 23: ...convenient way to create regions but it is sometimes useful For example drum kits often don t lend themselves to the more streamlined ways of creating regions because each drum snare kick hi hat etc i...

Страница 24: ...Actually if a sample is highlighted in the Sample Window it will be mapped here automatically Either way the mapping is easy to change as we ll see below When we create velocity splits later they ll a...

Страница 25: ...t the mouse turns into a left right arrow 2 Then drag the mouse to stretch the region You can do this with either side of the region 3 A single region can be stretched up to the full range of the MIDI...

Страница 26: ...ion the ALT key is not necessary Alternatively select the first region in the intended range then click the last region while holding down the SHIFT key 2 The selected regions will now be highlighted...

Страница 27: ...nothing more than play a single sample While a region that simple might have its uses we ll take things a small step further here and give our new region a single dimension so that we can make it more...

Страница 28: ...e visible in the Velocity window Each split can be mapped to its own sample Each split also has its own unique articulation that is its own set of envelopes filters and other performance parameters Ve...

Страница 29: ...al bands in the Velocity Window Note that the velocity splits are also divided into left and right halves indicating that this is a stereo region Mapping Samples to a Region At this point we ve create...

Страница 30: ...ely it maps to the entire region including all four of our velocity splits You can see this in the Velocity window where the ff sample is named in all four of the splits This isn t exactly what we wan...

Страница 31: ...ely to encounter this message in the early stages of constructing an instrument Minor edits such as changes to split points and articulation parameters are communicated directly to the instrument in m...

Страница 32: ...there are no unmapped keys between regions If you drop several samples and find that only one region is created a likely explanation is that the samples do not contain pitch information and have all...

Страница 33: ...Creating and mapping splits automatically In the example above we created a series of regions by dropping a group of samples in the Region Window This is a convenient way to create regions but it crea...

Страница 34: ...34 TASCAM GigaEditor 4 Manual The drop maps the samples across the keyboard according to their pitches...

Страница 35: ...indow with the left mouse button Map to existing split alpha order Replaces the samples in the existing split with samples from the dropped folder mapping the samples alphabetically by name The editor...

Страница 36: ...to choose then is Map to new split by pitch Since we dropped the folder in the upper part of the existing single velocity split the new split will be created above the old one The old split now covers...

Страница 37: ...the sample will not transpose at all it will always play at its natural pitch wherever you put it This is good for drums and percussion or sound effects 2 Pitch Tracking Enabled Drag With Left Mouse...

Страница 38: ...e removed when the switch is made 1 In this example we have four velocities mapped to four stereo samples 2 If we drag a mono sample to the top velocity the whole region is changed to mono and this sa...

Страница 39: ...Velocity This is the traditional velocity switch typically using the velocity with which the key is struck to select among samples recorded at various dynamic levels MIDI continuous controllers When...

Страница 40: ...gle note to get to know the concept of working with dimensions E 2 of an Orchestral Bass Ensemble from the Vienna Symphonic Library Everything will be done with the manual drag and drop method so you...

Страница 41: ...te existing splits and to change the order of splits within a dimension even after samples have been mapped to them 4 Click on the Add button to add a second velocity split The new split will appear a...

Страница 42: ...splits and more dimensions It s a worthwhile habit to get into if you plan to do a lot of instrument design Mapping the Samples At this point we have a stereo region with two velocity splits but with...

Страница 43: ...e now mapped to the low and high velocity splits In order to hear them we need to save and load this instrument 4 Choose Save or Save As in the File menu and save this gig file to your hard drive 5 Cl...

Страница 44: ...he highest velocity that will map to the split below the line Playback Monitoring This is a good place to briefly point out the various Playback Monitoring features of the GigaStudio Editor As you pla...

Страница 45: ...ed in yellow The sample mapped to the currently focused split the split highlighted in orange will have the orange border around its icon Now we will enable MIDI Select mode 5 Go to the top right of t...

Страница 46: ...te in real time as you adjust a filter on the bottom velocity you don t want the MIDI Select tool constantly throwing you to the top velocity split every time you play too loud This is a tool that you...

Страница 47: ...t the Dimension Controller dialog 5 Now we have two Mod Wheel splits and two Velocity splits However the instrument won t sound any different yet because we haven t mapped the new staccato samples 6 T...

Страница 48: ...of this new dimension click on the Download button again This will save the new changes and load the instrument Changing the Order of Dimension Splits You might decide that you d rather hear the Stac...

Страница 49: ...itched the Loud samples to the lower part of the velocity range Changing the Dimension Controller Dimension Controllers can also be changed easily without having to re map the samples and this can be...

Страница 50: ...ustain Pedal 4 Now instead of the Mod Wheel switching between the Sustain and Staccato samples the Sustain Pedal will change them instead You will need to re load the instrument to hear this change Ch...

Страница 51: ...on of the keyboard which is normally drawn as a gray rectangle When you create a Keyswitch dimension the region turns purple to show that it s now in use You can drag the keyswitch region to move or r...

Страница 52: ...ying the keyswitch and the other for playing the notes Change to Round Robin The procedure is the same as in the previous two examples Change to the Round Robin this time for the dimension controller...

Страница 53: ...on So far we have covered basic switching dimensions that use MIDI controllers or Velocity to change the samples that are played back Another type of dimension is the Layer This allows you to layer se...

Страница 54: ...urce to Layer Type in a Description and name the Split names to Soft and Loud Click OK 5 Now we have a Layer dimension split with Soft on the left and Loud on the right 6 Select the Soft dimension spl...

Страница 55: ...want to apply the following edit to both 9 Click the header bar in the Articulation Parameters window and choose Mix Layer from the category menu 10 Click in the value field for Attenuation controlle...

Страница 56: ...de between the soft and loud layer You can also do custom in and out points using the Crossfade Editor This tool can handle any number of layers When you use this method leave the Control invert param...

Страница 57: ...TASCAM GigaEditor 4 Manual 57...

Страница 58: ...Tutorial Files directory for this chapter How To Map Samples Advanced In the Instrument window you can name the instrument to Tutorial Drum Kit You can also delete the Default Sample folder to keep t...

Страница 59: ...ity splits ready to be mapped to Kick Drum samples 4 Drag and drop the Kick Drum samples to the four velocity splits as shown below Be sure to use the right mouse button to disable pitch tracking We w...

Страница 60: ...the instrument is loaded the LOADED indicator will turn green and you should be able to hear the Kick Drum if you play C2 on the keyboard 9 The note will also light up in blue on the keyboard when you...

Страница 61: ...y a little larger than the rest so you can hear it The top velocity has a narrower range so that it only triggers when you really hit the key fairly hard The next step is to put a longer release time...

Страница 62: ...d here as well By dragging the blue dot on the Kick Drum region you can adjust the Release Time here This is another option for editing various parameters in addition to the Parameters Window and the...

Страница 63: ...Type parameter to Lowpass 19 Now play the Kick Drum and notice how the tone gets darker or brighter depending on how hard you play There are two types of tone change happening here at once One is the...

Страница 64: ...we have two identical regions of the Kick Drum on C2 and D2 The new region is an exact copy of the original one including the sample mappings as well as the parameter edits that we made above Snare Dr...

Страница 65: ...k drum regions those will turn solid and these Snare regions will get the hash marks 2 The Velocity Map for these new regions shows a Stereo split and four Velocity splits 3 Select the Left Snare regi...

Страница 66: ...like a snare drum switch Moving the Mod Wheel forward beyond the halfway point will switch to the snares off samples while moving it back will switch back to the snares on samples Also there is only...

Страница 67: ...d then select the Snares Off dimension 10 Map the four Snares Off samples to the velocity map Repeat this with the Right snare region so that both regions have Snares Off samples 11 Click on the Downl...

Страница 68: ...se to select all four velocity splits In the Mod Wheel dimension window select only the upper snares off split Change an articulation parameter such as Release Time The result is that the new Release...

Страница 69: ...l apply to all of them 2 Using the same techniques as with the Kick and the Snare adjust the velocity split points and the Release Time and add a Lowpass filter Again the changes will apply to all thr...

Страница 70: ...aEditor 4 Manual 5 Now the Toms have a labeled dimension switch 6 Select the G2 region This will be the Floor Tom 7 Select the Snares On dimension 8 Map the Tom Floor Snares On samples using the right...

Страница 71: ...amples Select the Snares Off dimension Map the Tom Mid samples High Tom Select the B2 Region Select the Snares On dimension Map the Tom High Snares On samples Select the Snares Off dimension Map the T...

Страница 72: ...1 Create 4 new regions on C3 D3 E3 and F3 This should create four regions with four Velocity Splits Select all four of the regions 2 Give the velocity split points a rough adjustment as in the past e...

Страница 73: ...t the E3 region in the Region Window Map the Crash samples using the right mouse button 6 Select the F3 region in the Region Window Map the Splash samples using the right mouse button 7 Click on the D...

Страница 74: ...ote while the soft sample is still decaying and drown out the soft sample However even though you can t hear the soft sample any longer it would still be using up polyphony until it is finished decayi...

Страница 75: ...t least we have the Hi Hats 4 stereo velocities of Tip Closed 4 stereo velocities of Tip Open 4 stereo velocities of Edge Closed 4 stereo velocities of Edge Open 4 stereo velocities of Foot Closed We...

Страница 76: ...ain Pedal dimension split that will switch between open and closed samples 2 Click on a Dimension header bar 3 Do the same thing we did with the snares Set the Control source to Sustain Pedal Enter Hi...

Страница 77: ...Manual 77 5 Select the Hi Hat Open Dimension Split 6 Map the Hi Hat Tip Open samples using the right mouse button 7 Select the Hi Hat Close Dimension Split 8 Map the Hi Hat Tip Closed samples using th...

Страница 78: ...anual 9 Select the A3 region This region will have the Hi Hat Edge samples 10 Select the Hi Hat Open Dimension Split 11 Map the Hi Hat Edge Open samples using the right mouse button 12 Select the Hi H...

Страница 79: ...to map out is the Foot Closed Hi Hat region 14 Select the B3 Region This will be the Foot Closed Hi Hat 15 Map the Hi Hat Foot samples using the right mouse button 16 Click on the Download button to s...

Страница 80: ...w we can play the Foot Closed Hi Hat on the keyboard but we also want the Sustain Pedal to trigger one of those samples as well And we want it to shut off the open Hi Hat samples when closing just lik...

Страница 81: ...ings and click Add to add this trigger to the rule At this point the Controller Triggered dialog should look like this 21 Click OK to close the rule dialog and OK again to close the Rule Manager Now w...

Страница 82: ...t each other off The Sustain Pedal will cut off any open sustaining samples while it triggers the Foot Closed sample This is very similar to the way the real Hi Hat operates This chapter has touched o...

Страница 83: ...mple and will save a lot of time Sample Names and Unity Notes For the Instrument Wizard to work it needs to know the Unity Note also known as Root Note of each sample This is the note that the pitch i...

Страница 84: ...That would be 704 samples that would have to be mapped by hand without the Instrument Wizard The Instrument Wizard can map these out for you in about a second So as a general rule there needs to be o...

Страница 85: ...ect the checkbox Create Regions every and set it to 1 half step This will create chromatic regions one for every note on the keyboard The other option would stretch non chromatic regions 5 Set the sta...

Страница 86: ...ity split dimension 8 Set the Splits number to 4 This will create four velocity splits one for each folder of samples 9 Fill in the Description and the Split Names These work the same way as the descr...

Страница 87: ...ns Also notice that the folders of samples are represented in the left section Mapping the samples out is simply a matter of assigning these folders to the splits in the right section 11 Assign the fo...

Страница 88: ...to hear what it sounds like and start tweaking it Chromatic vs Non Chromatic mapping In the example above we chose to map the notes chromatically even though the samples are not chromatic This was th...

Страница 89: ...u don t need the editing resolution the non chromatic mapping makes it easier to see where the samples are mapped Using the Instrument Wizard A Complex Mapping In this example we ll use the Bass Ensem...

Страница 90: ...op and bottom notes a bit Press Next to move on to Step 3 of the Instrument Wizard 5 Set the first Controller Source to Velocity and give it 2 splits Name it Velocity Splits in the Description field 6...

Страница 91: ...t Wizard Here is where the naming comes in real handy This would just be a matrix of numbers otherwise 9 Map the folders on the left to the splits on the right Match the folder names to the split name...

Страница 92: ...MIDI channel to hear what it sounds like and start tweaking it Complex Mapping Example Here is a brief example of a more complex mapping in the Instrument Wizard In Step 3 of the Instrument Wizard we...

Страница 93: ...what you would see if you don t enter descriptions and state names It would be virtually impossible to figure out what goes where in this matrix of numbers Here are the dimensions of the finished inst...

Страница 94: ...You can play the instrument while you edit and you can hear the changes in real time as long as the RELOAD light is not glowing Loading Instruments to MIDI channels Choose a port and MIDI channel 2 C...

Страница 95: ...When the RELOAD indicator is lit you can continue to edit the instrument but you will not hear all of your edits until you have done a save reload cycle Click on the Download button You can save the...

Страница 96: ...Things to keep in mind This file will load just fine in the main GigaStudio Interface but you need to make sure that both files are together in the same directory on the hard drive or this will not wo...

Страница 97: ...ent the Editor s main menu one item at a time File Menu New Alt F N or Ctrl N Creates a new and empty gig file Open Alt F O or Ctrl O Opens an existing gig file This command is similar to the File Ope...

Страница 98: ...Descriptive wave names box The names will be replaced with simple numeric indexes For additional features of the Giga Editor file dialog see Save As below Save Alt F S or Ctrl S Saves the currently l...

Страница 99: ...n gx01 C MyGigs Violin gx02 To open this file set just open Violin gig as you normally would When you open Violin gig the extension files will automatically be opened along with it The Save As dialog...

Страница 100: ...own the Editor is relieved of the need to save the entire wave pool even if you make major changes such as adding or deleting new instruments regions and dimensions Save Limited Alt F L This is ident...

Страница 101: ...s editing commands Many of these commands can be accessed with the computer keyboard These keyboard commands match the standard Windows keyboard shortcuts for the most part The Cut Copy Paste and Dele...

Страница 102: ...e Editor compares them with the samples in the target file and discards any duplicates There are a variety of ways to paste depending on the item you are working with For example regions can be pasted...

Страница 103: ...Windows desktop into the Sample Window Using this method you can import more than one directory at once You can also right click anywhere in the Sample Window and choose Import directory from the con...

Страница 104: ...n compression with 20 bit quality This offers even more polyphony with a very slight quality loss 24 bit max accelerated preserve 18 bits More disk acceleration compression with 18 bit quality This of...

Страница 105: ...they contain loops or if they are too short for the acceleration algorithm to work on The output looks something like this Failed conversions do not mean there is anything wrong with your gig file Th...

Страница 106: ...dy contained mod wheel dimensions then all of the original mod wheel splits will be stacked together in the combined mod wheel dimension Note that this menu command is only enabled when two or more in...

Страница 107: ...The crossfade points you define and the controller you select under Attenuation control will be applied to the instrument when you press Apply Multiple instruments Use this mode when you plan to stac...

Страница 108: ...uickSound Database will recognize when doing complex searches for GigaStudio instruments The search criteria can also be edited from the QuickSound Explorer and you can do batch keyword entry as well...

Страница 109: ...below Velocity splits for manually created regions Defines the initial structure of regions that you create manually by right clicking in the keyboard display and selecting Create region Unity note f...

Страница 110: ...d to the null sample Unmapped regions are perfectly legal so uncheck this box if you are using them for some deliberate purpose Use internal names on WAV import Tells the Editor to take the names of i...

Страница 111: ...the Editor to hang temporarily check this box You will still be able to drag samples and folders into the other Editor windows for mapping purposes To export samples as wav files right click on a sam...

Страница 112: ...size which is an estimate of the disk space that will be needed to save all of the files currently open Show Audio Alt V A This command displays or hides the graphical audio waveform view The wavefor...

Страница 113: ...dow Menu This is the same as the Window menu seen in many Windows applications with options for automatically arranging the window layout and for bringing a particular window to the foreground when yo...

Страница 114: ...nstrument Banks This example shows two banks containing a total of three instruments A gig file can contain up to 128 instruments Bank and Instrument Facts GIG files can have multiple Banks and multip...

Страница 115: ...Properties You can change the Bank and Patch number here among other things In this example we will change this instrument to Bank 3 This will create a new Bank and move the instrument into it This i...

Страница 116: ...ontext menu and choose Delete bank You can also press the Delete key on your computer keyboard Cut or Copy Bank 1 Select the Bank you want to Copy or Cut with the mouse 2 From the Edit menu select Cut...

Страница 117: ...with that bank are merged into the second file s wave pool When this happens the Editor will discard any samples which have exact duplicates already in the new pool remapping regions as necessary to u...

Страница 118: ...New instrument from the popup menu Cut Copy Instruments 1 Select the Instrument you want to cut or copy with the mouse 2 Select the Cut or Copy command from the Edit menu You can also use Ctrl C for C...

Страница 119: ...ce in the target file but it can take some time to complete Copying and Pasting Instruments using Drag Drop Instruments can be dragged and dropped like other objects When you drag and drop an instrume...

Страница 120: ...hen standard MIDI Bank and Patch Change commands are sent from a keyboard or sequencers Instrument numbers are from 0 to 127 banks from 0 to 16383 Effects Send This feature is disabled for the time be...

Страница 121: ...ed by GigaPulse First and Last Keyswitch Key Sets the region of the keyboard which will be used for any Keyswitch dimensions in this instrument Note that the keyswitch range appears in the Keyboard wi...

Страница 122: ...is a view of the wave pool containing several folders It is extremely helpful organize the samples into folders for designing and building complex instruments Folders should be divided in categories...

Страница 123: ...indicates a sample that is either freshly imported or recently edited using an external audio editor Samples in this state may not play correctly until the gig file has been saved and reloaded Sample...

Страница 124: ...hen it is no longer needed To hear your edit first save the file from the audio editor and then save and reload the gig file Audition sample only Plays the selected sample Find instance Ctrl F sample...

Страница 125: ...desktop into the Sample Window This method allows you to import multiple folders at once Replace sample sample only Replaces the selected sample with a new sample from a wav file The Sample Open dialo...

Страница 126: ...und anywhere in the root directory or in any of its subdirectories 2 Match only if the subdirectory name also matches the wave pool folder This mode is useful when the sample files are arranged into s...

Страница 127: ...ed sample the audition sample for every instrument in the gig file The audition sample for the currently selected instrument will have a tiny letter A next to its icon Cut Copy Paste Delete Rename The...

Страница 128: ...convert the bit rate and apply Disk Acceleration compression to all the samples in the gig file You can also convert the whole file to mono This allows a developer to easily generate 24 and 16 bit ve...

Страница 129: ...yellow If you select multiple regions or splits then multiple samples may show the yellow highlight Even when you have selected multiple regions or splits a single region and a single split within eac...

Страница 130: ...ow has no horizontal scroll bar When the display is zoomed in too far to see the entire keyboard at once you can shift the view left or right by dragging the mouse in the keyboard area of the window Z...

Страница 131: ...The MIDI Select button allows regions and dimensions to be highlighted and selected by incoming MIDI data When this option is turned on for example you can select a particular velocity split within a...

Страница 132: ...the drag in the empty gray portion of the display To select a range of regions that are not contiguous hold down the CTRL key and click with the mouse to add or remove regions from the selection Note...

Страница 133: ...left or right You may also move several regions at once by selecting the regions you want to move and then dragging any one of the selected regions Normally regions moved in this way are not retuned...

Страница 134: ...yboard to use this command The newly created region will span a single key Drag the region or its left or right edges to change the note coverage Cut region s Deletes the currently selected region s a...

Страница 135: ...Apply macro Use this function to perform complex and repetitive editing This command will apply a Macro to every split in the currently selected region or regions This function works only if at least...

Страница 136: ...pdate here and vice versa This helps you keep a visual overview of the editing process It allows you to edit three different ways and see the results from three angles in real time When the Envelope p...

Страница 137: ...e pitch envelope is drawn in blue LFO View When an LFO parameter is selected in the Parameter Window the corresponding LFO waveform is drawn in the Waveform Window You can edit the LFO rate by draggin...

Страница 138: ...d by regular MIDI controllers such as the Mod Wheel or by other program logic for example a Round Robin dimension Each active dimension window is divided into cells representing its dimension s splits...

Страница 139: ...its is set and displayed here Various parameters settings and visuals are displayed here Right clicking here brings up a context menu with several editing tasks Each split in the Velocity Window also...

Страница 140: ...ally put it in Stereo mode You can also manually change the Stereo or Mono status by right clicking on the Velocity Map and choosing Force to mono or Force to stereo in the context menu When going fro...

Страница 141: ...ouse Velocity Splits are created and named in the Dimension Controller window The Velocity Split order can also be changed here as well To display the Dimension Controller window click on the header b...

Страница 142: ...ch region the sample which most closely matches the region s pitch is used for the mapping Drop multiple samples or a folder onto a velocity split with the right mouse button The selected splits are r...

Страница 143: ...d Press this button to add a split to the dimension To add more than one split with a single click increase the value in the numeric field to the right of the Add button Splits added in this way are e...

Страница 144: ...ed split See the chapter on Macros for details Map to null sample Clears any sample mapping from the selected split the split will be silent Show envelopes This menu option displays a check mark when...

Страница 145: ...o velocity Additional dimensions can be created in any of the smaller horizontal dimension windows Eight of these windows are available but you can select a display mode that hides some of the windows...

Страница 146: ...it will sound Examples include using the mod wheel to switch between closed and open hi hats or using the sustain pedal to switch between piano samples recorded with and without sustain Layer The Laye...

Страница 147: ...dimension advances to the next split when a key is struck in any region The basic Round Robin dimension described above advances only when a key is struck in its own region In the case where the numbe...

Страница 148: ...ently selected for editing These buttons will be extremely helpful as you proceed to edit articulation parameters in the next section To understand why the region and split selection is important cons...

Страница 149: ...s its own articulation a set of over 100 parameters that define envelopes LFOs filters and the like The parameters appear in the lower right portion of the Editor grouped into categories for easier ac...

Страница 150: ...er affects the Filter over time The GigaStudio offers the following envelope parameters for the amplitude and filter envelopes Pre attack level Attack Time sec Decay 1 Time sec Hold Yes No amplitude e...

Страница 151: ...will range from zero to at most a half second for a natural sounding instrument However extreme settings can be used for special effects to put a slow volume ramp up for each triggered note Decay 1 Ti...

Страница 152: ...rameter determines how long it will take for the sample volume to ramp down depending on how Decay 2 is set If the Decay 2 is set to Infinite the release will kick in when the note is released If the...

Страница 153: ...tic changes with the Mod controller This also applies to the Decay and Release settings A little experimentation will be needed to learn how this works and figure out the settings you need Amplitude F...

Страница 154: ...rnal depth settings but you won t hear its effect until the assigned MIDI controller is moved forward Amp LFO 1200 Volume Oscillation Filter LFO 1200 Filter Resonance Pitch LFO 1200 Pitch in Cents Con...

Страница 155: ...the sum of the internal and the modulated external depths Flip phase Inverts the polarity of the amplitude or filter LFOs This is not available for the pitch LFO Synch Enables a single synchronized LF...

Страница 156: ...etic textures with electronic characteristics Filter type 0 None The filter is bypassed 1 Lowpass Filters out high frequencies 2 Highpass Filters out low frequencies 3 Bandpass Filters both high and l...

Страница 157: ...r allows you to assign a MIDI controller to the Cutoff Frequency for real time continuous control This overrides the Cutoff Frequency setting which will be disabled once you assign a MIDI controller h...

Страница 158: ...ed Range is 0 127 Dynamic resonance A setting of Yes increases the overall resonance by dynamically scaling the Q in addition to the cutoff frequency of the filter in accordance with changes of envelo...

Страница 159: ...er velocity yielding a darker response The range is 0 127 with a default value of 20 This parameter is only available when the Cutoff Controller is set to None Filter velocity response curve Defines h...

Страница 160: ...160 TASCAM GigaEditor 4 Manual Velocity curve set to Linear Velocity curve set to Non linear...

Страница 161: ...hich define how the filter responds to changes in MIDI velocity The next section is concerned not with the filter but with the way simple volume responds to keyboard velocity Use these parameters to a...

Страница 162: ...he curves are the same as those shown in the previous section for the filter response Velocity curve scaling Works in conjunction with the five Dynamic Range settings to give even finer control over v...

Страница 163: ...sing a Release Trigger dimension you can control the volume of its playback depending on how long you hold the note With slower settings you can hold the note down longer and still get the release tri...

Страница 164: ...same attenuation controller to groups of related notes or samples a MIDI controlled sub mix capability can be designed into the instrument so that individual sounds can have discrete MIDI volume cont...

Страница 165: ...reversed on one of the channels The Side level can then be adjusted by attenuation to dial in the preferred amount of spread in the stereo image Self mask When checked this causes high velocity notes...

Страница 166: ...GigaStudio For example when an instrument is assigned to inputs 1 2 in the mixer Samples with an offset of 0 the default will be routed to channels 1 2 Samples with an offset of 2 will be routed to ch...

Страница 167: ...se parameters are modified automatically when you map a sample to the region The sample carries its own copy of these parameters visible in the Sample properties dialog and these values are copied to...

Страница 168: ...iled filter profiles In other words the DEF can make a sample sound as if it were played at different intensities allowing for real time crescendos and diminuendos of a sustaining note Note the DEF wo...

Страница 169: ...to modulate the DEF with the EG2 filter envelope This is always in addition to the assigned controller for the DEF the values of the EG2 envelope and MIDI controller are added together The normal mult...

Страница 170: ...ters are composed of four independent parameters that affect the overall shape and volume of the filter cutoff frequency Q Q0H and V0 Each parameter has a range of 0 to 127 The first three parameters...

Страница 171: ...are interrelated the Region Window plots them in a special way When any one of the DEF parameters is selected all of the parameters in that particular filter set pp mf or ff appear in the Region Windo...

Страница 172: ...how the value of the parameter that s currently selected in the Parameter Window While the Parameter Window shows multiple parameters for a single region the blue line display shows a single parameter...

Страница 173: ...sually affects all of the selected regions But the exact effect is determined by the current Drag Mode which is set via the Drag Mode menu To see the menu click on the right hand portion of the header...

Страница 174: ...justed proportionally Before After For example you could use this mode to set an amplitude release time that is short at the top of the keyboard and gets progressively longer in the lower register Dra...

Страница 175: ...ution The scale for the axis is displayed at the right side of the Region View The scale changes depending on the parameter being displayed For many parameters you can change the vertical resolution b...

Страница 176: ...nual Some articulation parameters have a very limited range for example those that can only be set to Yes or No When a parameter like this is selected rescaling the vertical axis isn t practical and t...

Страница 177: ...quently you can even assign a hot key to any macro You can also copy your collection of macros to another GigaStudio system A Macro can consist of just a single articulation parameter such as Filter C...

Страница 178: ...hecking or unchecking boxes in this list you control which parameters will be included in the macro The parameters are arranged by category these are the same categories used to organize the Parameter...

Страница 179: ...om of the editor window Copying Macros to other machines It is very easy to transfer your collection of macros to another machine This transfers the whole list and overwrites the existing macros of th...

Страница 180: ...utton near the bottom of the editor window The Articulation Macros dialog is displayed To change a macro s name or hot key select the macro and press Properties Macros may also be deleted using the Ar...

Страница 181: ...MIDI rules are listed later in this chapter iMIDI Rules are added edited or deleted via the iMIDI Rule Manager in one of two ways In GigaStudio a rule can be added to an instrument and then saved toge...

Страница 182: ...just the instrument settings with the performance 5 In the future when this performance is loaded the iMIDI Rules will be loaded along with the instrument iMIDI Rules applied in this way are part of...

Страница 183: ...loaded in the future its iMIDI rule will be loaded as well Using the iMIDI Rule Manager 1 Select a rule from the Available Rules window and click the Load button 2 Depending on the rule you may get an...

Страница 184: ...See the sections on the individual rules for details on editing 4 When you are finished click OK to close the Rule Manager Next we ll discuss each of the available iMIDI rules in detail The Transpose...

Страница 185: ...ortamento slides bewteen notes or for natural legato note transitions The rule automatically takes care of complex dimension switching in real time as you play the keyboard Legato Mode requires some v...

Страница 186: ...trument if the instrument is fairly simple and has one obvious key range of regions If needed you can change the note range here Number of Legato samples Displays the number of Legato articulations Fo...

Страница 187: ...ence you will need to create some standard release trigger samples This is usually done by creating a copy of the sustain samples and then deleting everything except the tail Release Trigger samples a...

Страница 188: ...ecorded sequence of notes The Repetition rule allows this sequence to be played at a faster tempo and for notes in the sequence to be omitted The Pattern Alternator Rule The Pattern Alternator acts li...

Страница 189: ...TASCAM GigaEditor 4 Manual 189 6 p f p swell 7 Tremolo 8 Pizzicato Add the Pattern Alternation rule using the iMIDI Rule Manager The configuration dialog for this rule looks like this...

Страница 190: ...next articulation Quarter Note Then the 8th Note articulation And so forth When all of the articulations have been performed the pattern will start over again with the Staccato sample This default se...

Страница 191: ...Staccato Quarter Note repeating On the other hand you might want a very complex pattern that covers a whole phrase or line of music In that case you increase the split count to as many notes as you ne...

Страница 192: ...ntroller Trigger rule allows any MIDI controller to trigger any MIDI note For continuous controllers this rule is velocity sensitive the faster you more the controller the louder the sample plays back...

Страница 193: ...ller like this there is no basis for velocity sensitivity When this box is checked the velocity of triggered notes is fixed at the value defined in the Velocity box When you have defined a trigger cli...

Страница 194: ...rule solves that problem by constantly tracking the signal level of each sample and setting the volume of the release trigger samples accordingly The configuration dialog for this rule is shown below...

Страница 195: ...n list Incoming MIDI Data 1 This will change depending on the type of incoming MIDI event For Note On Off the data will be in Note Names C 1 G9 For all the other controllers the data will be in MIDI c...

Страница 196: ...e bottom of this window to help figure out what Notes or MIDI controller numbers to use Use Data 2 from incoming This overrides the values entered here and lets whatever values are in the Incoming Dat...

Страница 197: ...ng the MIDI controller numbers Just play a note or controller and look at the list to see what it is To clear the list close the interface and reopen it Experiment away with this tool The possibilitie...

Страница 198: ...release time Play Zone Determines the upper and lower boundaries of instrument regions effected by the iMIDI rule defaulting to the max range of the instruments existing regions Instrument Layout Det...

Страница 199: ...to mode Overview Staccato mode is the most simple of the three Mono Mode Rules In this mode following notes will force previous notes to terminate Use the note off delay slider to determine how long t...

Страница 200: ...without using the formant shaping filters or extended portamento controls of the Custom PRF profiles This default mode simply bends samples from an original source note to a secondary destination not...

Страница 201: ...from scratch can be an involved process for this reason GS4 includes a nominal set of factory PRF profiles for different instrument types that are easily applied to any 24 bit instrument To load a fac...

Страница 202: ...s the region specific PRF parameters Portamento Extended Controls Portamento extened controls are located on the left hand side of the PRF tab and give the user specific control over the style and ran...

Страница 203: ...esponse is reduced flattened based on incoming note on velocity 0 no filter pullback 127 full pullback range With this parameter set to 127 an incoming note velocity of 127 will use the full value of...

Страница 204: ...to the next interval set i e once you select Up Long you should finish tweaking Fc Q0 Q0H and V0 before selecting the Up Short interval For example to adjust the Up Short filter set parameters first...

Страница 205: ...ransposed by the instruments region mapping and then apply those same filter settings to all keyboard regions that contain that sample For instance if a sample of C4 is mapped to both C4 and C 4 find...

Страница 206: ...capability will allow for one set of sustain samples to perform both tasks effectively Set of secondary release trigger samples secondary release Also optional 1 set of release triggers can be mapped...

Страница 207: ...an optional dimension that allows the instrument to vary samples and or articulations as the user plays the instrument For example if the instrument was played with a bowing technique then the design...

Страница 208: ...of the instrument layout expected if an instrument is to take advantage of this mode Region Layout Dimension 1 Round Robin optional 2 Smart Midi Processor Primary Sustain P Target Sustain Up TSu Hamme...

Страница 209: ...tain C4 Target Down Sustain When returning to root the Target sustain as well as the transitional sample and the secondary release will inherit the velocity of the note that is being released Appendix...

Страница 210: ...ng author string up 63 characters long company string up 63 characters long e g PerfUtility convert d tascam gig MyFolder comments Giga 4 converted performance author Joe Bibbo company TASCAM This wil...

Отзывы: