Tascam DM-3200 Скачать руководство пользователя страница 13

DM-3200 Release Notes

TASCAM  DM-3200 Release Notes V1.50


1

Connect the 

MIDI IN

 and 

MIDI OUT

 ports of a DM-3200 

and the MIDI device bi-directionally. You may also use 
these controllers as “send only” as well by just connecting 
the 

MIDI OUT

 port of the DM-3200 to the MIDI device.

Connection

Setting of the MIDI control setup is carried out on the 

REMOTE

>EXT.CTRL

 screen.

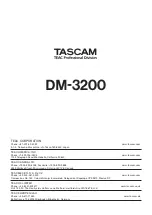
Selecting devices for MIDI control

The 

EXTERNAL CONTROL LIST

 on the left of the screen is 

initially blank. To add external devices from the list use 
the following procedure:

1  Turn the 

POD 4

 knob or the 

JOG/DATA

 dial to 

choose an item from the device list (

SUPPORTED 

DEVICES

). In the case of MIDI control, highlight 

either 

MIDI Ctrlrs

MIDI FADERS,

 or 

MIDI Mixer

.

2  When the device to be controlled by the DM-3200 is 

highlighted on the list, move the cursor to the  

ADD


button, and press the 

ENTER

 key. The device will 

be added to the 

EXTERNAL CONTROL LIST

 on the left of 

the screen.

Figure 6: 

REMOTE

>EXT.CTRL screen

NOTE

To obtain more information regarding a particular 
item in the list of devices that may be controlled by the 
DM-3200, highlight the item, move the cursor to the 

INFO

 button, and press the 

ENTER

 key. A pop-up screen 

provides information regarding the selected item.

Selecting control types for the devices

Each of the columns on the 

EXTERNAL CONTROL LIST

 will 

display the following when an MIDI device is added to the list.

STATE

: A one-way arrow 

®

 is displayed, representing an 

open-loop device.

DEVICE

: The name of the device is displayed together with 

the number of channels available for transmitting control 
signals. MIDI control has 16 channels.

ID

: If the device is a MIDI controller, 

ID

 indicates the MIDI 

ª

ª

channel of the device being controlled by the DM-3200. 
If the device is a 

MIDI fader

ID

 displays the number of the 

MIDI Control Change message (0 - 119). Nothing will be 
displayed in this column if the device is a 

MIDI mixer

.

PORT

: This displays the output port. For 

MIDI controls

MIDI

” will automatically display.

CH

: This displays the channel number used in the fader 

layer. It will display “

--

” for an 

MIDI controller

, “1-16” for 

MIDI faders

 and 

MIDI mixers

.

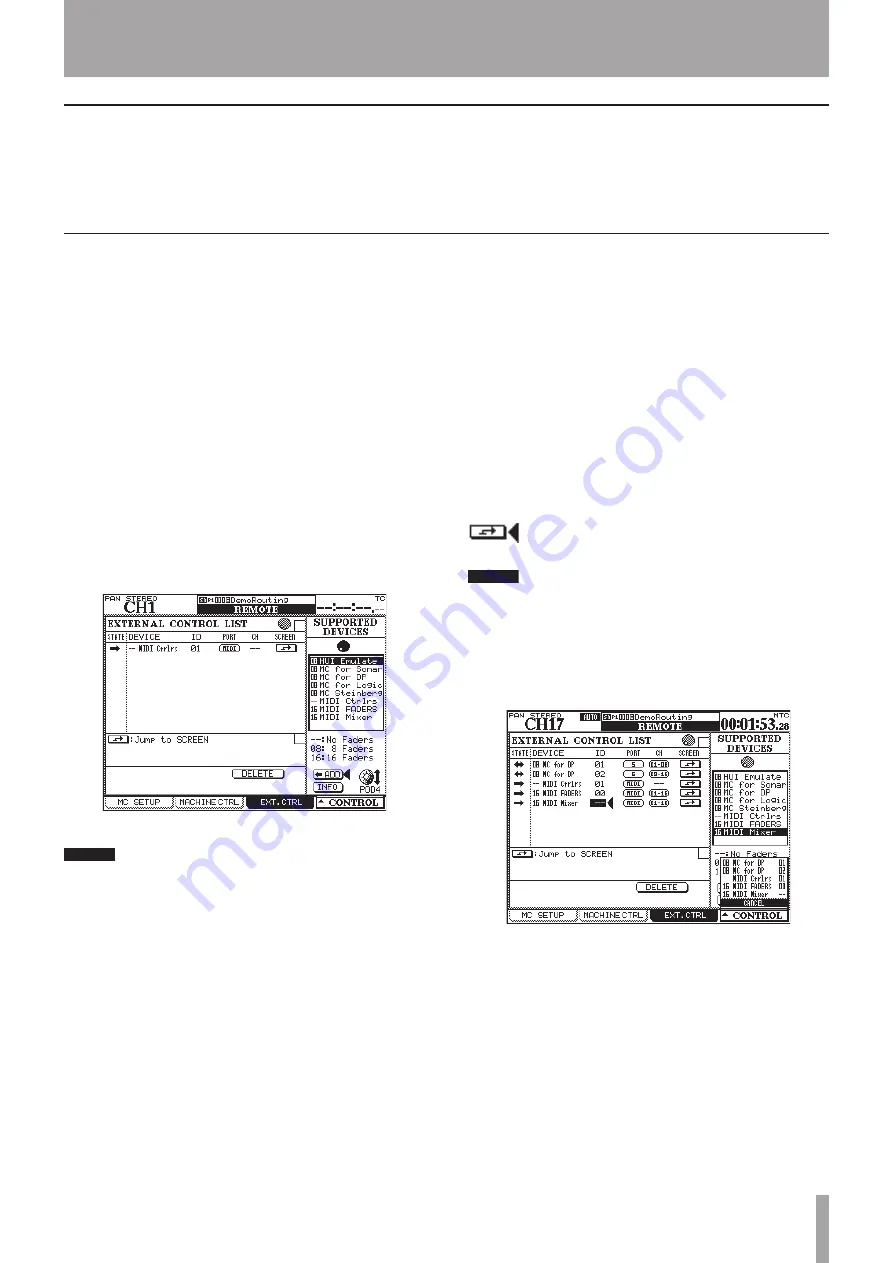
Setting up individual devices

To access the set-up screen of the individual devices listed 
in the 

EXTERNAL CONTROL LIST

, move the cursor to the 

 (

Jump to SCREEN

) button and press the 

ENTER


key.

NOTE

You can also go to the set-up screen of the individual 
devices by using the CONTROL button at the bottom 
right on the screen and use the following procedure:

1  Press the 

POD 4

 key. A pull-up menu will display 

the list of devices.

Figure 7: Pull-up screen for switching devices

2  Use the 

POD 4

 knob to highlight the device you 

want to set.

3  Press the 

POD 4

 key to select the device.

ª

Setting devices for MIDI control

Содержание DM-3200

Страница 1: ...DM 3200 DIGITAL MIXER RELEASE NOTES V1 50 D00992200A ...

Страница 2: ...IDI fader 14 MIDI mixer 15 Changing the assignment 15 Assigning parameters to rotary encoders 16 Cascade connection 16 Cascade connection overview 16 Master slave setting 16 Making a cascade connection 17 Settings and Operations that can be interlocked 18 Settings that can be interlocked 18 Operations that can be interlocked 18 GPI functionality 18 Making connections 18 Setting the GPI 19 GPI CONF...

Страница 3: ...er Figure 1 USER DEFINED LAYER screen You can monitor the following functionality of the speci fied module Meter Fader pan and mute Grouping settings Stereo link settings ª ª The metering point selected in the METER FADER METER screen is displayed You can also move the cursor by using the cursor keys or pressing the SEL key of the desired channel and use the POD knobs to operate the fader or pan T...

Страница 4: ...e message data byte 127 7Fh is output and 0 0h when released MIDI SETUP screen filtering In conjunction with support for MIDI event triggering a C Chg EXT filter has been added to the USB MIDI 4 PC CC port Figure 3 MIDI SETUP screen ª Meter display The meter display of the User Defined Layer is also shown in the User Defined Layer screen but can be shown in the METER FADER METER screen as well Fig...

Страница 5: ...d pitch shifter and numerous presets are provided For details on each type and on the preset library refer to the separate EFFECT LIST which are provided as elec tronic publications in PDF format This can also be downloaded from the TASCAM website http www tascam com TASCAM FX2 0 recall TASCAM FX2 0 recall is performed in the LIBRARY EFFECT screen shown in the right column Figure 5 LIBRARY EFFECT1...

Страница 6: ...FORMAT screen ª In the DIGITAL FORMAT screen TDIF I O Tx Rx MODE section you can now switch between high speed and dual line for TDIF 1 connectors 1 3 This selection will switch all three of the TDIF 1 connectors When using high speed operation the 8 I O setting will be available for TDIF input output in the ROUTING screen when using dual line only the 4 I O setting will be available IF TD DM Figu...

Страница 7: ...annels at once MIDI SETUP screen filtering In conjunction with MIDI control change support for mixer parameters filtering has been added to the USB MIDI 4 PC CC port Figure 9 MIDI SETUP screen Until now the input output on off setting for USB MIDI port 3 used for MIDI time code had been a single setting for input and out put but these can now be set independently ª ª MIDI Device Inquiry message su...

Страница 8: ...ameters that will be pasted Parameters whose square check boxes are selected will not be pasted You can copy paste from a CHANNEL to a master module such as a BUSS or AUX or the reverse In this case parameters existing at the copy source but not the copy destination will not be copied they will retain their state from before the paste operation The same applies to parameters that don t exist in th...

Страница 9: ...down the SHIFT key or CTRL key and press ing a MUTE key you can now defeat muting for all chan nel modules SHIFT key MUTE key Defeat muting for the currently selected channel layer CTRL key MUTE key Defeat muting for all channel layers This function does not work for master modules such as BUSS AUX or STEREO NOTE Solo can be cleared in a similar way ª When you write the current channel during an a...

Страница 10: ...A cascade connection can be made between two DM 3200 units GPI functionality DM 3200 can now remotely control external devices using a GPI signal output Expanded dynamic automation function The dynamic automation function of the DM 3200 can now capture buss assignments effect parameters and image parameters Scrolling indicators for the supported device list in the machine control screen If the lis...

Страница 11: ...ed surround monitoring to the DM 3200 Figure 1 shows an example of the screen display when IF SM DM card is inserted in Slot 2 For more details please refer to the owner s manual that comes with the IF SM DM card Figure 1 SLOT screen when an IF FW DM and an IF SM DMare installed Naming the mixer DM 3200 Ver1 20 allows you to set and edit mixer names so that you can easily differentiate between mul...

Страница 12: ...lay Control type MIDI open loop MMC Open M MMC closed loop MMC Full M Figure 5 Supported transport machine control devices added in Ver 1 20 Some devices such as the Alesis HD 24 only support a limited range of functions over MMC and may not support closed loop MMC control The MMC ID is set from the ID field on the MACHINE CTRL screen selectable between 1 and 127 using the JOG DATA dial These numb...

Страница 13: ...r the devices Each of the columns on the EXTERNAL CONTROL LIST will display the following when an MIDI device is added to the list STATE A one way arrow is displayed representing an open loop device DEVICE The name of the device is displayed together with the number of channels available for transmitting control signals MIDI control has 16 channels ID If the device is a MIDI controller ID indicate...

Страница 14: ...om an external MIDI device the value will be reflected on the DM 3200 s MIDI CONTROLLERS screen MIDI fader Using the DM 3200 faders you can send MIDI Control Change messages to all 16 MIDI channels of an external MIDI device Figure 9 MIDI FADERS screen As shown in figure 9 you can select and set the MIDI Control Change number on this screen MIDI Volume Control Change 7 is frequently used This allo...

Страница 15: ...UTE key Changes are made on the MIDI CTRL CHANGE screen Figure 11 MIDI CTRL CHANGE screen ª To display this screen either press the MIDI key followed by the POD 3 key or keep pressing the MIDI key or move the cursor to the Jump to SCREEN button at the top right on the MIDI MIXER screen and press the ENTER key Use the POD 4 knob to select the key whose assigned function is to be changed FADER PAN o...

Страница 16: ... be assigned to the highlighted encoder mode key from the ENCODER MODE SELECT section NOTE Depending on whether the surround mode is set to STEREO or not the options given in the ENCODER MODE SELECT section differ 4 Press the ENTER key Assignment of the parameter is now complete and will be displayed in the EDIT TARGET SELECT section NOTE You need to perform the corresponding encoder mode key oper...

Страница 17: ...TAL key to display the CASCADE sub screen Set the ID of one of the units to MASTER and the other to SLAVE Figure 13 DIGITAL CASCADE screen NOTE Set the unit ID while the ON OFF set up is OFF You cannot change the ID set up while it is ON 3 Turn the ON OFF setting on the CASCADE sub screen of the cascade master to ON Move the cursor to the ON OFF button and press the ENTER key A confirmation screen...

Страница 18: ...n is established Layer status Flip mode Encoder mode Surround mode Surround 5 1 rear MONO DIGITAL CASCADE screen setup except for ID setting OPTION SETUP screen setup except for FADER SENSITIVITY OPTION PREFERENCE screen setup OPTION SOLO screen setup except for INPLACE SOLO DEFEAT setup OPTION ENCODER MODE screen setup METER FADER METER screen setup SNAPSHOT RECALL SAFE setup on the LIBRARY SNAPS...

Страница 19: ...ports can be set in the TYPE column in the SETUP list Use the cursor key to highlight a cell in the TYPE column that you want to edit and select the item using the JOG DATA dial Depending on the type of the item you selected the options given vary as follows TIME EVENT TYPE column will show and the set ting of the type is done in the GPI EVENT LIST on the right of the screen FADER EVENT output low...

Страница 20: ...is to be executed Use either the cursor key or the POD 4 knob to highlight a cell in the TIME column that you wish to set use the JOG DATA dial to set the time then press the ENTER key to confirm Setting the type You can set the output waveform type for each of the GPI ports Use either the cursor key or the POD 4 knob to highlight a cell in the TYPE column that you want to edit then use the JOG DA...

Страница 21: ...tured and re played as the Initial Status Additional parameters that are re played as Initial Status Expanded dynamic automation function The following parameters can now be captured and re played by the dynamic automation function of DM 3200 please see Automated Controls on the page 4 of the DM 3200 Automation Guide Image Image parameter of the linked channel please see Pan and balance settings o...

Страница 22: ...DF format Please refer to the PDF specific to your DAW applica tion for details It is now possible to execute a project store directly from the front panel Press Control Library Store together to operate this shortcut It is now possible to change all the Program Change Library Number assignments to using the MIDI Program Change Batch Setup When using the internal MTC Generator pressing STOP REW on...

Страница 23: ... problem has been fixed that had caused the capacity to be shown incorrectly for CF cards larger than 1G byte A problem has been fixed that had caused the status of a CF card to be sometimes detected incorrectly when the CF was formatted at start up A problem has been fixed that had caused the status of a CF card formatted on Windows XP or Mac OS 10 4 3 to be detected incorrectly V1 30 Remote cont...

Страница 24: ...talk have been addressed Automation data file handling has been improved Where the CF card is close to full When creating a new project When using the Keep function Pink noise generated by the oscillator is now more accurate Rare instances of not being able to exit Initial Edit after writing automation have been addressed Rare instances of CTRL STORE over writing protected data have been addressed...

Страница 25: ...or the latest DM 3200 software Updating the firmware on a cascaded mixer When updating the firmware on a cascaded mixer first disconnect the cascade cable USB Connection notes Mac OS X If TMC or your DAW software fails to find your mixer after putting your computer into Sleep mode please remove the USB cable and re connect it before re launching TMC or your DAW software Windows XP If TMC or your D...

Страница 26: ...90 9888 www tascam com 5939 Wallace Street Mississauga Ontario L4Z 1Z8 Canada TEAC MEXICO S A De C V Phone 52 555 581 5500 www tascam com Campesinos No 184 Colonia Granjes Esmeralda Delegacion Iztapalapa CP 09810 Mexico DF TEAC UK LIMITED Phone 44 8451 302511 www tascam co uk Unit 19 20 The Courtyards Hatters Lane Watford Hertfordshire WD18 8TE U K TEAC EUROPE GmbH Phone 49 611 71580 www tascam de...

Отзывы: